Sumikko Gurashi Mochi Browniesicle

Hey Guys, today we are making these “Sumikko Gurashi Mochi Browniesicle”. Adorable chocolatey fudgy chewy brownie on a stick.

They are the perfect blend of “Japanese Butter Rice Cake” with “Classic Brownies”, crispy on the outside and ooey-gooey mochi-licious on the inside.
They look just like traditional brownie but a lot less sweet than normal brownies.

Are they so Kawaii?

It’s important to use glutinous rice flour (or Mochiko — sweet glutinous rice flour) for these brownies. It does not contain gluten and gives us the chewy, sticky mochi texture that we want.

These brownies come together quickly, paired with melted and modelling chocolate, pack a serious chocolate punch!
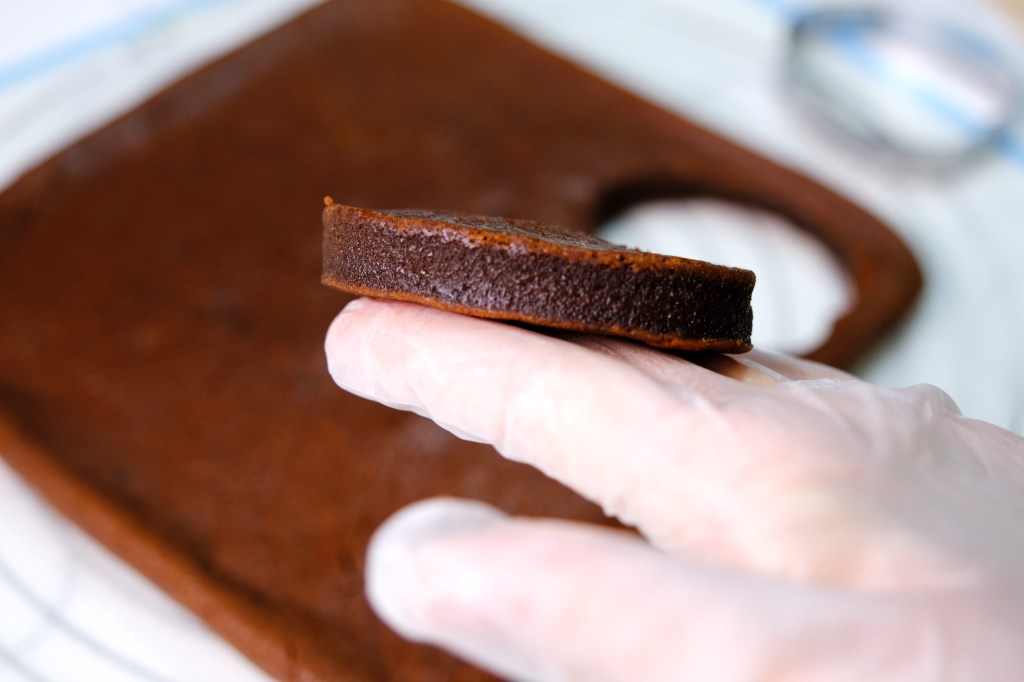
The exterior is similar to Brownie, but the interior is chewy like Mochi

Look! It has a crackly shiny crust, crispy edges and also a rich chocolate flavour and a chewy texture. It is the perfect blend of brownie and mochi.
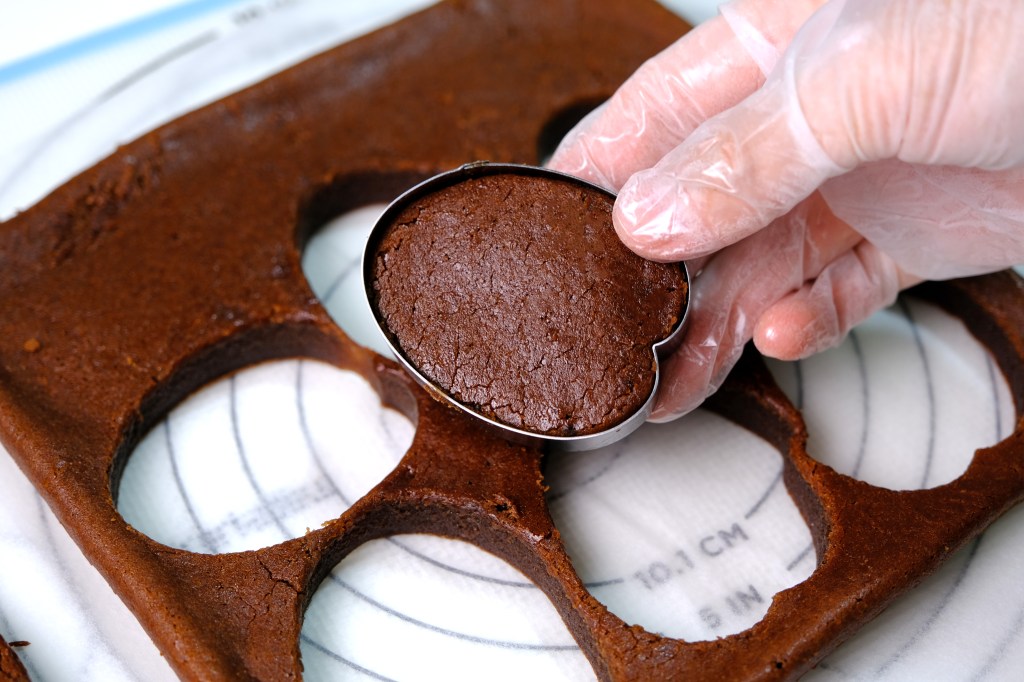
And when still hot, they are more sticky and difficult to cut, so make sure the brownies cool completely before cutting.
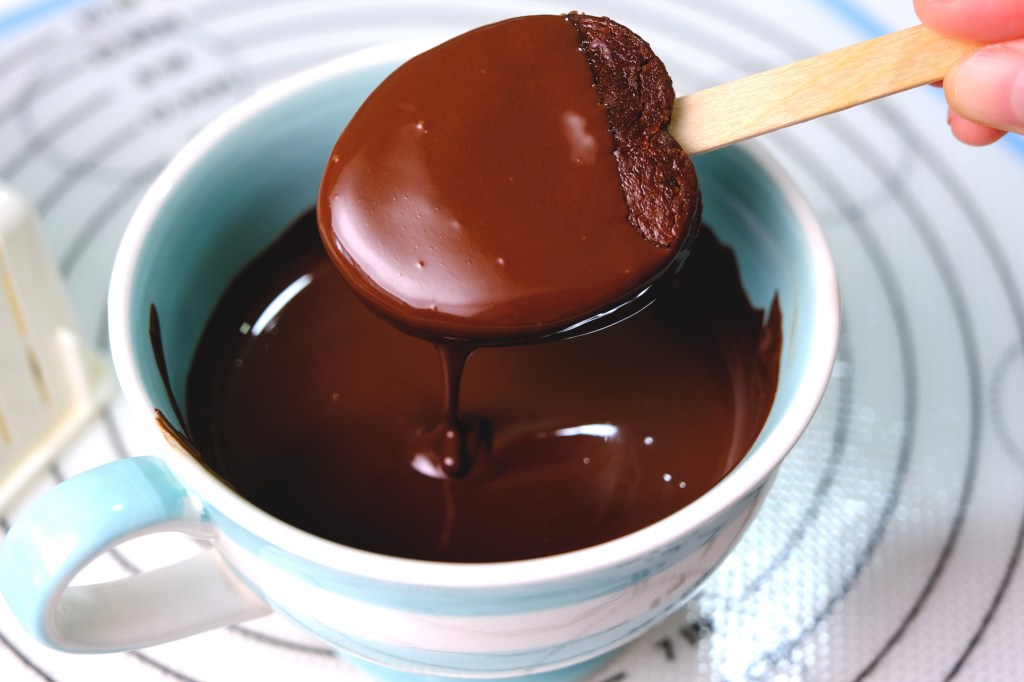
Then simply insert regular popsicle stick into the base of the brownie, cover them with melted dark chocolate and then decorate each character with modelling chocolate.
I love modelling chocolate so much as they are really flexible mouldable delicious clay and there’s no special food colouring require to color the chocolate.

It’s not necessary to use expensive Couverture Chocolate, I found a good dark and white compound chocolate (or candy melts) works best for texture and still tastes pretty good.
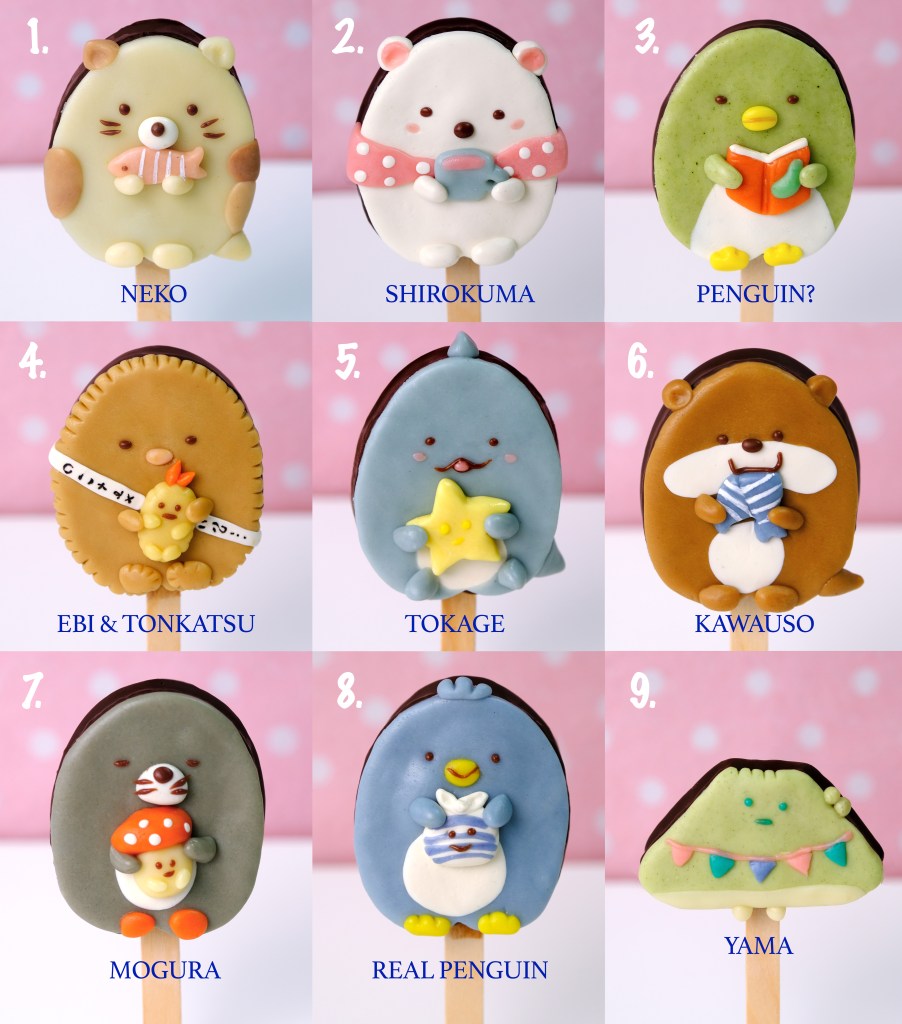
I will create my favorite 9 characters: 5 larger pieces for the main characters “Sumikko”, 3 smaller side characters “Minikko” and 1 piece for lovely Mount Fuji “Yama”.
It can be any design or character you want… The sky is the limit!
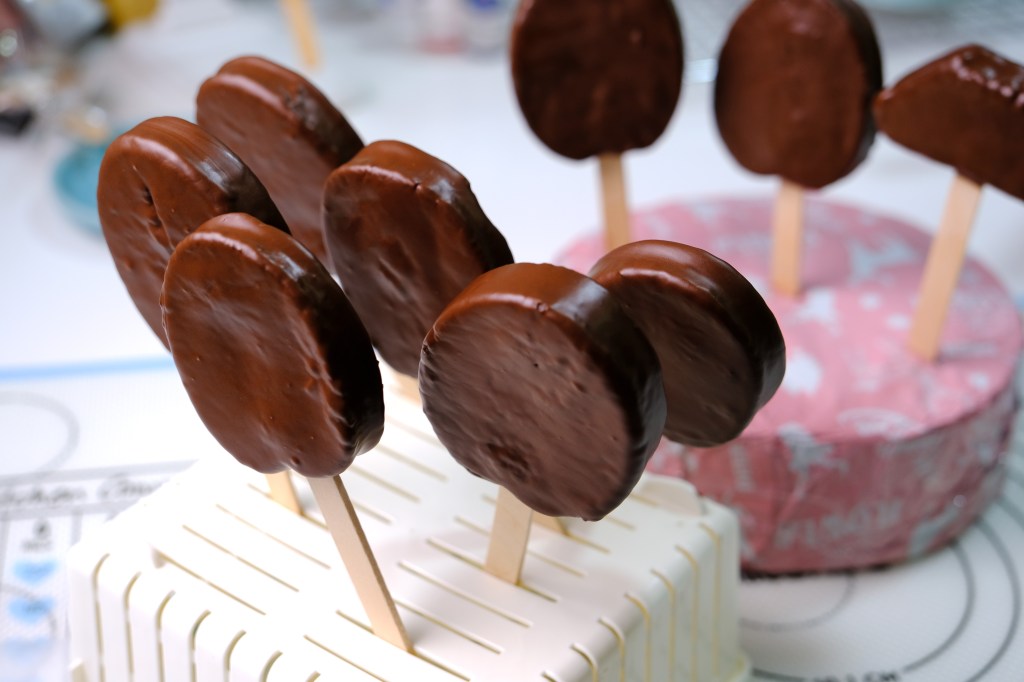
And can you imagine, what do you get when Mochi and Chocolate Brownies get together???
I’m sure after you tasted it, you may never want to go back to eating plain fudge brownie ever again!
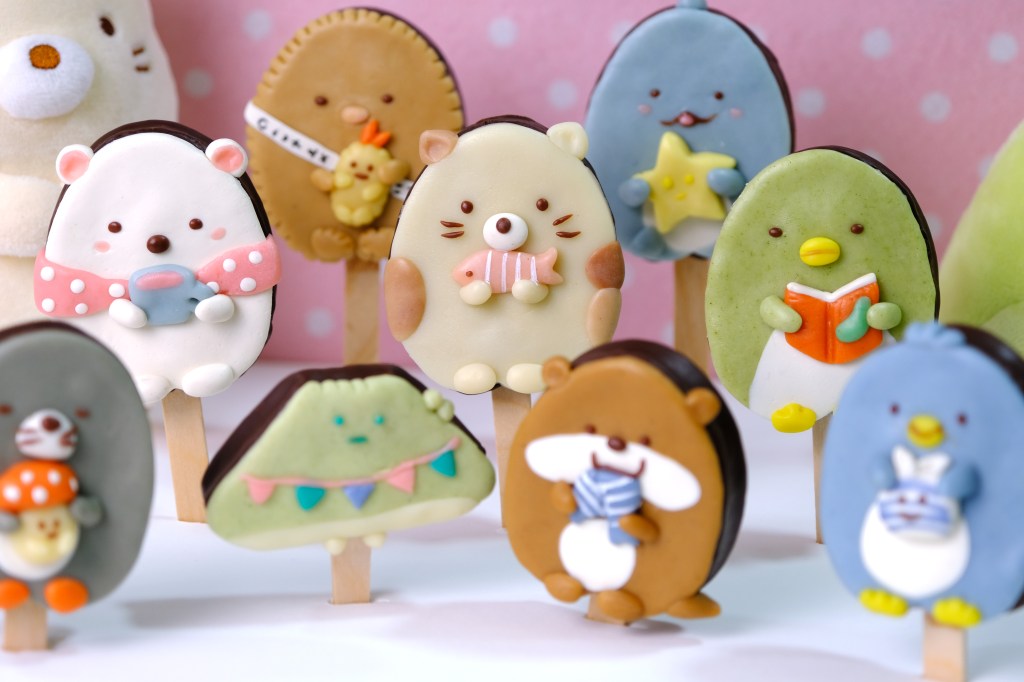
Which one is your favourite character?

They are a perfect gift, dessert or snack for when you get the nighttime munchies, and make sure you pour yourself a really nice glass of cold milk or hot coffee. Because you can’t have brownies without milk or coffee, just like cookies.

Very Chocolatey Ooey-Gooey Mochi-licious on the inside

I hope that you give this recipe a try , it’s really fun, so tasty and I’m sure you are gonna love them.
For all the chocolate lovers out there, enjoy the recipe and happy baking!
Love You All!!

SUMIKKO GURASHI MOCHI BROWNIESICLE
Yield: 9 pieces (8-inch Square Pan)
Active time: 3 hours
Total time: 4 hours

INGREDIENTS
White Modelling Chocolate:

  • 300 gr White Chocolate Compound or White Candy Melts
  • 70 gr Corn Syrup
  • Food Colouring


Mochi Brownies:

  • 35 gr Unsalted Butter
  • 190 gr Milk
  • 35 gr Vegetable Oil
  • 125 gr Brown Sugar
  • 1/2 teaspoon Vanilla Extract
  • 30 gr Eggs
  • 150 gr Glutinous Rice Flour
  • 20 gr Cocoa Powder
  • 1 teaspoon Baking Powder
  • 1/8 teaspoon Salt

INSTRUCTIONS
Modeling Chocolate

  1. Melt the chocolate in the microwave or a double boiler (let it cool to the touch). Add the corn syrup, stir just until it turns into a thick, smooth paste.
  2. Pick up the dough as soon as you can easily handle it and knead it over the bowl (knead out as much oil as possible).
  3. Pat the surface of the dough with some paper towel to sop up the oil (pat the dough quickly because the dough is quite sticky at this stage, if the paper sits too long it will get stuck in it).
  4. Once patted dry, wrap it tightly in plastic. Store in an airtight container.
    Allow the dough to sit 8-10 hours at room temperature or at least 1 hour in the fridge to set faster.


Mochi Brownies

  1. Preheat the oven to 180° C, grease and line pan with parchment paper.
  2. Place the unsalted butter and milk in small pan, cook over medium low heat until the butter melted. Take it off from the heat and pour it into a bowl.
    Add in the oil, sugar and vanilla extract, mix until all the sugar dissolved and well combine.
    Allow to cool slightly before you add the egg yolks (we don’t want it turned into scramble eggs).
  3. In another bowl combine all the dry ingredients, mix well.
    Pour in milk mixture onto the dry ingredients, do not over mix, whisk until just combined and no lumps remain.
  4. Pour the batter into the prepared pan (the batter will be on the thinner side).
    Tap few times to remove air bubbles and then bake for about 20-25 minutes or until toothpick inserted to the center comes out clean.
  5. Take it off from the heat, remove it from the pan, peel the parchment paper and let them cool completely on a cooling rack.


Decorate

  1. Cut mochi brownie according to the template.
  2. Insert regular popsicle stick into the base of the brownie until it’s about almost to the top.
  3. Dip them into a melted dark chocolate, tap a bit to get off any excess, stand these brownies up in a block of Styrofoam until the chocolate is completely hardened.
  4. Colour modelling chocolate as needed and start decorate the browniesicle (kindly follow video instructions)

NOTES

  1. When still hot mochi brownies are more sticky and difficult to cut, so make sure it cool completely before cutting.
  2. Remember when making or working with modelling chocolate are to never overheat and never overwork the mixture when it’s warm. On extremely hot days have a shelf in the freezer set aside so you can pop the piece/pieces you are working on in the freezer for a few minutes to firm up before you continue to work on it.
  3. There is no special food colouring required to colour Modeling Chocolate.
    Modeling Chocolate already has liquid in it (corn syrup) so adding more won’t hurt. I like to use regular gel food colours like Americolor.
  4. Mochi browniesicle serve freshly made.
  5. To store; 2 days at room temperature, 3 days in the fridge or freezer for up to 1 month.
  6. Please note; after 2 days in the fridge or 1 day in the freezer, they will lose the chewiness and the texture will becomes like normal brownie.

Giant Gingerbread Man Cake (Bonus Snowman Cake Pops)

Hi Guys, I’m back here with another Christmas treats ideas.
Today we are making these cute giant Gingerbread Man Cake along with Snowman Gingerbread Cake Pops.

They are great for a Christmas party which is never complete without loads of gingerbread around.

As you can see, They all look so adorable and they are really great for Christmas showstopper cakes.

This moist cakes is laced with all the best spices and it’s brimming with robust flavors.

The flavors are so rich and just layers upon layers of spice are to be found in so many sweet delights.

I am not sure if I said this before, but I love winter time baking. I had so much fun with this one and I know you will too! Enjoy Guys!

GIANT GINGERBREAD MAN CAKE (BONUS CAKE POPS)
Yield: One 8 x 11 inch Square Pan Cake & 10 pieces Cake Pops
Active time: 2 1/5 hours
Total time: 3 hours

INGREDIENTS
Fondant:

  • 200 grams Marshmallow
  • 2-3 tablespoons Water
  • 400 grams Icing Sugar
  • 50 grams Vegetable Shortening

Frosting:

  • 180 grams Milk
  • 3 tablespoons All-Purpose Flour
  • 80 grams Brown Sugar
  • 180 grams Unsalted Butter
  • 1/4 teaspoon Salt
  • 2 teaspoons Ginger Powder
  • 1 teaspoon Cinnamon Powder
  • 1/2 teaspoon Cloves
  • 1/2 teaspoon Nutmeg
  • 1 teaspoon Vanilla Extract

Cake Batter:

  • 290 grams All-Purpose Flour
  • 2 2/3 teaspoon Ginger Powder
  • 1 1/3 teaspoon Cinnamon Powder
  • 1/3 teaspoon Nutmeg
  • 1/6 teapoon Cloves
  • 2/3 teaspoon Baking Powder
  • 1/3 teaspoon Salt
  • 240 grams Boiling Water
  • 2/3 teaspoon Baking Soda
  • 265 grams Unsulphured Molasses
  • 200 grams Granulated Sugar
  • 96 grams Vegetable Oil
  • 133 grams Whole Eggs
  • 15 grams Mixed Peel

Cake Pops: White and Dark Chocolate Lolipop Stick


INSTRUCTIONS
Marshmallow Fondant

  1. Mix marshmallows and water, microwave it in 30 seconds intervals (or in double boiler), stirring in between, until the marshmallows completely melted.
  2. Add in ¾ of the icing sugar and mix (you can add any flavouring extract if you want).
  3. After the fondant comes together, turn marshmallow mixture onto the counter. Add some more left over icing sugar, and continue kneading until it’s form a firm nice and smooth elastic ball (if it starts to feel a bit dry, add 1/2 tablespoon of water at a time and knead it again until it feels soft and pliable).
  4. Once it’s kneaded, grease the outside of the ball with shortening to prevent dryness and then store them in a ziplock bag to keep it moist.
  5. Colour it as needed.

Cake Batter

  1. Preheat the oven to 180 C.
  2. Grease the pan, line bottom with a parchment paper, and grease it again.
  3. In a large bowl, combine the flour, ginger, cinnamon, nutmeg, cloves, baking powder and salt. Mix well.
  4. For molasses mixture, mix the baking soda, boiling water, molasses and the granulated sugar, mix it all through (it’s gonna fizz up a bit, keep on stiring until the sugar dissolved).
  5. Add in the vegetable oil and eggs, mix well.
  6. Then whisk in the dry ingredients into molasses mixture 1/3 at a time, mixing well after each addition.
  7. Strain the batter to remove any lumps.
  8. Pour mixture into a prepared pan, sprinkle some mixed peel and sink them into cake mixture.
  9. Bake it in the preheated 180 C oven for about 30-35 minutes until toothpick inserted into center comes out clean. After baking, remove it from the pan, let it cool completely on the cooling rack.

Brown Sugar Buttercream Frosting

  1. Mix the flour and milk together, strain the mixture to remove any lumps. Cook on the stove or just microwave it in 20 seconds intervals until it just become a paste. Set aside and cool completely.
  2. In a large bowl, cream the butter, brown sugar, and salt together until it gets a really smooth consistency. Add in the cooled flour paste, beat for about 5 minutes on medium-high to high until it looks like whipped cream. Add in all the spices, ginger, cinnamon, cloves, nutmeg along with Vanilla Extract. Mix until well combined.


ASSEMBLE
Gingerbread Man Cake

  1. Slice the cake into 2 layers, top with a layer of frosting. Smooth it out. Place the second layer of cake on top.
  2. Using gingerbread man template cutting the cake layers with a serated knife.
  3. Cover the cake with frosting; using small spatula, apply a thin layer all over the cake (this is just going to lock in all of those little crumbs). Smooth it out , put it in the fridge for about 25 minutes to firm up a bit.
  4. Rolling out the fondant on a corn starch surface to about 3 mm thick. Draping it over chilled cake. Working quickly with my hands just to get all the air pushed out from underneath that fondant (going around the head and the arms and the legs, gently press in the fondant). Using serated knife cut around the excess fondant.
  5. Decorate them with gingerbread man fondant details.

Snowman Gingerbread Cake Pops

  1. Crush left over cakes into fine crumbs. Take about 25 grams for the body, 10 grams for the head, roll it into a ball. Put the cake balls in the freezer for about 15 minutes (you don’t want them to be frozen), so after about 15 minutes put them in the fridge and let them stay chilled there. 2.
  2. Dip the lollipop stick it into the melted chocolate just about a half inch, take it out and insert it straight into the large cake ball (insert it until past the cake ball). And then dip it into melted chocolate again, insert it into the small cake ball.
  3. Dip all into the melted chocolate, tap it off with a gentle motion to remove any excess. Place it in your Styrofoam block to dry.
  4. Decorate them with fondant and melted chocolate.

Easy (NO BAKE) Kero Keroppi Cake Pops

Hi Everyone, today we are making these cute “Kero Keroppi Cake Pops”.  They look so adorable that I just couldn’t help myself.

I love all Sanrio Character so much when I was a child, I felt like a little kid again making these 😚

These super easy recipe is a NO bake version Cake Pops, the texture is fluffy and moist and it wasn’t messy and no time consuming.

You’ll need a Food Processor or rolling pin to crumble up the cookies. It’ll be like playing with mud, but it’s really fun, trust me

🤤 looks good !!

They already look cute and adorable and also the Chocolate Rum Truffles are so tasty! You might not be able to resist popping one in your mouth.

If you try this recipe, please let me know! Leave a comment and tag a photo #bembumkitchen on Instagram so I can see it.

I always love to see what you Guys come up with 🤗
Happy Baking!

watch how to make kero keroppi cake pops


NO BAKE KERO KEROPPI CAKE POPS
Yield: 7 pieces
Active time: 1 1/2 hour
Total time: 2 hours

🍡 INGREDIENTS
360 grams Digestive Biscuits
2 tablespoons Cocoa Powder
50 grams Unsalted Butter
200 grams Condensed Milk
2 tablespoons Rum Liqueur
7 pieces Ice Cream Cones
300 grams white Candy Melts
2 teaspoons Matcha Powder
Fondant (Black, Soft Pink, Red, White)
Black Colour Edible pen

🍡 INSTRUCTIONS

  1. Put Digestive Biscuits in a plastic bag (or use a Food Processor) and bash with a rolling pin until you have a nice fine crumbs.
  2. Heat the Butter and Condensed Milk.
    Put the Butter and Condensed Milk in a pan over a low heat, stir constantly until the Butter melted.
    Allow to cool slightly, then pour in to the Biscuit Crumbs, mix well (the texture will be like a cookie dough-not too wet not too crumbly, just right).
  3. Before start rolling out the cake pop balls, cut down the Ice Cream Cones (about 2 cm), so that you know what size to roll them out to.
    Just really carefull with these or they may crack, making just a bit by bit to cut it through.
  4. Don’t waste up the cone crumbs, throw these into the Food Processor, add Colourful Chocolate Rice and fill into the cone for a little surprise (like Pinata).
  5. To roll these up; for the head take about 60 grams of Cookie Dough, squeeze that together so you don’t have any air pockets in your cake ball and then roll out between your hands really lightly (you don’t really want to be applying any pressure here, just enough to form it into a ball).
    **Now double check that It’s the right size for your cone.
    And for the eyes; take 10 grams of the dough for each eye, and roll it the same way (note that you need to make 7 heads and 14 eyes).
  6. Just go ahead and roll off the rest of your cake pop balls.
    Once it’s done, pop them into the fridge for about 10 minutes so they can firm up.
  7. In the meantime, melt the white Candy Melts, then add in the Matcha Powder. Mix well.
  8. To start assembling
    Grab one Ice Cream Cone; dip the “head” Cookie Dough in a little bit of Candy Melts, then press it on the Ice Cream Cone.
    Then for the eyes, dip each eye into a Candy Melts and stick it to the head and set aside.
    Continue cranking out the rest of these, then pop them again into the fridge for another 10 minutes (it’s really a great way to use something to hold these while they are drying).
  9. After 10 minutes
    Grab the assembled Ice Cream Cone Cake Pop and dunk it right into the melted Candy Melts; Tap your wrist to get off any excess Candy Melts;
    Set aside and then do the second time dip for more smooth finished.
  10. Once you have them all dipped, add on the details (as shown in the video)
    I’m using some Fondant for these and I’m just sticking it on with a bit of water.


NOTES

  1. You can use White Chocolate instead of Candy Melts (Wilton brand), but I does have some candy melts tips here and that is my major tip when it comes to cake pops.
    Candy melts so much better that White Chocolate in my opinion, it has the perfect consistency and set to a smooth hard finish,they also has a lot of colour variation so you don’t need to color it by yourself.
    If your Candy Melts is too thick, just add a bit of shortening or EZ Thin (Wilton Brand).
    ***Check out on my “Pikachu Donuts” video for more info about Candy Melts: https://www.youtube.com/watch?v=BMS2VKqsrGo&t=12s
  2. You can substitute Digestives Biscuits with any plain biscuits you want.
    Some people use biscuits with fillings type (like Oreo) to make these.
    I found that it’s too oily and also the fillings inside Oreos will add more sweetness to the final result so I’m personally not recommend these type of biscuits.
  3. It will be great if you have green colour Candy Melts or you can use green Candy Colouring
    I don’t have any of that, so I just add some Matcha Powder.