Sumikko Gurashi Deco Mousse Cake


I’m obsessed with Sumikko Gurashi, I even sleep with them every day 😂 and I was thinking that they would be very interesting if I draw them on a Sponge Cake 🤔.

So here it comes ” Sumikko Gurashi Deco Mousse Cake“
I love this cake so much 😍, I think they are really cute and so tasty.
Sponge cake painted with cute Sumikko and filled with delicious and cloud-like Strawberry Mousse.
It is super light, moist and really fluffy.

Some of my Sumikko collection 😬 and there are many more… 😳 SHY…

Some people might think that they won’t be able to make this kind of cake, because they are not really good in painting.

As you can see (in my video), this cake is actually not difficult to make. 
You just need to print and trace according to the template, it’s a really fun activity!
So don’t be discouraged, if I can do it, you can do it too! 🥳


In this recipe, I will show you in details how it’s done!
Here with some tips and tricks you can bake it as a gift and I’m sure everyone will love it so much Because it was so SPECIAL 😆

1. Pan – Templates – Baking Paper
It is important to prepare the pan and templates first (as your drawing guide) before you start making the cake.

Penguin? accompany me 😷
Kindly find the ready print A4 templates below

This “Reusable Non-Stick Baking Paper” is perfect for deco rolls. 
You can use Parchment Paper if you want.
I found that if you apply too much drawing paste on Parchment Paper, it will wrinkle easily.

Reusable Non-Stick Baking Paper

Compared to parchment paper, this makes tracing from the template easy and it peels off the cake smoothly to yield neat and pretty results, even for the finest patterns.
So.. if you keen to buy this kind of baking paper, I totally recommend it.

Make sure that you secure the paper with some double tape, so they stop slipping around

2. Tie the Colour Bags Tightly
Another important thing is the drawing paste.
You should be able to control the colour, so make sure you tie each of the piping bags tightly so you feel comfortable holding it, they will be your drawing pen.


3. Let the Drawing Paste Set
And since our Sumikko is quite complex, it’s a good ideas to break down the process into several steps.
The goal is to let it harden so it doesn’t bleed to the next colour.

STEP 1 ~ Outline and Small Details

Start by drawing the outline and any small details that can interfere with the color next to it
Don’t worry if you make some mistake, you can always fix it, you can use small dry brush to fix or even remove the paste.

Kitchen paper is your best friend. Sometimes you will find that your piping bag is clogged and you need to clean the tip, that’s what your best friend for 😬

After finished with all the outlines, pop them in the fridge to harden or until it doesn’t stick to your finger when you touch it.

STEP 2 ~ The Rest Details (Except the Grass)

Next, you can continue with the rest of the details, except the grass; just leave it for the last step.
Make sure that you apply the color thick enough, because if it’s too thin it will peel off easily.

STEP 3 ~ The Grass

And lastly, add some pale green color to the grass.
Sometime you will see some air bubbles on the paste, you can use toothpick to release it.

Once it’s done, it is important to let our cutie Sumikko chill for at least 30 minutes in the fridge to set before you pour the cake batter on top.
Remember… you don’t want to ruin your hard work.

Toothpick to prick a naughty bubbles 😤

4. Don’t Pour the Cake Batter ALL at Once
You don’t want the stream of the batter damaging your beautiful drawing.
Pour some batter into a piping bag, pipe around the drawing patterns to make sure the gaps between the images are covered in cake batter; and then spoon the rest of the batter gradually.

Spoon the batter gradually PLEASE 😇 BE CAREFUL don’t disturb my beautiful friends 😱

5. Release Heat & Prevent Drying
Once it’s baked, cover the cake with parchment paper as soon as it’s out from the oven
invert onto a cooling rack and immediately peel off the paper from pattern to release heat (you don’t want to keep the moisture inside and the cake will get soggy); and then cover our lovely Sumikko with a new piece of parchment paper so it doesn’t dry out.

So pretty!!! 😳🥲

6. Assemble the Cake First
Because Gelatin in the mousse can thicken, it’s really important to assemble the cake first before you start making the Strawberry Mousse.


Don’t peel off the bottom parchment paper, it will be very helpful when you lift the cake into the pan.


Fit both strips of cake around side of the pan.
You might need to trim the second strip a bit to fit perfectly; And then cut the remaining cake to fit the bottom of the pan.


7. Let the Mousse Harden
I know you can’t wait to meet your cutie Sumikko, but you will need to let them chill in the fridge for at least 5 hours or preferably overnight until the mousse is firm.
So… be patient 🙃

Is that a cake? 😧

Actually without any decoration our cake is cute already 😜


I always like to add some sweet touch to the cake…


And don’t forget my lovely Ebifurai No Shippo on top 🤗 so cute!

My favourite Sweet Sugar Cube (left hand side) 😚 SATOU TENCHO is always excited in baking 🤗

This cake is so adorable…
Will you make it for someone you love?


This cake is so light and moist with a jiggly cloud-like strawberry mousse filling inside…
Your kids will fall in love with it … 😄

Feel free to do as many different pictures and colour variations as you would like to…

And if you do please tag share it with me… I would be happy and love to see your beautiful creations 🙂

So.. hungry.. 🙄😓

For the Sumikko lovers, I hope you all enjoyed 😆
Take care Guys AND happy baking !!!
LOVE YOU ALL…

A4 TEMPLATE
Kindly print the the templates in A4
with the scale setting 100%

SUMIKKO GURASHI DECO MOUSSE CAKE
Yield: One 5-Inch Round Pan x 3-Inch Tall
Active Time: 3 Hours
Total Time: 10 Hours

INGREDIENTS
✨DRAWING PASTE

  • 70 g Unsalted Butter
  • 70 g Egg Whites
  • 70 g Icing Sugar
  • 70 g Cake Flour
  • Food Colouring

✨CAKE BATTER

  • 115 g Milk
  • 35 g Caster Sugar
  • 35 g Vegetable Oil
  • 90 g Cake Flour (sifted)
  • Blue Food Colouring
  • 115 g Egg Whites
  • 35 g Caster Sugar


✨STRAWBERRY MOUSSE

  • 2 ½ tbs Cold Water
  • 8 g Gelatine Powder
  • 190 g Fresh Strawberris
  • 70 g Caster Sugar
  • 3/4 tbs Lemon Juice
  • 190 g Whipping Cream

✨BUTTERCREAM

  • 90 g Shortening
  • 15 g Unsalted Butter
  • 60 g Icing Sugar
  • 1 tsp Vanilla Exract
  • 30 g Whipping Cream


INSTRUCTIONS
Prepare the template and Pan

  1. Print some design templates (kindly find the templates above)
  2. Cut each template and merge the two images with some double tape.
  3. Place the template on the baking pan. Rectangular 28 cm x 24 cm
    Overlay template with a piece of “reusable non-stick baking paper” that’s fit exactly the bottom of the pan.
    Make sure that you secure them each other with some double tape, so they stop slipping around.
  4. Lightly grease the surface with some vegetable oil to enable paper to be peeled off easily after baking.

Drawing Paste

  1. In a medium bowl, simply combine all the ingredients. 70 g Unsalted Butter; 70 g Egg Whites; 70 g Icing Sugar; 70 g Cake Flour
  2. Divide the paste and colour it according to your own design.
  3. Pour each colour paste into a piping bag, make sure you tie them tightly so you feel comfortable holding it (they will be your drawing pen).

Drawing Process
(I will divide the process in 3 steps, kindly watch video for detail instructions)

  1. Step 1 Outline and Small details
    Start by drawing the outline and any small details that can interfere with the color next to it.
    Don’t worry if you make some mistake, you can always fix it.
    You can use small dry brush to fix this or even remove the paste.
    Kitchen paper is your best friend, sometimes you will find that your piping bag is clogged and you need to clean the tip, that’s what your best friend for.
    Once it’s done, pop them in the fridge for about 10 minutes, let it harden so it doesn’t bleed into the next colour.
  2. Step 2 The Rest Details (Except the Grass)
    After 10 minutes the outline is set, it doesn’t stick to your finger when you touch it.
    Continue with the rest of the details (except the grass, just leave it for the last step).
    Make sure that you apply the color thick enough, because if it’s too thin it will peel off easily. 
    You can use toothpick to release some air bubbles.
    After finished with all the details, pop them again in the fridge for about 10-15 minutes or until it doesn’t stick to your finger
  3. Step 3 The Grass
    Lastly, add some pale green color to the grass.
    Once it’s done, tap the pan a few times to remove air bubbles and let our cutie Sumikko chill for at least 30 minutes in the fridge to set while waiting for the cake batter.

Cake Batter

  1. In a medium bowl, pour in the Milk along with Caster Sugar and Vegetable Oil; mix them lightly. 115 g Milk; 35 g Caster Sugar; 35 g Vegetable Oil
  2. Sift in the Cake Flour and beat again until the batter is sticky for about 5 minutes. 90 g Cake Flour (sifted)
    * Mixing the batter well at this stage will ensure a soft and elastic cake that will not crumble easily when assembly it.
  3. Add Blue Food Coloring, mix well. Set that aside
  4. For the meringue
    In a clean bowl beat the Egg Whites until soft peaks form. 115 g Egg Whites
    Make sure that your bowl is grease free, otherwise you won’t be able to beat the whites properly (wipe the bowl and beater with some vinegar to remove any left-over fat or grease).
    Add Caster Sugar in 3 batches and continue beat until it reach a stiff peak form. 35 g Caster Sugar
  5. Add the meringue to the flour batter in 3 batches; Mix gently after each addition until the batter is smooth.
  6. Pour 1/3 of the batter into a piping bag.
    Pipe around the drawing patterns to make sure the gaps between the images are covered in cake batter
  7. Spoon the rest of the batter gradually (don’t pour it all at once, you don’t want the stream of the batter damaging your beautiful drawing).
  8. Using a scrapper spread it evenly, be careful don’t disturb our Sumikko underneath.
  9. Tap the pan a few times to remove air bubbles and then bake them in the preheated 170°C oven for 12 minutes
  10. Once it’s done, cover the cake with parchment paper as soon as it’s out from the oven; invert onto a cooling rack and immediately peel off the paper from pattern to release heat.
    Cover our Sumikko Drawing with a new piece of parchment paper so it doesn’t dry out.
    Turn it over, change the bottom paper again one more time so it doesn’t get soggy;
    Turn it back and let it cool completely.


Assembly the Cake into the Pan
Because Gelatin in the mousse can thicken, it’s really important to assemble the cake first before you start making the Strawberry Mousse.

  1. Place a piece of parchment paper at the bottom of the pan (5-Inch Round Pan) so it will be easier when you unmould it.
  2. Trim the sides of the cake to make it prettier;
    And then cut 2 strips from the cake according to the template.
    * Don’t peel off the bottom parchment paper, it will be very helpful when you lift the cake into the pan.
  3. Place a piece of parchment paper on top of the long strip and carefully lift it up;
    Fit both strips of cake around side of the pan (you might need to trim the second strip a bit to fit perfectly).
  4. And then cut the remaining cake to fit the bottom of the pan.


Strawberry Mousse

  1. In a small bowl, sprinkle Gelatin over cold water; Mix well. 2 ½ tbs Cold Water; 8 g Gelatine Powder
  2. Place the bowl into a hot water bath to dissolve Gelatin and set aside.
  3. For the strawberries
    Wash, hull and puree them in a food processor; then Strain to remove the seeds. 190 g Fresh Strawberries
  4. Add in the Caster Sugar and Lemon Juice to the strawberry puree, mix well. 70 g Caster Sugar; 3/4 tbs Lemon Juice
  5. Pour in the dissolved gelatin and stir until well combined.
  6. Place the bowl in an ice water bath, stir constantly until gelatin thickens; set that aside.
  7. Then over an ice water bath, beat the whipped cream until stiff peaks form. 190 g Whipping Cream
  8. Add beaten Whipped Cream to the gelatin mixture, mix lightly until well combined
  9. Pour the Strawberry Mousse into prepared pan
    Tap a few times to remove air bubbles, cover it with a cling wrap (the prevent the sponge cake from drying out) and pop them in the fridge for at least 5 hours or preferably overnight until the mousse is firm.


Simply Fluffy Buttercream

  1. Simply combine the Shortening and Unsalted Butter until soft. 90 g Shortening; 15 g Unsalted Butter
  2. Add in the Icing Sugar and Vanilla Extract, mix until light and fluffy. 60 g Icing Sugar; 1 tsp Vanilla Extract
  3. And finally, pour in the Whipping Cream and mix until well combined. 30 g Whipping Cream

Finishing
Once the mousse is set, carefully remove it from the pan. Pipe some fluffy buttercream on top,
add a few strawberries slices; And don’t forget our lovely Ebifurai No Shippo on top.
And it’s done!

NOTES

  1. The great thing about Drawing Paste is that you can also color it a few times. 
    For example, if I need white and pink color, I will make white color first;
    After I’m done with the white pattern, then I will add a little bit of red food coloring to that white paste and I get a pink color.
  2. To Store; In the fridge (in an airtight container) for 3-4 days.


My Melody Taiwanese Savory Mooncake

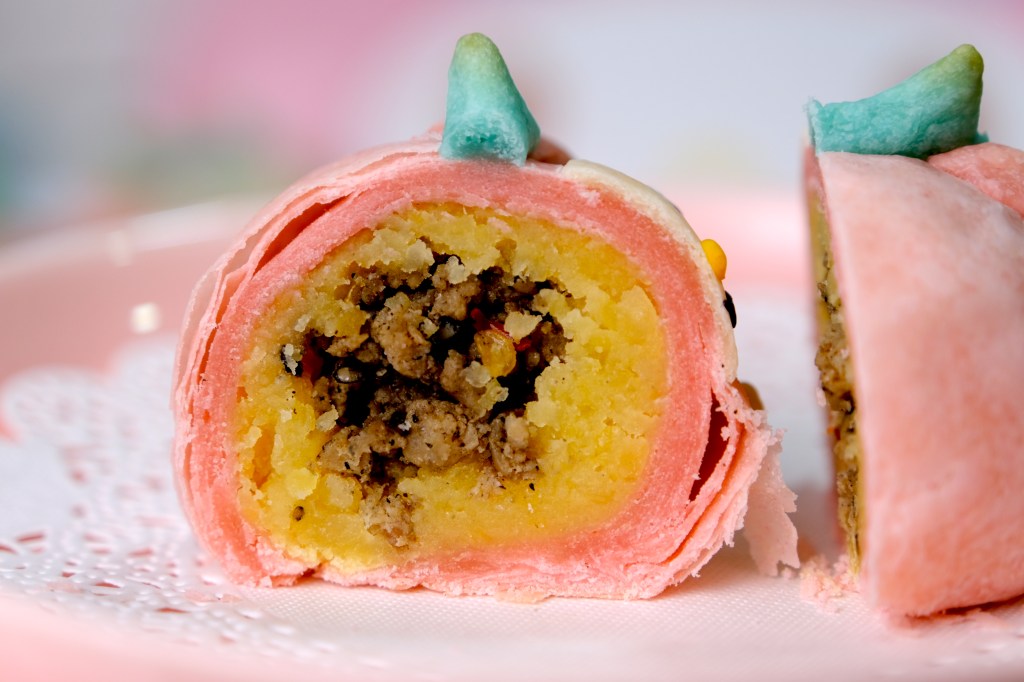
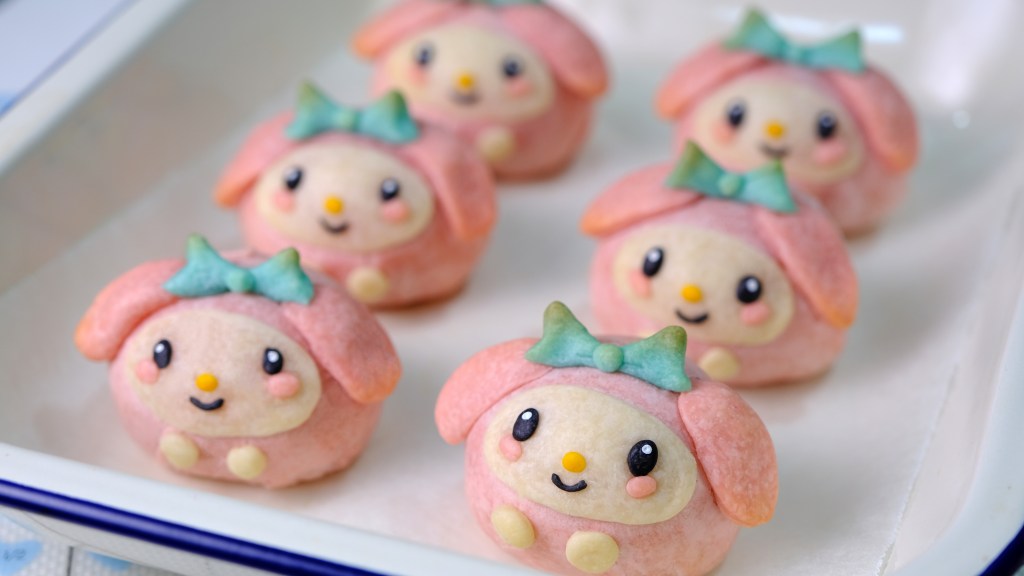
Hi Guys, today we are making these “My Melody Taiwanese Savory Mooncake”. It’s a flaky crust moon cake with the savoury sweet fillings inside which has a really unique texture.

Unlike the common traditional mooncake that are sweet, some spicy braised meat was added to the mung bean paste as a filling, they blends really well, the savoury perfectly complement the sweetness.

Crispy crust outside, Sweet spicy salty filling inside

You have some bits to bite in the smooth fillings, the savoury pairs the sweetness perfectly, the crunchiness of the layer crust even make it more special.

You can actually omit the meat portion if you wish too, but that’s what makes it special in my opinion. And if you are not preparing this for moon cake festivals, it’s definitely a good snack or a nice breakfast item.

Look how adorable they are!

The beautiful flaky crust itself created by combining 2 different type of dough which is called water and oil dough that has been layered by rolling and folding similar in making puff pastry dough.

Feel free to create any design you like but always remember that for the combined dough, you need to make the oil dough colour slightly lighter than the water dough so it doesn’t show on the surface of the water dough when you roll it.

So this is how we combine the dough;
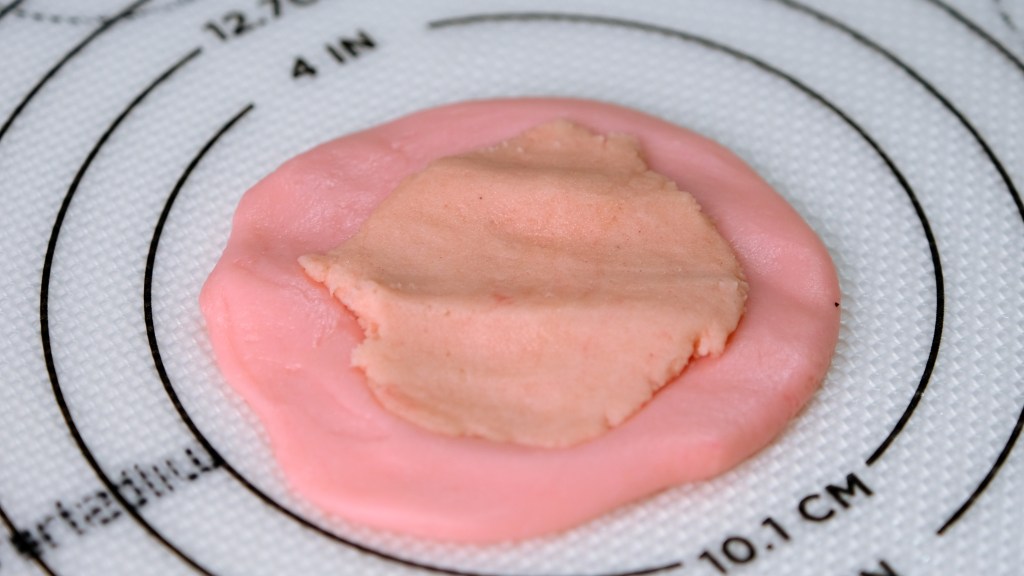
Lightly press down to flatten the water dough and place the oil dough in the center of the water dough. Fold the combined dough like an envelope, seal all the seam and shape it round again.
Cover and let them rest for at least 10 minutes so the gluten can relax a bit.

Place oil dough in the center of the water dough

After resting, take one combined dough, using rolling pin, roll the dough into a long rectangular shape as evenly as possible, don’t press it too hard as you might tear the water dough membrane, about 3 mm thick is enough (pic. 1)
And then roll it up like you are preparing swiss roll (pic. 2)


Then turn the swiss roll direction with the shorter side pointing at you, using rolling pin roll it again into a long rectangular shape (pic. 3 & 4)

*One important tip when you roll the dough is always make sure that your rolling pin is clean from any dough flakes coz it will attracts the water dough surface which can cause a lot of cracks on the mooncake later.


And finally, roll it up again like a swiss roll (pic. 5 & 6)


Please note the colour will be much lighter when baked in the oven.
The minced meat is slightly on the salty side to compliment the sweet of the mung bean paste. If you prefer more spicy, feel free to add more chili or for a bigger kick, you can add a teaspoon of cayenne pepper, that will be great too!

And if the times permit, you even can prepared this meat the night before and store them in the fridge to let the flavor develops, it will taste even better.

Oh I love My Melody so much, they are my favorite Sanrio character since I was a child.

They taste amazing when served slightly warm and paired with a cup of hot tea or maybe your favorite coffee.
They are so adorable, tasty and also satisfying with their unique texture, it’s really hard to describe unless you have a chance to taste it

The recipe is rather long winded but it is rewarding coz they are so pretty and delicious.
I really hope you Guys give it a try coz this mooncake really suit my taste buds and I have to stop myself for further eating.

And if you want; you can share your creations with me with the “hastags bembumkitchen”, I really love to see all your creativity and I’ll make sure to give a like or thumbs up!

Enjoy the recipe, Love you All!!

MY MELODY TAIWANESE MOONCAKE
Yield: 10 pieces
Active time:  3 hours
Total time: 4 hours

INGREDIENTS
Mung Bean Paste:

  • 100 gr Split Yellow Mung Beans
  • 100 gr Hot Water
  • 75 gr Granulated Sugar

Braised Meat:

  • 100 grams Minced Pork
  • 1 tbs Corn Flour
  • 1 tsp Garlic (Minced)
  • 1 tsp Ginger (Minced)
  • 1/2 tbs Onion (Minced)
  • 1/2 tbs Rice Wine
  • 2 tbs Soy Sauce
  • 1 tsp Chopped Chilli Padi
  • 1/2 tsp Five Spice Powder
  • 1/4 tsp White Pepper
  • 1/4 tsp Salt
  • 2 tsp Sugar
  • 1/2 tbs White or Black Sesame Seeds

Water Dough:

  • 200 gr All-Purpose Flour
  • 50 gr Shortening
  • 20 gr Icing Sugar
  • 100 gr Cold Water
  • Food Colouring (Pink, Black, Blue, Yellow)

Oil Dough:

  • 75 gr Cake Flour
  • 35 gr Shortening
  • Pink Food Colouring


INSTRUCTIONS
Mung Bean Paste

  1. Wash mung beans in several rinses of water until the water runs clear, then soak them in a hot boiling water for 30 minutes (the water will be absorbed and the beans gets bigger). 
  2. Preheat the steamer, bring water to a boil and then steam the soaked beans for about 30 minutes or until it can be easily mashed.
  3. Pour the beans into a non-stick pan, add in the sugar, cook over medium low heat (it will be wet at first as the sugar melts,keep stirring until it gets drier).
    Using a spatula, press the beans until it resembles a thick paste (as the water evaporates, the beans will no longer be sticky).
    Feel free to use blender or immersion blender if you prefer a really fine paste.
  4. Take it off from the heat, cover it with a plastic wrap, store in the fridge to firm up.


Braise Meat

  1. Sprinkle corn flour to the meat before cooking (it will helps prevent overcooking and toughening of the outer layers so the result will be more tender and flavourful).
  2. In a medium pan, heat 2 tablespoons of vegetable oil, add in the minced garlic and onion, cook until golden brown.
    Add in minced pork, continue cooking until it change in colour.
    Pour in the rice wine and soy sauce, stir well.
    Add in the rest ingredients and mix until well combined.
    *Feel free to add more chili or cayenne pepper if you like more spicy.
  3. Cover and store them in the fridge to let the flavor develops.


Water Dough

  1. In a medium bowl, combine all the ingredients, stir until it forms a sticky dough.
  2. Lightly transfer to a work surface and knead until it forms a smooth dough. 
  3. Divide the dough for each details, color as needed
  4. Cover each colours with a cling wrap and let it rest for at least 20 minutes.


Oil Dough
Mix the flour and shortening, add in the pink food colouring (this oil dough colour must be slightly lighter than the water dough for the base of My Melody’s head).
Keep mixing until it forms a soft dough (it can be slightly sticky). Cover it with a plastic wrap to prevent the dough dry.


COMBINE, ROLL & BAKE

  1. Divide the bean paste into 10 equal portions (25 gr each), shape it into a ball.
    Using your thumb press the center of the bean ball to create a hole. Insert about 1-2 tsp of the braised meat filling in the center, and then wrap and seal. Perform the same for the remaining 9 portions.
  2. Combine 2 dough:
    Divide the “soft pink” water dough and oil dough into 10 equal pieces (19 grams water dough, 11 grams oil dough).
    Lightly press down the water dough to flatten and place the oil dough in the center of the water dough.
    Fold the combined dough like an envelope, seal all the seam and shape it round again. Continue with the rest dough.
    Cover and let them rest for at least 10 minutes so the gluten can relax a bit.
  3. Roll the combined dough:
    Take one combined dough, using rolling pin, roll the dough into a long rectangular shape as evenly as possible (don’t press it too hard as you might tear the water dough membrane), 3 mm thick is enough. 
    Roll it up like you are preparing swiss roll.
    Turn the swiss roll direction with the shorter side pointing at you, using rolling pin roll it again into a long rectangular shape. Then roll it up again like a swiss roll.
    Set aside, cover it up while continue with the rest dough.


FILL  & DECORATE

  1. Fill
    Take one of the swiss roll dough, using rolling pin, flatten it into a circle shape.
    Flip the dough, place one portion of a bean ball at the center of the dough, and start covering the bean ball from all sides, rotate while tighten your palm, make sure the skin and filling stick together evenly.
    Seal all the seam. Shape the mooncake a bit oval as My Melody’s head. Repeat this process for the rest of the Mooncake.
  2. Decorate
    Add details according to My Melody’s Head, add the spark of her eyes with some white food colouring

BAKE
Bake in the preheated 170°C oven for about 15-18 minutes.
Remove from the heat, allow to cool slightly on the pan for about 10-15 minutes then transfer to a cooling rack to cool completely.


NOTES

  1. Don’t let the water dough sit too long coz it will release the oil and cause a lot of crack on the mooncake surface later.
  2. Best serve 20 minutes freshly baked. 
  3. To store in an airtight container; 1 day at room temperature, 1 week fridge, 1 months freezer.
  4. To reheat; 180°C oven for about 5-10 minutes

Peppermint Hot Chocolate Drink Fruit Cake

Hey Guys, happy early holiday season to you all!
As the end of the year mean a lot of parties and food; and one of my favorite Christmas dessert is traditional fruit cake with loads of dark rum.
A festive, flavorful, and moist fruit cake to enjoy all holiday season. 

Bland and Boring Style Fruit Cake 🙁

Sometimes I have no time left to marinated the dried fruit and I felt the appearance of the fruit cake can get a little bland and boring, anyway… I still want to eat fruit cake.

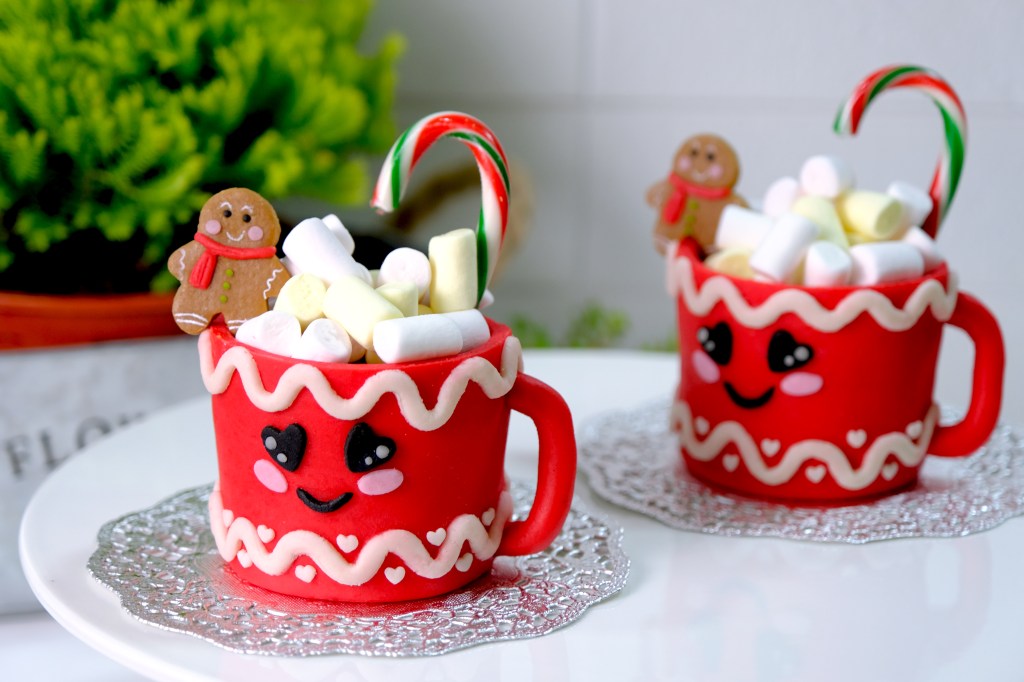
So I was thinking why not we try something that’s a little different? It’s gonna be a “Quick Fruit Rum Cake”, decorate as a Peppermint Hot Chocolate Drink! How cool is that?

No Cooked Homemade Egg-Free Marzipan

And to decorate the cake, of course marzipan is the best and traditionally has been used to cover fruit cakes with it.

You could use ready made marzipan, I personally love to make my own “No Cooked Homemade Egg-free Marzipan” which is very simple and easy. It only takes 10 mins and needs no special skills or equipment to make it.

Sifted Almond Flour and Icing Sugar

So… you will need to sift the almond flour and icing sugar.
It will be easier if you have food processor on hand, you can just pulse them until smooth, coz how smooth you grind the almond will determine the texture of your marzipan.

I don’t have one, so… I just do it manually by hand, try not to do it all at once, sift it gradually.
It will be a bit time consuming, just keep smiling and be patient.

My Sweet Little Gingerbread Man

And the most fun part, by using marzipan you can create customize decorations for your Hot Choco Mug.
I really fall in love with this cute little Gingerbread man cake topper, it’s perfect for my Christmas Cakes.

Look how cute he is!

The liquor will make the fruitcake more moist, and will help it last longer.
Well, traditionally one of the most important function of fruitcake is for storage. It could be stored for weeks, sometimes half year, if stored properly.
But in this recipe, it tastes the best when it’s fresh in my opinion.

Beautiful Golden Colour, Loads of Rum and Moist Cake

Unlike the other brownish fruitcake, this one has a beautiful golden color. The Marzipan is so soft not too sweet. A thin slice of this cake is a wonderful treatment with a cup of black coffee or tea.

I hope you Guys give this recipe a try and have a wonderful Christmas & Happy New Year!
Love you all…

PEPPERMINT HOT CHOCOLATE DRINK FRUIT CAKE
Yield: Five Pieces (Upper diameter: 6.8 cm, Bottom diameter: 6 cm, Height: 5 cm) cupcakes liners
Active time:  2 hour
Total time: 3 hour

INGREDIENTS
Marzipan:

  • 300 grams Almond Flour
  • 775 grams Icing Sugar
  • 2 1/2 tablespoons Corn Syrup
  • 1 teaspoon Almond/ Rose/ Vanilla Extract (or any favourite extract)
  • 2-5 tablespoons Water


Fruit Rum Cake:

  • 100-120 grams Dried Fruit (cut into small pieces)
  • 80 grams Dark Rum
  • 40 grams Orange Marmalade
  • 130 grams Cake Flour
  • 2/3 teaspoon Baking Powder
  • 100 grams Salted Butter
  • 50 grams Brown Sugar
  • 50 grams Granulated Sugar
  • 2 Eggs

Soaking:
30 grams Dark Rum, 1 tablespoon Orange Marmalade

Decorating:
Candy Canes, Mini Marshmallow, Food Colouring (red, black, green, pink)


INSTRUCTIONS

Marzipan

  1. In a large bowl, sift together the almond flour and the icing sugar.
    If you have food processor on hand, you can just pulse them until smooth, coz how smooth you grind the almond will determine the texture of your marzipan.
  2. Pour in the corn syrup and mix.
    Add in the water and almond extract, mix well (the mixture started grainy).
  3. Using hand, bring it all together into a ball (you can add one or two teaspoons of water if necessary if you feel the dough too dry). Lightly knead on a work surface until you have a smooth ball.
    Please note, try not to ever kneading, coz it will cause the almonds to give out oil and that can make the marzipan too oily.
  4. Place it in a plastic wrap and store them in the fridge for at least 1 hour before using. Colour as needed.

Soaking
Mix marmalade with dark rum, strained the mixture.

Fruit Rum Cake

  1. Mix dried fruit and dark rum, let it soak for at least 1 hour. Add in marmalade and fold to combine.
  2. In a medium bowl, whisk together the flour and baking powder, set aside.
  3. In another large bowl, combine the butter and both kinds of sugar, beat until fluffy. Pour in the eggs and mix until well combined.
    Add half of the flour mixture and mix. Pour the soaked dried fruit rum mixture that has been mixed with marmalade and fold to combine. Pour the rest of the flour mixture to the bowl and mix until well combined.
  4. Pour the batter into the prepared cupcake liners about ¾ full and bake them in the preheated 180°C for about 30-35 minutes of until toothpick inserted in the center comes out clean.
  5. Once they come out from the oven, brush the with generous amount of soaking mixture and let them cool completely on the cooling rack.


Decorating

  1. Trim the top of the cupcake so it have an even flat top.
    Sprinkle some icing sugar so the marzipan won’t stick to the work surface. Roll some red marzipan about 3 mm thick for the base of the mug cake, using some marmalade jam as a glue.
  2. For the sides; prepare a piece of greaseproof paper as a marzipan templates so we know how long and how much marzipan should we roll for the sides of the mug cake.
    Roll the marzipan about 5 mm thick according to the template, stick onto the cake with some marmalade jam. Cut off the excess.
  3. Using fondant smoother, press the marzipan onto the sides of the mug cake to make sure that it stick well to the cake surface
  4. Using knife tool, tuck the marzipan under a cake so it completely seal.
  5. For the decorations; add some ribbon and tiny hearts around the cake. Stick all mug details and handle with some marmalade. 
  6. Insert a stick of candy cane to the mug, add some mini marshmallow and tiny gingerbread man 


NOTES

  1. You can use your favorite dried fruits such as raisins, figs, prunes,cherries, apricots, or maybe peaches.
  2. If you don’t like dark rum, feel free to use other liquor.
  3. To colour the marzipan, you can use any food colouring, water based, gel, powder. 
  4. I highly recommend to use concentrated food colouring, specially for a deep colour (so you can add less and still get a deep colour).
    Food coloring can throw off the consistency of your marzipan, especially if you have to add a ton to achive the color you’re after.
  5. To store marzipan; wrapped well in an airtight container or it can dry out easily. I suggest to store your Marzipan in the fridge (1 month) or freezer (up to 6 months), when you are ready to use take it out from the fridge or freezer then lightly knead to make it pliable again.
  6. To store fruit cake; In an airtight container for about 3 days at room temperature, 1 month in the fridge and 3 month in the freezer.

Lovely Taiwanese Pineapple Cakes/ Tarts

Hi Everyone, today we are making these “Lovely Taiwanese Pineapple Cakes”.
It is a crumbly and nearly melt-in-the-mouth pastry with the pineapple jam as the filling inside.

The difference with the Singaporean/ Malaysian pineapple tart is they are typically larger and made in square or rectangle shape.

I personally prefer the Taiwanese version coz the pastries have a rich distinctively crumbly milky taste and filled with a generous portion of sweet sticky chewy pineapple filling inside.

Pineapple cakes filling from commercial manufactures usually made of winter melon and Maltose Syrup so that the filling is extra sweet, heavy and sticky, which is not healthy.

They usually substitute all or part of the pineapple with winter melon, a vegetable in the squash family that is much cheaper than pineapple.

Since winter melon has little flavour, artificial flavours and colours are added to the pastries to make them attractive to consumer, and then Maltose syrup has been added to stiffen the fillling.

For this reason, I would like to show you how to make the healthier style of Taiwanese Pineapple Cakes which is hold up pretty well, so adorable and taste much fresher.

A lot of research went into perfecting these treats. But the end result was wonderful.
The key is the exterior, that’s how it will remain even after it is baked so you want the dough to be as smooth as possible. 

Pineapple Cakes before baking

So I actually found two versions of the crust that I liked, and there’s no need to put them in the fridge at all.

The first one I called a “basic dough” for the character’s body. It’s buttery, soft, yet also malleable and sturdy enough to hold its form.
And the second dough that I called the “colouring dough”. It’s soft and easy to work with, even for small details and also colour well with any kind of edible food colouring.

Is there anybody that wouldn’t want to box these as a present ? They are so cute, tasty, photogenic, everthing you could ever want!

They taste amazing when served slightly warm and paired with a cup of hot tea.
The buttery crust is rich and crumbly, filled with fruity sweet sour, chewy and sticky pineapple filling, they are absolutely delicious.

I really hope you Guys give it a try, they are a lot of fun to put together and they are pretty simple too! Love you all!!

LOVELY TAIWANESE PINEAPPLE CAKES
Yield: 10 pieces
Active time: 1 hour
Total time: 2 1/2 hours

INGREDIENTS
Pineapple Filling

  • 500 grams Pineapple (Chopped)
  • 120 grams Granulated Sugar
  • 20 grams Unsalted Butter
  • 30 grams Glutinous Rice Flour

Basic Dough

  • 100 grams Salted Butter (Cold)
  • 12 grams Icing Sugar
  • 22 grams Egg Yolks
  • 152 grams All-Purpose Flour
  • 24 grams Milk Powder

Colouring Dough

  • 25 grams Salted Butter (Cold)
  • 7 grams Condensed Milk
  • 3 grams Egg Yolks
  • 38 grams All-Purpose Flour
  • Food Colouring (Red, Soft Pink, Black, White)

INSTRUCTIONS
Pineapple Filling

  1. Cut off the pineapple skin, took off the core and coarsely cut them into chunks (if you use canned pineapple, make sure to adjust the sugar level. They will take longer to cook coz the heavy water content in the canned pineapple).
  2. Transfer the chunks into a non-stick pan, add in the sugar (since the sweetness of each pineapple is different, feel free to adjust the amount of the sugar accordingly). Cook over medium high heat. Stirring constantly until most of the moisture has evaporated. Don’t forget to adjust the heat level based on the water content that was left in the pan.
    *I suggest using a non-stick pan as it is sticky after when it becomes concentrated.
  3. When the pineapple is about to dry, looks translucent and a bit brownish, lower the heat, add in the butter. Stir continously until the butter melted and incorporated in the pineapple (the butter makes the pineapple fillings smoother and easier to handle during wrapping).
  4. For the binder, sprinkle in some of the glutinous rice flour. Add it gradually, to make sure that the flour are distribute evenly. Mix until well combined.
  5. Take it off from the heat, spread the fillings thinly on a large plate to cool completely.


Basic Dough

  1. In a large bowl, cream the butter and icing sugar until light and smooth.
  2. Add in the egg yolks, mix well 
  3. Pour in All-Purpose Flour and milk powder, mix until all the ingredients just combined and create a dough ball (do not overmix to avoid the formation of gluten, which will make the pastry less flaky).
  4. Cover them with a plastic wrap to prevent the dough dry. Set aside


Colouring Dough

  1. Combine the butter, condensed milk and egg yolks, mix well.
  2. Pour in the all-purpose flour, mix until it’s form a smooth dough.
  3. Colour it as needed (remember to always cover the dough with a plastic wrap to keep their moisture).


Wrapping, Decorating and Baking

  1. Divide pineapple filling into portions of 20 grams each, and basic dough 25 grams each.
  2. Roll each portion of pineapple filling into a ball.
  3. Flatten a portion of basic dough (you can do this in your palm or with a small rolling pin).
  4. And then place a portion of filling into the centre of the flattened dough. 
  5. Gently wrap the dough around the filling, pinching away and setting aside excess dough at the top and where the edges meet. 
  6. Gently roll the filled dough between your palms to form a smooth oval ball. 
  7. Using some basic dough and white colouring dough for the ears.
    Apply some white colouring dough for the face.
    Black dough for the nose, mouth and eyes.
    Soft pink for the cheeks and tounge.
    Using love shape plunger cutter to create the heart shape.
    And finally, use some basic dough to create her hands and legs.
    *Make sure the details sticks really well otherwise it will tilted or fall down while baking.
  8. Bake in the preheat 160°C oven for 20 minutes.
    Remove from the oven, allow  to cool slightly on the pan for about 20-25 minutes, and then transfer them onto a cooling rack to cool completely.


NOTES

  1. The dough will expand a bit when baked in the oven.
  2. You can use any food colouring for the “Colouring Dough” (powder, gel, liquid).
  3. Store the cakes at room temperature in an airtight container, the crust will have become more tender.
  4. Pineapple cakes turning mouldy even when stored in an airtight containers is due to the presence of too much moisture.
    Store pineapple cakes which are cooled to room temperature in an airtight container away from the sunlight for 3-4 days.
    Keep them refrigerated for up to 1 months.