
Hi Guys, today we are making these “My Melody Taiwanese Savory Mooncake”. It’s a flaky crust moon cake with the savoury sweet fillings inside which has a really unique texture.
Unlike the common traditional mooncake that are sweet, some spicy braised meat was added to the mung bean paste as a filling, they blends really well, the savoury perfectly complement the sweetness.
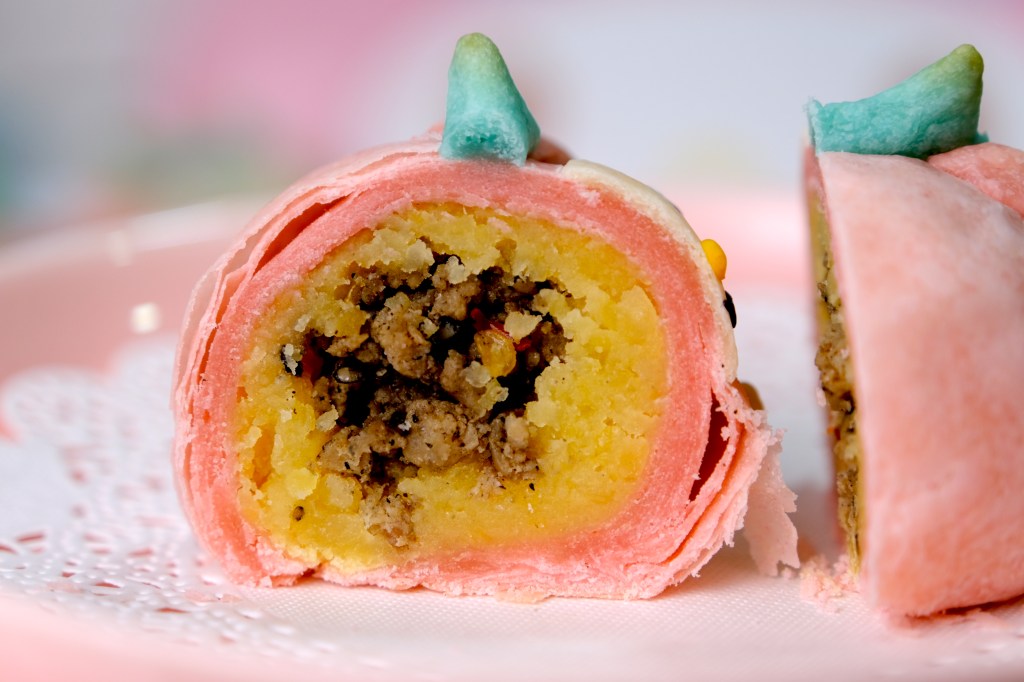
You have some bits to bite in the smooth fillings, the savoury pairs the sweetness perfectly, the crunchiness of the layer crust even make it more special.
You can actually omit the meat portion if you wish too, but that’s what makes it special in my opinion. And if you are not preparing this for moon cake festivals, it’s definitely a good snack or a nice breakfast item.

The beautiful flaky crust itself created by combining 2 different type of dough which is called water and oil dough that has been layered by rolling and folding similar in making puff pastry dough.

Feel free to create any design you like but always remember that for the combined dough, you need to make the oil dough colour slightly lighter than the water dough so it doesn’t show on the surface of the water dough when you roll it.
So this is how we combine the dough;
Lightly press down to flatten the water dough and place the oil dough in the center of the water dough. Fold the combined dough like an envelope, seal all the seam and shape it round again.
Cover and let them rest for at least 10 minutes so the gluten can relax a bit.
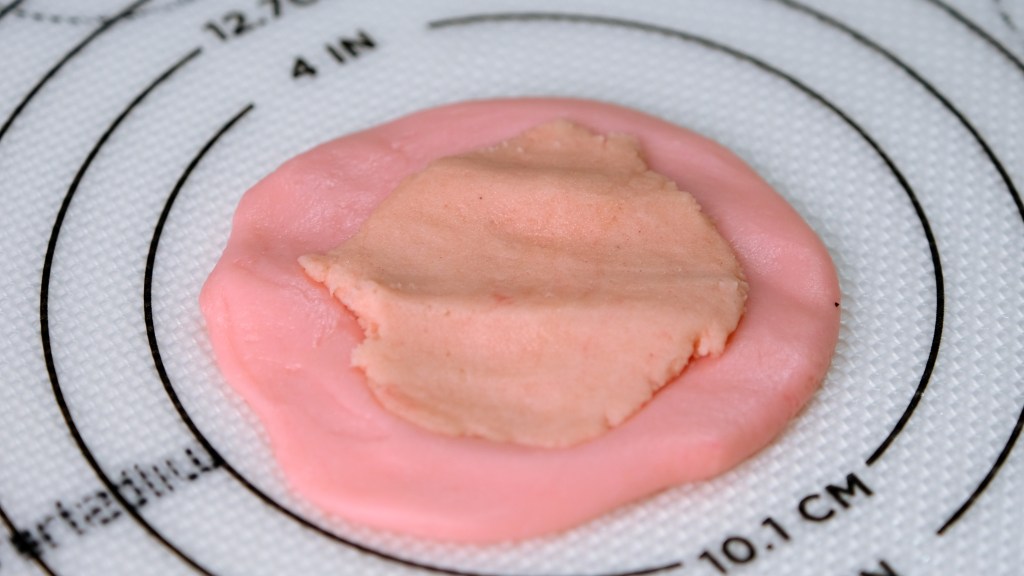
After resting, take one combined dough, using rolling pin, roll the dough into a long rectangular shape as evenly as possible, don’t press it too hard as you might tear the water dough membrane, about 3 mm thick is enough (pic. 1)
And then roll it up like you are preparing swiss roll (pic. 2)

Then turn the swiss roll direction with the shorter side pointing at you, using rolling pin roll it again into a long rectangular shape (pic. 3 & 4)
*One important tip when you roll the dough is always make sure that your rolling pin is clean from any dough flakes coz it will attracts the water dough surface which can cause a lot of cracks on the mooncake later.

And finally, roll it up again like a swiss roll (pic. 5 & 6)

Please note the colour will be much lighter when baked in the oven.
The minced meat is slightly on the salty side to compliment the sweet of the mung bean paste. If you prefer more spicy, feel free to add more chili or for a bigger kick, you can add a teaspoon of cayenne pepper, that will be great too!

And if the times permit, you even can prepared this meat the night before and store them in the fridge to let the flavor develops, it will taste even better.

Oh I love My Melody so much, they are my favorite Sanrio character since I was a child.
They taste amazing when served slightly warm and paired with a cup of hot tea or maybe your favorite coffee.
They are so adorable, tasty and also satisfying with their unique texture, it’s really hard to describe unless you have a chance to taste it

The recipe is rather long winded but it is rewarding coz they are so pretty and delicious.
I really hope you Guys give it a try coz this mooncake really suit my taste buds and I have to stop myself for further eating.
And if you want; you can share your creations with me with the “hastags bembumkitchen”, I really love to see all your creativity and I’ll make sure to give a like or thumbs up!
Enjoy the recipe, Love you All!!
MY MELODY TAIWANESE MOONCAKE
Yield: 10 pieces
Active time: 3 hours
Total time: 4 hours
INGREDIENTS
Mung Bean Paste:
- 100 gr Split Yellow Mung Beans
- 100 gr Hot Water
- 75 gr Granulated Sugar
Braised Meat:
- 100 grams Minced Pork
- 1 tbs Corn Flour
- 1 tsp Garlic (Minced)
- 1 tsp Ginger (Minced)
- 1/2 tbs Onion (Minced)
- 1/2 tbs Rice Wine
- 2 tbs Soy Sauce
- 1 tsp Chopped Chilli Padi
- 1/2 tsp Five Spice Powder
- 1/4 tsp White Pepper
- 1/4 tsp Salt
- 2 tsp Sugar
- 1/2 tbs White or Black Sesame Seeds
Water Dough:
- 200 gr All-Purpose Flour
- 50 gr Shortening
- 20 gr Icing Sugar
- 100 gr Cold Water
- Food Colouring (Pink, Black, Blue, Yellow)
Oil Dough:
- 75 gr Cake Flour
- 35 gr Shortening
- Pink Food Colouring
INSTRUCTIONS
Mung Bean Paste
- Wash mung beans in several rinses of water until the water runs clear, then soak them in a hot boiling water for 30 minutes (the water will be absorbed and the beans gets bigger).
- Preheat the steamer, bring water to a boil and then steam the soaked beans for about 30 minutes or until it can be easily mashed.
- Pour the beans into a non-stick pan, add in the sugar, cook over medium low heat (it will be wet at first as the sugar melts,keep stirring until it gets drier).
Using a spatula, press the beans until it resembles a thick paste (as the water evaporates, the beans will no longer be sticky).
Feel free to use blender or immersion blender if you prefer a really fine paste. - Take it off from the heat, cover it with a plastic wrap, store in the fridge to firm up.
Braise Meat
- Sprinkle corn flour to the meat before cooking (it will helps prevent overcooking and toughening of the outer layers so the result will be more tender and flavourful).
- In a medium pan, heat 2 tablespoons of vegetable oil, add in the minced garlic and onion, cook until golden brown.
Add in minced pork, continue cooking until it change in colour.
Pour in the rice wine and soy sauce, stir well.
Add in the rest ingredients and mix until well combined.
*Feel free to add more chili or cayenne pepper if you like more spicy. - Cover and store them in the fridge to let the flavor develops.
Water Dough
- In a medium bowl, combine all the ingredients, stir until it forms a sticky dough.
- Lightly transfer to a work surface and knead until it forms a smooth dough.
- Divide the dough for each details, color as needed
- Cover each colours with a cling wrap and let it rest for at least 20 minutes.
Oil Dough
Mix the flour and shortening, add in the pink food colouring (this oil dough colour must be slightly lighter than the water dough for the base of My Melody’s head).
Keep mixing until it forms a soft dough (it can be slightly sticky). Cover it with a plastic wrap to prevent the dough dry.
COMBINE, ROLL & BAKE
- Divide the bean paste into 10 equal portions (25 gr each), shape it into a ball.
Using your thumb press the center of the bean ball to create a hole. Insert about 1-2 tsp of the braised meat filling in the center, and then wrap and seal. Perform the same for the remaining 9 portions. - Combine 2 dough:
Divide the “soft pink” water dough and oil dough into 10 equal pieces (19 grams water dough, 11 grams oil dough).
Lightly press down the water dough to flatten and place the oil dough in the center of the water dough.
Fold the combined dough like an envelope, seal all the seam and shape it round again. Continue with the rest dough.
Cover and let them rest for at least 10 minutes so the gluten can relax a bit. - Roll the combined dough:
Take one combined dough, using rolling pin, roll the dough into a long rectangular shape as evenly as possible (don’t press it too hard as you might tear the water dough membrane), 3 mm thick is enough.
Roll it up like you are preparing swiss roll.
Turn the swiss roll direction with the shorter side pointing at you, using rolling pin roll it again into a long rectangular shape. Then roll it up again like a swiss roll.
Set aside, cover it up while continue with the rest dough.
FILL & DECORATE
- Fill
Take one of the swiss roll dough, using rolling pin, flatten it into a circle shape.
Flip the dough, place one portion of a bean ball at the center of the dough, and start covering the bean ball from all sides, rotate while tighten your palm, make sure the skin and filling stick together evenly.
Seal all the seam. Shape the mooncake a bit oval as My Melody’s head. Repeat this process for the rest of the Mooncake. - Decorate
Add details according to My Melody’s Head, add the spark of her eyes with some white food colouring
BAKE
Bake in the preheated 170°C oven for about 15-18 minutes.
Remove from the heat, allow to cool slightly on the pan for about 10-15 minutes then transfer to a cooling rack to cool completely.
NOTES
- Don’t let the water dough sit too long coz it will release the oil and cause a lot of crack on the mooncake surface later.
- Best serve 20 minutes freshly baked.
- To store in an airtight container; 1 day at room temperature, 1 week fridge, 1 months freezer.
- To reheat; 180°C oven for about 5-10 minutes


