Traditional Orange Nian Gao (Quick & Easy Way)

Hi Guys, today we are making these “Traditional Orange Nian Gao”. A symbol of a high year, an increase in prosperity and a good luck.
Despite numerous varieties, my favorite will always be the West Java Indonesian Nian Gao which they called “China Cake”.
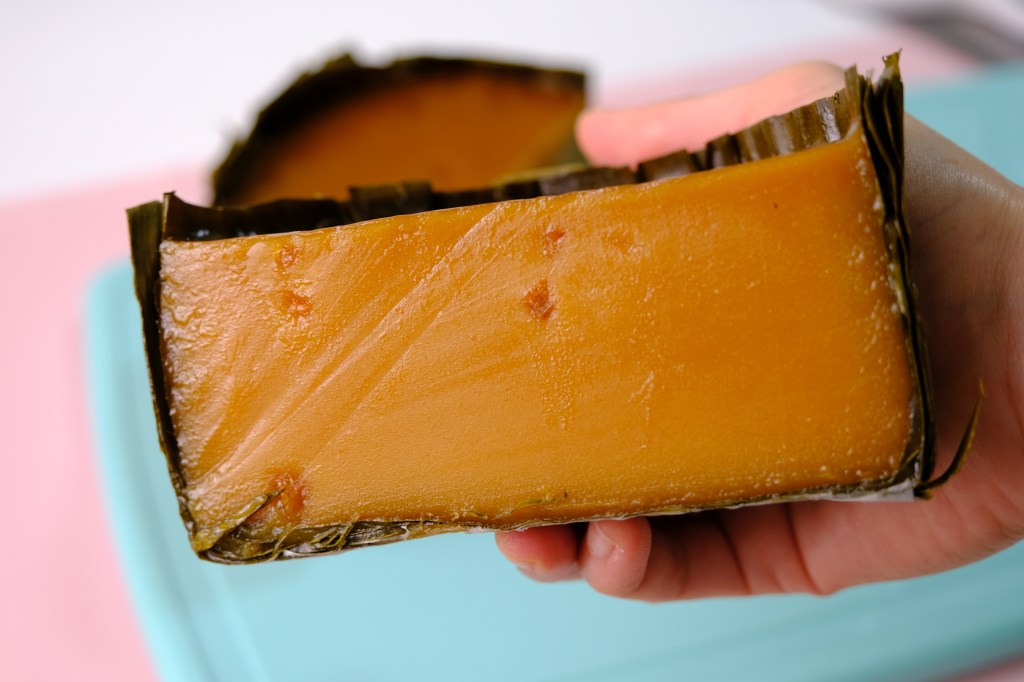
It’s made by mixing the glutinous rice flour, pure Gula Malacca, salt and water, then add in the minced orange peel to the mixture.
By using pure gula malacca and orange peel not only so much better in flavour, but it also has a lovely fragrance.

Look how soft and chewy this Nian Gao!

The color of course much darker and after so many hours of steaming, it will turn very dark, almost of a similar sweet cake, Dodol.

Mold layering with banana leaves

Some people use greaseproof paper or even food grade plastic for layering the moulds,
I personally love to use banana leaves simply because it’s natural and healthier and also add more delightful fragrance to your Nian Gao.

Japanese Yuzu Peel

And for the orange peel, I am using Japanese minced dried yuzu peel here or you can substitute it with Italian mixed peel. It also works well.
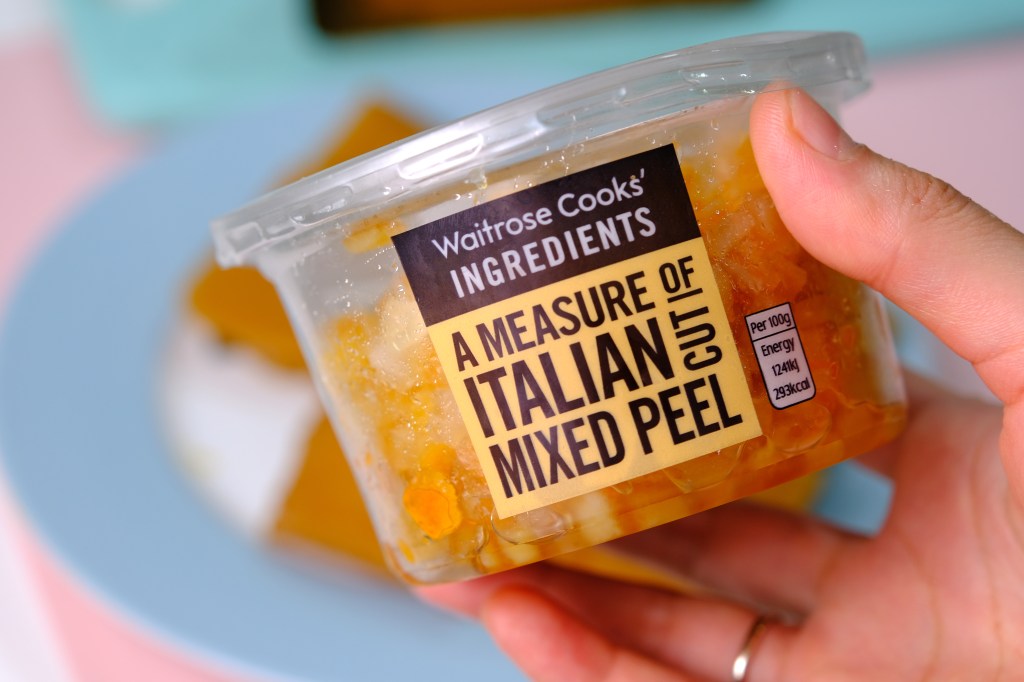
Italian Mixed Peel

The Nian Gao will still appear very soft at the end of cooking time, we need to let them cool down completely, let it sit at room temperature in a plastic container or wrapper for at least 24 hours before unmoulding.
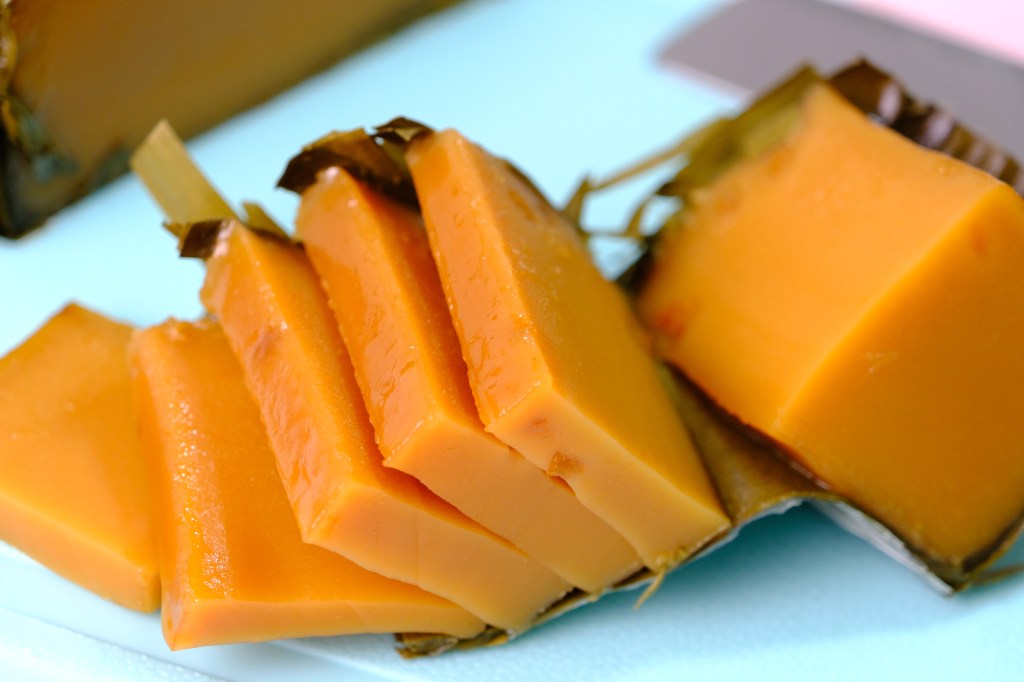
Beautiful Sliced Nian Gao

You can eat the rice cake once it’s steamed, just remember that it’s very sticky and gooey when it’s hot.
The best way to enjoy this Sweet Rice Cake is wait for it to cool. They will be slightly firmer or you can store them in the fridge so it will firm faster and easier to sliced them.

So pretty! This is almost similar as the one sold in the store

Nian Gao also a popular gift when visiting family and friends during the chinese new year celebration.
If you have plan to make this as a present, you can simply cover the top with a piece of acetate film with some Chinese New Year sticker on it, and before you stick them, make sure that you apply some vegetable oil onto the acetate film so it will be easier to remove later.
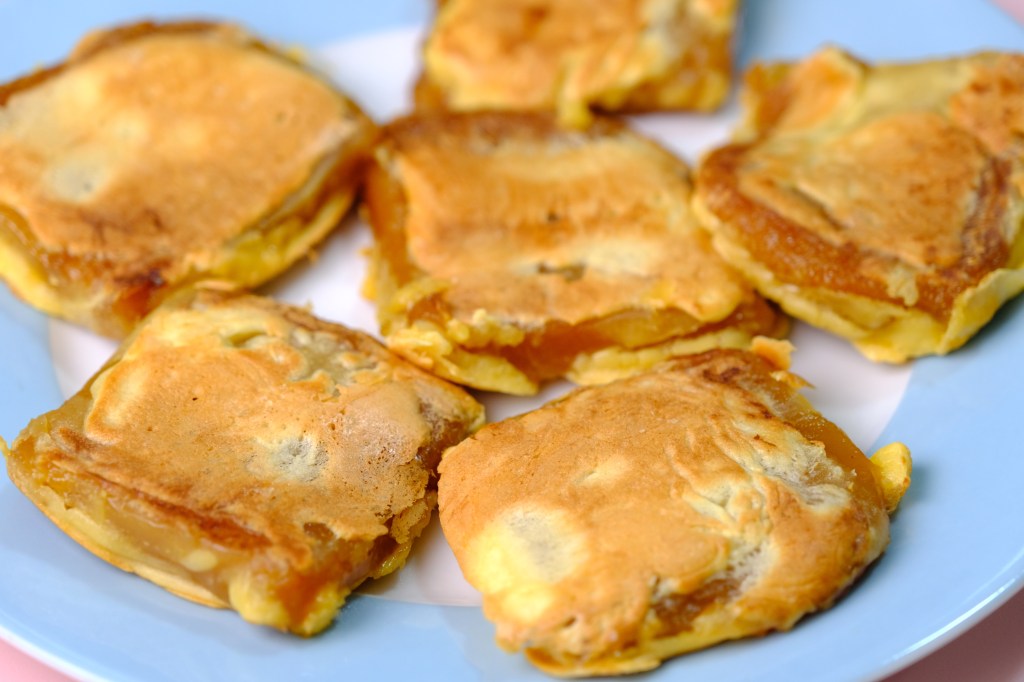
Pan-Fried Nian Gao

And when ready to serve them just reheat with steamer or microwave if you want to eat them plain or you can follow my Pan-Fried or Steamed Coconut Nian Gao recipe, a great way to use leftover Nian Gao from Chinese New Year. It’s really good!

Look at the Interior!

Look!! Light and airy thin batter coating the outside of the nian gao, while soft, chewy and stretchy Nian Gao on the inside.

Steamed Coconut Nian Gao

And for the Steamed Coconut Nian Gao also quite easy and so delightfull, and it’s perfect for coconut lovers.
You just need to steam the grated coconut for about 10 minutes, add in the salt, and simply fully coat the softened nian gao with grated coconut.
How cool is that?

Whishing you a happy and prosperous Chinese New Year! It’s time to celebrate the hard work, a time for families to reunite, feast, give thanks and rejoice.
I hope you enjoy these recipe as much as I do, Love You All!

TRADITIONAL ORANGE NIAN GAO
Yield: Three 5-inch Round Pans or (One 6-inch, One 5-inch and One 4-inch) 
Active time:  1 1/2 hours
Total time: 4 hours

INGREDIENTS
Molds:

  • Three 5-inch Round Pans or (One 6-inch, One 5-inch and One 4-inch) 
  • Banana Leaves
  • Rubber Band 


Nian Gao Batter:

  • 550 grams Gula Malacca
  • 700 grams Water
  • 1/2 teaspoon Salt
  • 600 grams Glutinous Rice Flour
  • 3 tablespoons Orange Peel


Pan-Fried Nian Gao (For 1 Pan):

  • One 5-inch Nian Gao (Sliced)
  • 50 grams All-Purpose Flour
  • 1/2 teaspoon Baking Powder
  • 1/4 teaspoon Salt
  • 50 grams Eggs
  • 3-6 teaspoons Ice Water


Steamed Coconut Nian Gao (For 1 Pan):

  • One 5-inch Nian Gao (Sliced)
  • 250 grams Grated Coconut
  • 1 teaspoon Salt


INSTRUCTIONS
Molds

  1. Remove the center hard part of the banana leaves (you can use greaseproof paper or food grade plastic). Clean the leaves under running water.
  2. Blanch the banana leaves in hot boiling water for about 5 minutes to soften it so it won’t tear easily (alternatively you can soften it by heating over a stove). Pat them dry.
  3. Using the moulds as a guide, measure the length and width of the leaves.
    The width should be 2 times of the height of the moulds, and the length should be enough to cover the circumference of the mould. Cut off the excess.
  4. Wrap the leaves around the mould, covering half of the outer rim.
    Secure the position of the leaf by putting a rubber band around the rim of the container. Insert the remaining part of the leaves into the mould. 
    * Please note that the leaves should cover the inner wall and at least half of the bottom part.
    To help shape the inside part of the mould, insert a smaller round container into the mold and press the leaves against the base and the inner wall of the mold.
    Repeat the same process by adding two more leaves. Don’t be confused if the leaves is too small, you can still use it by patch them to one another.
  5. For the bottom part, cut 2 pieces of round shaped leaves with the diameter slightly bigger than the base and then insert and press against the bottom to cover the base completely. 

Nian Gao batter

  1. Place gula Malacca, salt and water in a saucepan and bring to a gentle simmer, until the sugar completely melted. 
  2. Once melted, remove from the heat, strain the mixture and let it cool completely.
    In the meantime, prepare the steamer by bringing the water to a rolling boil.
  3. After the sugar mixture cooled down, gradually pour it into the glutinous rice flour, stirring in between until the mixture is smooth. Strain the mixture to make sure there’s no lumps persist.
  4. Pour the mixture onto the moulds (do not fill the mould all the way to the top, leave half inch clear space to top of the pan).
  5. Sprinkle 1 tablespoon orange peel for each mould, tap the mould for a few times, cover each moulds with aluminium foil to prevent the water condensation drops to the Nian Gao.
  6. Place inside the steamer and steam on medium heat for 2 hours (you may need to refill the water throughout the cooking process, don’t let it dry out).
  7. Take it off from the heat, remove the aluminium foil immediately and then let it sit on a cooling rack to cool completely before storing.
  8. Wrap in a plastic container for at least 24 hours before unmoulding.
  9. Unmould and cut of the excess banana leaves, leave about 1-2 cm from the edge of the Nian Gao.


Pan Fried Nian Gao

  1. Slice the Nian Gao in a square shape about 1/4-inch thickness.
  2. In a medium bowl mix the all-purpose flour, baking powder and salt. Add in the eggs and mix until just combined.
  3. Gradually mix in the ice water, don’t add the ice water all at once, start by adding 1 teaspoon at a time until you get the perfect consistency (not too thick or too watery).
    Dip Nian Gao slices to the batter.
  4. On a medium heat, apply some margarine to the pan (if you use butter, add some vegetable oil to avoid the butter burning).
  5. Pan fry the Nian Gao until golden brown on both sides, press once in a while to check whether the inside cooked well (control the heat so the batter won’t get burn while the Nian Gao on the inside isn’t soft and chewy just yet).


Steamed Coconut Nian Gao

  1. Slice the Nian Gao in a square shape about 1/4-inch thickness, steam or microwave it until a bit sticky and soft.
  2. Steam the grated coconut for about 10 minutes. Add in the salt, stir well.
  3. Coat the softened Nian Gao with salted grated coconut.

NOTES

  1. Yes you can eat the Nian Gao once it’s steamed, but it will be very sticky and gooey when it’s hot.
  2. The best way to enjoy this Nian Gao is wait for it to cool.
    At day 3, usually the this cake will be much more firm or you can store them in the fridge so it will firm faster and easier to sliced them. And when you cut, don’t forget to apply some vegetable oil to your knife or any kitchen tools to prevent stickiness.
  3. To store Nian Gao; 2 days at room temperature, 1 week in the fridge, 6 months in the freezer.
  4. Pure Gula Malacca should be dark in colour and pliable to touch. Hard lighter colour gula malacca have likely been mixed with cane sugar.
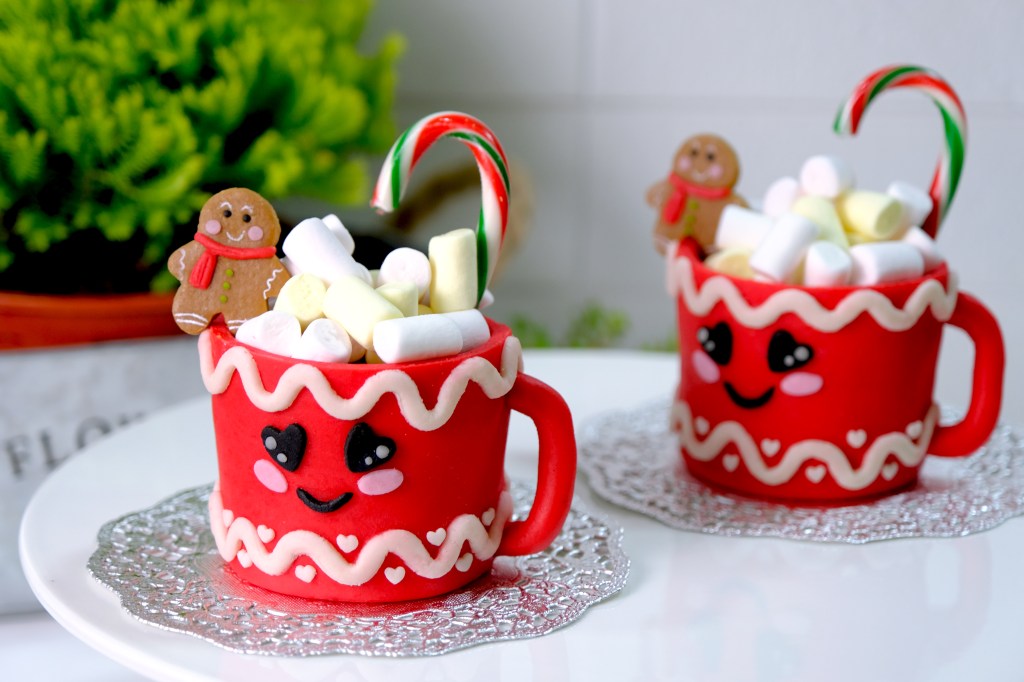
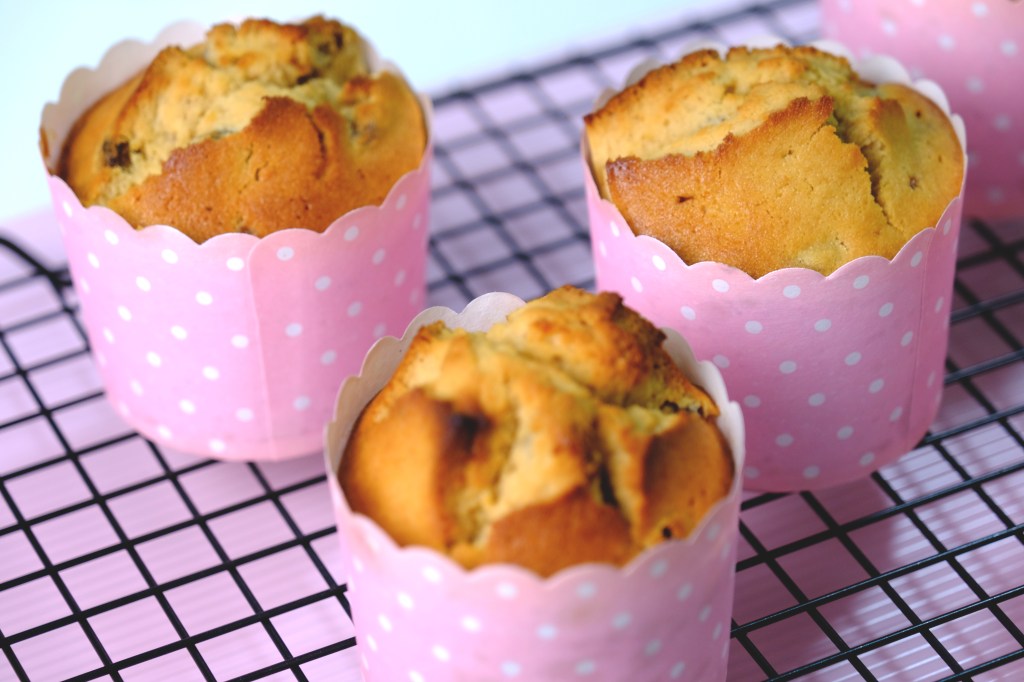
Peppermint Hot Chocolate Drink Fruit Cake

Hey Guys, happy early holiday season to you all!
As the end of the year mean a lot of parties and food; and one of my favorite Christmas dessert is traditional fruit cake with loads of dark rum.
A festive, flavorful, and moist fruit cake to enjoy all holiday season. 

Bland and Boring Style Fruit Cake 🙁

Sometimes I have no time left to marinated the dried fruit and I felt the appearance of the fruit cake can get a little bland and boring, anyway… I still want to eat fruit cake.

So I was thinking why not we try something that’s a little different? It’s gonna be a “Quick Fruit Rum Cake”, decorate as a Peppermint Hot Chocolate Drink! How cool is that?

No Cooked Homemade Egg-Free Marzipan

And to decorate the cake, of course marzipan is the best and traditionally has been used to cover fruit cakes with it.

You could use ready made marzipan, I personally love to make my own “No Cooked Homemade Egg-free Marzipan” which is very simple and easy. It only takes 10 mins and needs no special skills or equipment to make it.

Sifted Almond Flour and Icing Sugar

So… you will need to sift the almond flour and icing sugar.
It will be easier if you have food processor on hand, you can just pulse them until smooth, coz how smooth you grind the almond will determine the texture of your marzipan.

I don’t have one, so… I just do it manually by hand, try not to do it all at once, sift it gradually.
It will be a bit time consuming, just keep smiling and be patient.

My Sweet Little Gingerbread Man

And the most fun part, by using marzipan you can create customize decorations for your Hot Choco Mug.
I really fall in love with this cute little Gingerbread man cake topper, it’s perfect for my Christmas Cakes.

Look how cute he is!

The liquor will make the fruitcake more moist, and will help it last longer.
Well, traditionally one of the most important function of fruitcake is for storage. It could be stored for weeks, sometimes half year, if stored properly.
But in this recipe, it tastes the best when it’s fresh in my opinion.

Beautiful Golden Colour, Loads of Rum and Moist Cake

Unlike the other brownish fruitcake, this one has a beautiful golden color. The Marzipan is so soft not too sweet. A thin slice of this cake is a wonderful treatment with a cup of black coffee or tea.

I hope you Guys give this recipe a try and have a wonderful Christmas & Happy New Year!
Love you all…

PEPPERMINT HOT CHOCOLATE DRINK FRUIT CAKE
Yield: Five Pieces (Upper diameter: 6.8 cm, Bottom diameter: 6 cm, Height: 5 cm) cupcakes liners
Active time:  2 hour
Total time: 3 hour

INGREDIENTS
Marzipan:

  • 300 grams Almond Flour
  • 775 grams Icing Sugar
  • 2 1/2 tablespoons Corn Syrup
  • 1 teaspoon Almond/ Rose/ Vanilla Extract (or any favourite extract)
  • 2-5 tablespoons Water


Fruit Rum Cake:

  • 100-120 grams Dried Fruit (cut into small pieces)
  • 80 grams Dark Rum
  • 40 grams Orange Marmalade
  • 130 grams Cake Flour
  • 2/3 teaspoon Baking Powder
  • 100 grams Salted Butter
  • 50 grams Brown Sugar
  • 50 grams Granulated Sugar
  • 2 Eggs

Soaking:
30 grams Dark Rum, 1 tablespoon Orange Marmalade

Decorating:
Candy Canes, Mini Marshmallow, Food Colouring (red, black, green, pink)


INSTRUCTIONS

Marzipan

  1. In a large bowl, sift together the almond flour and the icing sugar.
    If you have food processor on hand, you can just pulse them until smooth, coz how smooth you grind the almond will determine the texture of your marzipan.
  2. Pour in the corn syrup and mix.
    Add in the water and almond extract, mix well (the mixture started grainy).
  3. Using hand, bring it all together into a ball (you can add one or two teaspoons of water if necessary if you feel the dough too dry). Lightly knead on a work surface until you have a smooth ball.
    Please note, try not to ever kneading, coz it will cause the almonds to give out oil and that can make the marzipan too oily.
  4. Place it in a plastic wrap and store them in the fridge for at least 1 hour before using. Colour as needed.

Soaking
Mix marmalade with dark rum, strained the mixture.

Fruit Rum Cake

  1. Mix dried fruit and dark rum, let it soak for at least 1 hour. Add in marmalade and fold to combine.
  2. In a medium bowl, whisk together the flour and baking powder, set aside.
  3. In another large bowl, combine the butter and both kinds of sugar, beat until fluffy. Pour in the eggs and mix until well combined.
    Add half of the flour mixture and mix. Pour the soaked dried fruit rum mixture that has been mixed with marmalade and fold to combine. Pour the rest of the flour mixture to the bowl and mix until well combined.
  4. Pour the batter into the prepared cupcake liners about ¾ full and bake them in the preheated 180°C for about 30-35 minutes of until toothpick inserted in the center comes out clean.
  5. Once they come out from the oven, brush the with generous amount of soaking mixture and let them cool completely on the cooling rack.


Decorating

  1. Trim the top of the cupcake so it have an even flat top.
    Sprinkle some icing sugar so the marzipan won’t stick to the work surface. Roll some red marzipan about 3 mm thick for the base of the mug cake, using some marmalade jam as a glue.
  2. For the sides; prepare a piece of greaseproof paper as a marzipan templates so we know how long and how much marzipan should we roll for the sides of the mug cake.
    Roll the marzipan about 5 mm thick according to the template, stick onto the cake with some marmalade jam. Cut off the excess.
  3. Using fondant smoother, press the marzipan onto the sides of the mug cake to make sure that it stick well to the cake surface
  4. Using knife tool, tuck the marzipan under a cake so it completely seal.
  5. For the decorations; add some ribbon and tiny hearts around the cake. Stick all mug details and handle with some marmalade. 
  6. Insert a stick of candy cane to the mug, add some mini marshmallow and tiny gingerbread man 


NOTES

  1. You can use your favorite dried fruits such as raisins, figs, prunes,cherries, apricots, or maybe peaches.
  2. If you don’t like dark rum, feel free to use other liquor.
  3. To colour the marzipan, you can use any food colouring, water based, gel, powder. 
  4. I highly recommend to use concentrated food colouring, specially for a deep colour (so you can add less and still get a deep colour).
    Food coloring can throw off the consistency of your marzipan, especially if you have to add a ton to achive the color you’re after.
  5. To store marzipan; wrapped well in an airtight container or it can dry out easily. I suggest to store your Marzipan in the fridge (1 month) or freezer (up to 6 months), when you are ready to use take it out from the fridge or freezer then lightly knead to make it pliable again.
  6. To store fruit cake; In an airtight container for about 3 days at room temperature, 1 month in the fridge and 3 month in the freezer.

Black Forest Cake

Hi Guys, there’s something about Christmas that makes everything a bit more magical, even the dessert. I grew up making treats to share with the entire family and I love baking so much.

And for this special day, I’m gonna share with you my signature “Christmas Blackforest Cake”. The perfect dessert for Christmas dinner that my whole family will love.

This is the first cake that I’ve learned to made when I was 13 years old. I was so happy and proud of myself at that time because everyone (specially my Mom) said that the cake was delicious.
Sometimes I think they gave me compliment just to make me feel good, they don’t want me to be disappointed.

But as I got older, I just realized that what they said was true.

Dark Sweet Cherry Filling

This Blackforest Cake combines a very soft chocolately chocolate sponge cake, layered with a rich dark cherry fillings, covered with fluffy frostings and sprinkle with a generous amount of dark chocolate shavings.

What make it special from other Blackforest Cake is the rich dark sweet cherry filling, which people usually use only whipped ceam.

And because it has always been very difficult to get Kirsch in my country (Kirsch is a traditional cherry liquor for Blackforest Cake), I always substitute it with my favourite Dark Rum for the wonderful aroma.

You can use Vodka, wine or Brandy if you want or just leave this out if you’d like to keep it kid-friendly.

Look how soft and chocolately this chocolate sponge cake!

The cake so soft, melts in your mouth, full of that rum flavour cherries filling, and the fluffy light frosting and dark chocolate shaves, really create a decadent, rich!

Light, fluffy, not too sweet frosting

Black Forest Cake was a staple when I was growing up. It’s a light and perfectly sweet German dessert that is easy to make and a chocolate-lover’s dream!

I created this special frosting recipe, coz I don’t like to use whipped cream for covering the cake which is melts easily.

And of course it’s not complete without some fresh cherries, sift some icing sugar for the snow effect, and I would like to add silver sugar pearls for a sweet touch.
Feel free to add other decoration as desire.

The frosting won’t melt , so you we don’t need to worry too much 🙂

Isn’t this cake look tempting? It’s ready to serve or you can pop it into the fridge to hang out for a while.

Look at the inside, that delicious chocolately sponge cake!
And the thick rich dark sweet cherry filling in between

I’m so ready for a Christmas celebration, they are also perfect with your favorite tea or coffee.

I now you can’t resist it!

No one thought we would be celebrating Christmas in the midst of a pandemic, yet here we are. But we are still grateful for everything we have and always hope for the best.
May your Christmas be a merry one! Stay safe!! Love you All…


BLACKFOREST CAKE
Yield: One 8-inch Round Pan
Active time: 1 hour
Total time: 3 hour

INGREDIENTS
Chocolate Sponge Cake:

  • 100 grams Cake Flour
  • 25 grams Cocoa Powder
  • 65 grams Granulated Sugar
  • 50 grams Vegetable Oil
  • 65 grams Milk
  • 1 teaspoon Vanilla Extract
  • A Pinch of Salt
  • 85 grams Egg Yolks
  • 165 grams Egg Whites
  • 1 teaspoon Lemon Juice/ Vinegar
  • 65 grams Granulated Sugar

Cherry Filling:

  • 1 can (16 Ounces) Dark Sweet Cherries
  • 80 grams Granulated Sugar
  • 30 grams Corn Flour
  • 3 tablespoons Dark Rum/ Kirsch

Frosting:

  • 225 grams Shortening
  • 40 grams Unsalted Butter
  • 190 grams Icing Sugar
  • 2 tablespoons Dark Rum/ Kirsch
  • A Pinch of Salt
  • 60 grams Whipped Cream


INSTRUCTIONS
Prepare the panFor the water bath; Line the inside bottom part of 8-inch round pan with parchment paper and wrap the outside bottom part of the pan with aluminium foil.
Place the wrapped pan on bigger baking pan, set aside.


Chocolate Sponge Cake

  1. Preheat the oven to 150°C.
  2. In a large bowl, sift the flour and cocoa powder, set aside.
    In a medium bowl, combine the sugar, vegetable oil, milk, vanilla, salt and egg yolks, mix well. Pour the egg yolks mixture into the flour mixture and mix until no lumps remain.
  3. In another large bowl, whip egg whites and lemon juice until a bit foamy. Add the sugar gradually, continue mixing until reach a stiff peak.
  4. Very gently fold the egg whites into the egg yolks batter in three batches (don’t mix it together all at once, to prevent the egg foam deflate).
    Using spatula, mix gently just until all incorporated, make sure there’s no egg yolks batter left on the bottom of the bowl.
  5. Pour the mixture into the baking pan, tap the pan a few times to get rid off air bubbles.
    And for the water bath; pour about ½-inch hot water onto the bigger pan.
    Place both pans on the bottom rack of the oven and bake it for about 85 minutes.
  6. Once it come out from the oven, take it out immediately from the water bath. Tap the pan a few times so it won’t shrink too much, remove the cake from the pan and let it cool on a cooling rack.


Cherry Filling

  1. Strain the cherries and place the syrup to a medium sauce pan.
  2. Soak the cherries with generous amount of dark rum for about 1 hour (you can leave this out if you’d like to keep it kid-friendly).
  3. To make the cherry filling; Combine the reserve cherry syrup with sugar and corn flour (strain to make sure there’s no any lumps) pour it back to the pan.
    Cook over medium low heat, keep stirring until it boil becomes transparant and thickened. Remove it from the heat, add in rum, mix well
  4. Drain the soaked cherries and combine with the cherry filling.


Frosting

  1. In a large bowl combine the shortening and unsalted butter mix until soft and well combined.
  2. Add in the icing sugar, rum and salt, continue mixing until becomes light and fluffy.
  3. Pour in the whipped cream and mix until just combined.


Assembly

  1. Using a large serrated knife, divide the cake into 3 equal layers.
  2. Place the first cake layer on a cake plate, brush it with rum. Pipe a rim of frosting around the cake layer before adding the filling (this creates a nice barrier so the filling stays in place), spread half of the cherry filling within the frosting barrier.
    Place the second layer on top, repeat the step. Place your final cake layer bottom side up on top of the cake.
  3. Crumb coat your cake with a light coat of frosting (freezer for about 10 or 30 minutes in the fridge to set the crumb coat). Continue frost the cake with remaining frosting.
  4. Press generous amount of the chocolate shaves onto the cake, sprinkle some for the top
    (Tip: grate the chocolate 1 hour in advance and store them in the fridge so it’s easier to handle).
  5. Pipe frosting to make it pretty, place some fresh cherries. Sift some icing sugar on top of the cake. Add another decoration if desire.


NOTES

  1. Best serve on the day it’s made.
  2. Cover in an airtight container and store leftover cake in the refrigerator for up to 5 days.
  3. I suggest to use 16 Oz S&W Dark Sweet Cherries brand for the best result coz it serve fresh cherries inside and better taste than any other brand.

Perfect Fluffy Pancakes | With Homemade Maple Syrup

SIMPLE. EASY. QUICK. FLUFFY. The Perfect Fluffy Pancakes recipe you will fall in love with!
I’ve tried so many recipes using milk or buttermilk but none of it as fluffy as this recipe. These homemade Greek Yogurt Pancake so delicious and incredibly quick to whip up.

Do not overmix the batter, a few small lumps is perfect!

It all starts with the batter! The key to light and fluffy pancakes is mixing just until combined, it’s important not to over mix.

Don’t use electric beaters or a mixer, just whisk it by hand until it’s generally smooth, but you still can see a few small lumps. That way you know you’ll have tender fluffy light pancakes.

Cook until small bubbles appear on the surface and the edges lose it’s shine

You can add some toppings to the batter directly before flipping; such as Blueberries, Chocolate chips, slices bananas, nuts anything you like . Just drop them on the top of the pancake, distribute them evenly.

When you can see small bubbles appear on the surface and the edges lose it’s shine, that way you know it’s cooking from underneath and they are ready to flip (it will takes for about 1-2 minutes).

Homemade Maple Syrup can be store 2 months in the fridge

I love to pair them with my Homemade Maple Syrup. This Maple Syrup is low budget, simple, easy to make and it taste like pure Maple Syrup, how cool is that?

If you don’t like to use my Canadian style Maple Syrup, feel free to serve them with your favorite Nutella, fruit jams, chocolate sauce, caramel syrup or maybe a bit savory like cheese if you want.

Look how fluffy those are!

I love everything about these pancakes, they turns out perfect every single time! An amazing fluffy and light texture, they make me hungry as soon as I see them.

They are so tender and warm.
If you are making these on the weekend and you have a few extra left, just keep them in the fridge.
When it comes to Monday morning when you are in a hurry, just take them out from the fridge, pop  in the microwave or toaster for a few seconds, and you have got a quick breakfast on the go!

Start your mornings with these perfect pancakes, I’m sure that you will love them!

PERFECT FLUFFY PANCAKES (WITH HOMEMADE MAPLE SYRUP)
Yield: 10-12 pieces
Active time: 1/2 hour
Total time: 1 hour

INGREDIENTS
Maple Syrup:

  • 160 grams Granulated Sugar
  • 20 grams Granulated Palm Sugar
  • 2 teaspoons Honey
  • 140 grams Water
  • 2 teaspoons Vanilla Extract
  • 1 teaspoons Maple Extract (optional)


Pancakes Batter:

  • 195 grams All-Purpose Flour
  • 1 tablespoon Granulated Sugar
  • 1/2 + 1/4 teaspoon Baking Powder
  • 1/4 + 1/8 teaspoon Baking Soda
  • 1/4 teaspoon Salt
  • 180 grams Plain Greek Yogurt
  • 180 grams Milk
  • 75 grams Whole Eggs
  • 3 tablespoons Vegetable Oil


INSTRUCTIONS
Maple Syrup

  1. In a medium saucepan, combine the granulated sugar, granulated palm sugar, honey and water.
  2. Bring the mixture to boil, then reduce the heat to low. Cover the pan and allow it to simmer for about 15 minutes.
  3. Take it off from the heat and let it cool for 20 minutes.
  4. Stir in the extracts, mix well.
  5. Let the syrup cool completely before pour them in a jar or containers. You can store them for up to 2 months in the fridge.


Pancakes Batter

  1. In a medium bowl whisk together all the wet ingredients; Greek Yogurt, milk, eggs and vegetable oil, set aside.
  2. In another large bowl combine all the dry ingredients; the flour, sugar, baking powder, baking soda and salt.
  3. Pour the wet ingredients to the dry .
    The key to light and fluffy pancakes is mixing just until combined (don’t use electric beater or mixer, just whisk it by hand).
    Do not over mix, whisk until it’s generally smooth but you still can see a few small lumps.
  4. To cook
    On a medium heat, preheat a nonstick pan until a drop of water sizzles. Pour batter into rounds (about 3-4 tablespoons).
    Cook until small bubbles appear on the surface and the edges lose it’s shine (it will takes for about 1-2 minutes).
    *At this point you can add some toppings to the batter directly (blueberries, chocolate chips, slices bananas, nuts anything you like). Just drop them on the top of the pancake, distribute them evenly.
  5. Flip the pancakes and then cook for another minute or so until golden and cooked through. Repeat with remaining batter.

NOTES

  1. For the Pancake Batter;You can substitute the vegetable oil with melted unsalted butter, it will gives the pancakes a bit more flavor.
    Sour cream subs great for the greek yogurt, or you can use regular plain yogurt.
  2. Store leftover pancakes in an airtight container. They’ll be good in the refrigerator for 2-3 days, or you can freeze for up to 3 months.
  3. To reheat Pancakes
    Microwave: 20 seconds to 1 minute
    Oven: 10 minutes in the preheated 180°C
  4. Maple syrup can be store in the fridge for up to 2 months.

Traditional Mooncake (Inspired by Sin Hap Hoat Brand)

Hi Guys, today we are making my favorite childhood Traditional Mooncake inspired by the famous brand “Sin Hap Hoat”.
And until now, I still fall in love with this moon cake.
Mid-Autumn Festival takes place when the full moon is said to be the largest and brightest of the whole year. It was traditionally a time to give thanks to the Gods.

This is the type of moon cake that capture my heart, it brings fond memories for me and my family.
The round moon cakes are symbols of the great family reunion just like the round, as usual we sit together under the bright light of the moon, sip tea, nibble on mooncakes.

It’s completely different with alkaline water or snow skin kind moon cake, no need any fancy ingredients such as golden syrup or alkaline water.
They original Brand “Sin Hap Hoat” have flavour varieties such as Chocolate, Milk, Durian, Jackfruit, cheese and many more. My favorite flavour will always be these lovely chocolate.

Yummy Thick Chocolate Paste

The chocolate paste mixed nut filling is not too sweet, it’s pretty thick and so flavourful.

“Tjoklat” Old Stamp Spelling

And originally it still use the old stamp spelling of the flavour on the top of the Mooncake, like Tjoklat means Chocolate.

DIY Stencil

As I don’t have customized stamp for the cake design so I decided to make my own DIY cake stencil.

These mooncake has an equal proportions of skin and filling. That helps the mooncake to balance out the sweetness and make it taste so good.
They are best enjoyed with a strong, palate-cleansing cup of Chinese tea.

The cake skin will be sturdy and a bit crunchy after baking, but as you store them, it will absorb the oil from the filling and become softer, which is a good thing! Make them even tastier.

I hope that you will enjoy these recipe, maybe turned them into gifts for friends or relatives and have a happy Mid-Autumn Festival.
Love you Guys!


TRADITIONAL MOONCAKE (INSPIRED BY SIN HAP HOAT BRAND)
Yield: 4 pieces
Active time: 1 hour
Total time: 1 1/2 hour

INGREDIENTS
Chocolate Nut Filling:

  • 15 grams Unsalted Butter
  • 45 grams Dark Baking Chocolate (Compound or Couverture)
  • 65 grams Granulated/ Raw Sugar
  • 40 grams Water
  • 1/2 tablespoon Vanilla Extract
  • 80 grams All-Purpose Flour
  • 20 grams Cocoa Powder
  • 60 grams Baked Cashew Nut

*For those of you who prefer savoury flavour, you can substitute the chocolate filling with this delicious Cheese Filling:

  • 120 grams Grated Cheddar Cheese
  • 95 grams Icing Sugar
  • 80 grams All-Purpose Flour
  • 40 grams Salted Butter

Skin Dough:

  • 125 grams Condensed Milk
  • 44 grams Eggs
  • 1/2 teaspoon Vanilla Extract
  • 165 grams All-Purpose Flour
  • 1 1/2 tablespoons Milk Powder
  • 1/3 teaspoon Baking Powder

Cake Stencil:

  • Printed design on A4 paper
  • Greaseproof Paper
  • Double Tape
  • Red Food Colouring Powder
  • White Vinegar
  • Small Brush


INSTRUCTIONS
Cake Stencil
Print the design on a piece of standar A4 paper. Laminate back side of the A4 printed design with a greaseproof paper using double tape. Then using sharp Xacto knife carefully cut out the design out.


Chocolate Nut Filling

  1. In a medium pan, combine the unsalted butter, dark sweet chocolate, granulated or raw sugar, water and Vanilla Extract. Cook over medium low heat until start to boil and the chocolate melted. Take it off from the heat.
  2. Sift the flour and cocoa powder immediately into the pan, mix until well combined until it create a smooth shiny chocolate dough.
  3. Add the crushed cashew nuts into the chocolate filling, mix well.
  4. Divide the fillings into 4 equal pieces (about 80 grams each), shape the chocolate filling into a disk about 1-inch thick, set aside.

Cheese Filling
Simply combine all the ingredients. The mixture will be gritty at first, keep kneading until it creates a dough ball.

Divide into 4 equal pieces (about 80 grams each) shape into a disk.

Skin Dough
In a large bowl combine the condensed milk, eggs, and vanilla extract, mix well. Then pour in the all-purpose flour, milk powder and baking powder Mix until well combined.
The dough should be sticky at first, cover and let it rest for about 5 minutes to let the flour absorbed the water so it’s will be less sticky.
Divide the skin dough into 4 equal pieces (about 80 grams each).


Wrapping, Decorating and Baking

  1. Wrapping;
    Using rolling pin, gently flatten and roll the skin dough into 7 cm in diameter disk, put some flour on your palm, then pick up the skin and put it on your palm.
    Place one portion of the chocolate nuts filling ball at the center of the skin, gently wrap the dough upwards and around the filling, tighten your palm, pinching edges at the top to seal.
    Make sure the skin and the filling stick together evenly.
  2. Place a piece of greaseproof paper on top of the mooncake. Using flat surface, press the mooncake gently into a thick flat disk (make sure the top is flat and it should be about the same diameter size as the template).
    *If you see a shadow of the chocolate filling on the skin surface, don’t worry it won’t be visible after the skin dough risen in the oven.
  3. Decorating;
    Dilute about 1/2 teaspoon red food colouring powder with a bit of white vinegar. Place your stencil on top of the mooncake, using round brush tap the coloured gently over holes in the stencil (make sure it doesn’t move around while you stenciling).
    Gently peel away the stencil, using tiny brush paint the rest of the missing details.
  4. Baking;
    Bake the mooncake in the preheated 160°C oven for about 25 minutes.
    After baking, remove it from the heat and let it cool completely on the cooling rack.
  5. Store them in an air-tight container.

NOTES

  1. The cake skin will be sturdy and a bit crunchy after baking, but as you store them, It will absorb the oil from the filling and become softer, which is a good thing, Make them even tastier.
  2. The mooncake has an equal proportions of skin and filling. That helps the mooncake to balance out the sweetness and make it taste so good
  3. You can substitute cashew nut with any other baked nut you like (macademia, almond, walnut or peanut).
  4. Best serve after you keep them 1-2 days at room temperature (in an airtight container), when the skin soften a bit.
  5. You can store them 4 days at room temperature or 3 months in the fridge.

Fluffy Snow Cheese Cake

Hi Guys, today we are making these classic “Fluffy Snow Cheese Cake”. Ultimately soft, moist and cheesy sponge cake that you cheese lover will surely love!

This cake bakes up so nice and beautifuly even on the top, making it perfect for layering.

Fluffy Vanilla Buttercream

A light, moist and fluffy vanilla sponge cake, lightly filled and frosted with fluffy vanilla buttercream on top.

Finished with a generous topping of shredded cheddar cheese.
The combination of soft cake, sweet vanilla buttercream and salty cheddar cheese are perfect match in every bite.

And if you are a true cheese lover, feel free to add shredded cheedar cheese in the middle of the filling if you want.

Pillowy Soft Crumb

Look how soft and pillowy the crumb is. They are amazingly fluffy and stay moist even if you keep them in the fridge for a few days.

This cake is perfect little snack to go with your afternoon tea or after dinner time with coffee or tea. You will literally could not stop eating it!

There’s something about milky and creamy cheese that really gives depth of flavor of the cake.
If you not exactly a sweet tooth, these Snow Cheese Cake might be just right for you!

SNOW CHEESE CAKE
Yield: One 8-inch bundt pan 
Active time: 1/2 hour
Total time: 1 1/2 hour

INGREDIENTS
Sponge Cake :

  • 150 grams Egg Whites
  • 1 1/2 teaspoons Lemon Juice
  • 150 grams Granulated Sugar
  • 90 grams Egg Yolks
  • 135 grams Cake Flour
  • 20 grams Corn Flour
  • 1/4 teaspoon Salt
  • 40 grams Milk
  • 25 grams Vegetable Oil
  • 1 teaspoon Vanilla Extract


Vanilla Buttercream:

  • 140 grams Shortening
  • 35 grams Salted Butter
  • 35 grams Condensed Milk
  • 1 teaspoon Vanilla Extract

Grated Cheedar Cheese


INSTRUCTIONS
Sponge Cake

  1. Preheat the oven to 150° C, grease the pan (I am using my bakery pan grease https://www.youtube.com/watch?v=ilWe6_4ZDuI or  you can brush it with some butter and sprinkle flour to grease them).
    One important tips, if you are using bundt pan, just make sure that you coat all of it’s nooks and crannies or else the cake will stuck inside the pan.
  2. For the wet ingredients;
    In a medium bowl  combine the milk, vegetable oil and vanilla extract. Mix that all through, set aside.
  3. For the batter;
    – In a large bowl, pour in the egg whites, whip at low speed until foamy, then add the lemon juice and continue mixing it (by adding small amounts of lemon juice helps to stabilize the egg whites, help prevent overbeating and allows the beaten whites to reach their full volume and stiffness).
    – When the mixture start become white, add the sugar gradually, continue beating until it reach a stiff peak (they will look shiny and the tips can stand straight up).
    – Add in the egg yolks, mix slowly until just combine.
    – Sift all the dry ingredients into a bowl in 3 batches. Mix after each addition, stirring just top part of egg mixture
  4. Take about 3 tablespoon of the eggs mixture and mix them to the wet ingredients.
    Then gently pour it back to the egg mixture.
    Scrape down and fold with spatula until well combined (this technique is used to make sure that the batter is well combined and there’s no liquid left at the bottom of the batter).
  5. Pour the batter slowly to the pan. Pour it from above 15 cm height to help get rid of air bubbles and then shake and tap the pan against worktop for 2-3 times. 
  6. Bake this off at 150° C for 40 minutes, then increase the heat to 170° C and continue baking for another 5-10 minutes.
  7. Take it off from the heat.
    Tap the pan immediately about 2-3 times against worktop so the cake won’t shrink too much.
    Put the greaseproof paper and cooling rack on top, flip the pan and let it sit for about 10-15 minutes.
  8. After 15 minutes, remove the pan and let it cool completely.

    Vanilla Buttercream
    In a large bowl, combine the shortening, salted butter, condensed milk and vanilla extract.
    Mix it all through until it becomes pale white, light and fluffy.

ASSEMBLY

  1. Using serrated knife, divide the cake horizontally into half (make sure the cake is perfectly flat all the way around).
  2. Apply about half of the vanilla buttercream as a filling, spread evenly.
  3. Place the other layer of the cake on top
  4. Spread the rest buttercream over the cake
  5. Coat the cake with a generous amount of shredded cheddar cheese.

*If you are a true cheese lover, feel free to add shredded cheedar cheese in the middle of the filling if you want. 

NOTES

  1. This basic sponge cake recipe is perfect for many other delicious treats.
  2. After the cake cooled completely, if you are not gonna assembly the cake immediately, wrap it with a cling wrap to prevent the cake dry.
  3. They are amazingly fluffy and stay moist even if you keep them in the fridge (in an airtight container) for a few days.
  4. To serve the cake from the fridge; let it the cake sit at the counter (in an airtight container) for about 20 minutes and enjoy.
  5. You can keep them in the refrigerator (in an airtight container for 3-4 days.

Martabak (Indonesian Thick Pancake)

Hey Guys, today we are making these “Indonesian Thick Pancake”. These thick sweet pancakes are known as Martabak, it was one of the most famous street food in Indonesia.
They are usually lining up on the street at night to get this Martabak as a midnight snack.

These thick yummy pancake characterized by its honeycomb textures and the sweet decadent stuff like chocolates, condensed milk, butter, cheese, peanuts, Nutella, etc.
It really doesn’t require any fancy ingredients to make it.

There are many recipes to make Martabak, some of them used Baking Soda as a leavening agent.
I personally not prefer to use Baking Soda in the recipe, coz it’s a base or alkaline ingredient, which naturally has a bitter taste.

A popular and indulgent choice of toppings for Martabak in Indonesia includes butter, condensed milk, chocolate rice and shredded cheese -which is my favorite!

I love this martabak so much because they are so soft, spongy, the rich of the butter and sweet mild savory combination was truly amazing!!!

The sides and bottom of the pancake should be nicely brown and the middle of the pancake is lightly springy when you touch it.

Crispy and golden brown on the out side, but moist in the inside. It’s really easy and comforting, especially for us who stay at home 24/7.

Making Martabak is about patience and many many trial and errors. Never give up, keep practice Guys! And once get the hang of it, you will always want to make and crave it! Enjoy the recipe!!

MARTABAK (INDONESIAN THICK PANCAKE)
Yield: One 8-inch round pan
Active time: 1/2 hour
Total time: 1 hour

INGREDIENTS
Batter:

  • 1 teaspoon Instant Yeast
  • 1 teaspoon Granulated Sugar
  • 25 grams Slightly Warm Milk (too hot will kill the yeast)
  • 100 grams Cake Flour
  • 1 tablespoon Granulated Sugar
  • 1/4 teaspoon Vanilla Extract (optional)
  • 25 grams Eggs
  • 100 grams Water
  • 45 grams Salted Butter (melted)
  • 1/4 teaspoon Baking Powder

Filling:

  • Pure Creamy Butter (butter in a can)
  • Condensed Milk
  • 100 grams Cheddar Processed Cheese Block
  • Chocolate Rice Sprinkles

INSTRUCTIONS

  1. To activate the yeast; In a medium bowl, combine warm milk, 1 teaspoon of sugar and the yeast. Allow to stand for about 5-10 minutes until the mixture begins to foam.
  2. In a large bowl combine the flour, sugar, eggs, water. Mix until just combined. Stir in the activated yeast, mix well. Pour in the melted butter, mix until smooth and no lumps remains (you will have a thin, shiny batter.
    Cover the bowl and set aside for about 30 minutes (the volume of batter will increase and have air bubbles all over the surface).
    In the meanwhile, you can prepare your favorite fillings.
  3. Prepare 8 inch non-stick pan, make sure the pan has a glass lid so that you can check the pancake while cooking it.
    Heat the pan over medium high heat (it’s really important to preheat the skillet fully before you add the batter, or it won’t rise and get those honeycomb textures).
    To test whether the pan is hot enough; a drop of water thrown into the pan should sizzle right away.
  4. Once the pan is hot and ready, add baking powder into the batter. Mix it well and pour the batter immediately into the pan, don’t let the batter sit around for too long after the baking powder is in.
    Very gently slightly turn the pan around in circular motion so the batter thinly coat the side of the pan (this will form a nice crust later and that’s one of the best part of martabak).
  5. Let it cook on medium high heat until the bubbles came out into the entire surface and then reduce the heat immediately to the lowest setting.
    Please note, never use high heat because it could burn the bottom of pancake while cooking.
  6. When the edges of the pancake begin to look dry, sprinkle the top with 1 tablespoon of sugar and then cover the pan with the lid. Let it cook for about 5 minutes or until the center of pancake surface is fully dry and cooked.
  7. Remove pancake from the pan and place it on a cutting board. Spread a generous amount of pure creamy butter on top of the pancake. Cut them into half before you start adding the filling.
  8. Add your favourite fillings (grated cheese, chocolate rice, etc).
  9. Drizzle with some condensed milk.
  10. Gently fold half of the pancake to the other half to form a sandwich.
  11. Spread with some more pure creamy butter on top (you don’t have to do this if you feel it’s too oily, but actually it’s the main thing that makes the martabak more appealing and delicious)
  12. Cut them into pieces according to your preference’s size, traditionally, they will cut them into these square shapes. Don’t forget to wipe your knife with a clean damp kitchen towel between each cut, so the filling doesn’t stick everywhere.

    NOTES
  1. Making Martabak is about patience and many many trial and errors. Pay more attention to the heat, it’s very critical.
    Never use high heat to cook Martabak, because it could burn the bottom of the pancake before it’s completely cooked. Once the entire top surface of the pancake has bubbles, reduce the heat to the lowest setting to continue cooking.
  2. I will recommend to use heavy thick high quality non-stick skillets if possible.
    If you use non-stick regular pans, apply a thin layer of oil might be needed and you will need to peek the bottom part occasionally as they generally burn more easily.
  3. After mixing the batter with baking powder, immediately pour the batter to the heated pan for optimum results. So make sure by this time, the heated pan is ready. 
  4. Instead of using Pure Creamy Butter, you can substitute it with regular salted butter.
  5. Best serve immediately while still warm. You can store left over in the fridge for 3-4 days.
  6. To reheat; 200° C oven for 10-15 minutes or 1000 W microwave for 1 minute (most of the fillings will be melt).

Purin Steamed Birthday Brownie

Hey Guys, today I’m gonna show you how to make my signature “Steamed Brownie Birthday Cake”. It is the moistest steamed brownie possible, filled with melted dark sweet chocolate, cover with fluffy classic steamed buttercream, and then decorate as a Purin, my favorite Sanrio character.

Brownie Batter

Have you ever steamed your brownies batter? Or you always bake your brownies? Have you ever tried steamed brownies?
The texture of steamed brownie is different than a baked brownie. It is very soft and moist, light and cakey. It is more like a chocolate cake and it’s so tasty.

Look at all those layers, melted chocolate and fluffy buttercream! This cake is soft and moist, and the taste of chocolate is just gorgeous.

I’m sure most of you have heard the method “steam buttercream”. More appropriate would be sort of, “melted or poured buttercream”.

Steamed Buttercream

To cover the cake with steamed buttercream start by fill a medium sized saucepan about a quarter full with boiling water, and then place a heatproof bowl with a yellow buttercream on top.
You need to stir the buttercream, keep stirring until the buttercream is softened to a pouring consistency.

As it doesn’t need an oven to make it, it is suitable for anyone who wants to make a good quality dessert without an oven.
I’m pretty sure you can already see why I love this recipe and the method of decorating and you don’t have to be a perfect cake decorator to be able to do this!

PURIN STEAMED BIRTHDAY BROWNIE
Yield: One 16-inch round pan
Active time: 1 1/2 hours
Total time: 3 hours

INGREDIENTS
Brownie Batter

  • 120 grams Salted Butter
  • 80 grams Dark Sweet Baking Chocolate
  • 200 grams Eggs
  • 150 grams Granulated Sugar
  • 1 teaspoons Vanilla Extract/ Paste
  • 80 grams All Purpose Flour
  • 35 grams Cocoa Powder
  • 1 teaspoon Baking Powder

Chocolate Filling
40 grams Dark Sweet Baking Chocolate (melted)

Buttercream

  • 200 grams Shortening
  • 20 grams Salted Butter
  • 40 grams Condensed Milk
  • Yellow Food Colouring

Purin Hat Covering
100 grams Dark Sweet Baking Chocolate (melted)


Details Decoration

  • 50 grams Dark Sweet Baking Chocolate (melted)
  • 80 grams White Baking Chocolate (melted)
  • Candy Colouring/ Colouring Powder (Yellow, Pink)


INSTRUCTIONS
Details Decoration

  1. Prepare the template, tape some greaseproof paper right on top, make sure it doesn’t budge.
  2. Melt some white and dark chocolate (using microwave or a double boiler). Colour them as needed (you can use candy or powder colouring). Pour each colour into a piping bag.
  3. Start create the details (according to the template): Dark chocolate for the nose, mouth and eyes (using toothpick to remove any air bubbles); yellow for ears; soft pink for cheeks and tongue.
  4. Allow them to chill and sets hard in the fridge.

Brownie Batter

  1. Preheat steamer.
  2. Prepare pans; 6-inch stainless steel bowl for the face and 4-inch round plate for the hat. Grease them (brush with butter and spinkle some flour) or use baking pan grease kindly find the recipe in this link https://www.youtube.com/watch?v=ilWe6…
  3. Melt butter and dark chocolate in a double boiler, set aside until slightly warm.
  4. In a large bowl, mix eggs, sugar and Vanilla Extract. Whip them until the mixture is pale yellow, thick and forms a ribbon. Sift in flour, cocoa powder and baking powder; mix well. Pour in butter chocolate mixture. Mix until well combined. Using spatula, gently folding the bottom over the top to make sure there’s no butter mixture left underneath.
  5. Pour about 4 tablespoons batter into the hat pan and half of the left over mixture into the bowl.
  6. Tap it and place them in the steamer that has been pre heated (don’t forget to cover the steamer lid with a kitchen towel so the water doesn’t drip into the brownie). Steam on a medium high heat for about 20 minutes.
  7. After 20 minutes, take both pans off the heat. Set aside the hat. And for the face, pour the 40 gr melted chocolate as a brownie filling, spread it evenly. And then pour another half part or the rest of the batter on top of the first batch. Put it back to a steamer and steam for another 35-40 minutes
  8. Take it off from the heat (it’s done when a skewer inserted in the center comes out clean). Remove it from the pan and let it cool completely on the cooling rack.

Buttercream
In a large bowl, mix shortening, salted butter and condensed milk. Whisk for about 5 minutes or until it’s really light and fluffy. Split the buttercream into 2 batches; colour 2/3 of the buttercream with yellow food colouring and the rest will remains bright white. Set aside.

Design Cake

  1. The Hat
    Cover the hat cake with 100 gr melted dark chocolate. Place them in the fridge so the chocolate will sets hard.
  2. The face
    Place the face cake onto 6-inch cake board. Cover entire surface with white buttercream (just a thin coat of buttercream to protect the cake from any crumbiness). Use elastic scraper to help the smoothing process.
  3. To cover the face cake with steamed buttercream; Fill a medium sized saucepan about a quarter full with boiling water, and then place a heatproof bowl with a yellow buttercream on top (make sure it isn’t touching the water).
    Stir continuously until the buttercream is liquidy. You’ll see some of the oil comes out and separate from the buttercream. Don’t worry, keep on stirring until the mixture incorporated. After reach the right consistency, pour it onto our crumb coated cake. Allow them to set up a bit before continue to decorate it
  4. Using medium star tip, pipe some white buttercream on top of the face cake, place the hat on it. Decorate the gap between hat and face with some more white buttercream.
  5. Stick and insert the ears on each sides of the face.
  6. Using small round tip pipe a tiny pearls around the bottom part of the face.
  7. Stick the details (nose, mouth, eyes and cheeks).


NOTES

  1. You can use candy melts for the details decoration.
  2. Store cake 1 day at room temperature, 3 days in the fridge.

Lovely Taiwanese Pineapple Cakes/ Tarts

Hi Everyone, today we are making these “Lovely Taiwanese Pineapple Cakes”.
It is a crumbly and nearly melt-in-the-mouth pastry with the pineapple jam as the filling inside.

The difference with the Singaporean/ Malaysian pineapple tart is they are typically larger and made in square or rectangle shape.

I personally prefer the Taiwanese version coz the pastries have a rich distinctively crumbly milky taste and filled with a generous portion of sweet sticky chewy pineapple filling inside.

Pineapple cakes filling from commercial manufactures usually made of winter melon and Maltose Syrup so that the filling is extra sweet, heavy and sticky, which is not healthy.

They usually substitute all or part of the pineapple with winter melon, a vegetable in the squash family that is much cheaper than pineapple.

Since winter melon has little flavour, artificial flavours and colours are added to the pastries to make them attractive to consumer, and then Maltose syrup has been added to stiffen the fillling.

For this reason, I would like to show you how to make the healthier style of Taiwanese Pineapple Cakes which is hold up pretty well, so adorable and taste much fresher.

A lot of research went into perfecting these treats. But the end result was wonderful.
The key is the exterior, that’s how it will remain even after it is baked so you want the dough to be as smooth as possible. 

Pineapple Cakes before baking

So I actually found two versions of the crust that I liked, and there’s no need to put them in the fridge at all.

The first one I called a “basic dough” for the character’s body. It’s buttery, soft, yet also malleable and sturdy enough to hold its form.
And the second dough that I called the “colouring dough”. It’s soft and easy to work with, even for small details and also colour well with any kind of edible food colouring.

Is there anybody that wouldn’t want to box these as a present ? They are so cute, tasty, photogenic, everthing you could ever want!

They taste amazing when served slightly warm and paired with a cup of hot tea.
The buttery crust is rich and crumbly, filled with fruity sweet sour, chewy and sticky pineapple filling, they are absolutely delicious.

I really hope you Guys give it a try, they are a lot of fun to put together and they are pretty simple too! Love you all!!

LOVELY TAIWANESE PINEAPPLE CAKES
Yield: 10 pieces
Active time: 1 hour
Total time: 2 1/2 hours

INGREDIENTS
Pineapple Filling

  • 500 grams Pineapple (Chopped)
  • 120 grams Granulated Sugar
  • 20 grams Unsalted Butter
  • 30 grams Glutinous Rice Flour

Basic Dough

  • 100 grams Salted Butter (Cold)
  • 12 grams Icing Sugar
  • 22 grams Egg Yolks
  • 152 grams All-Purpose Flour
  • 24 grams Milk Powder

Colouring Dough

  • 25 grams Salted Butter (Cold)
  • 7 grams Condensed Milk
  • 3 grams Egg Yolks
  • 38 grams All-Purpose Flour
  • Food Colouring (Red, Soft Pink, Black, White)

INSTRUCTIONS
Pineapple Filling

  1. Cut off the pineapple skin, took off the core and coarsely cut them into chunks (if you use canned pineapple, make sure to adjust the sugar level. They will take longer to cook coz the heavy water content in the canned pineapple).
  2. Transfer the chunks into a non-stick pan, add in the sugar (since the sweetness of each pineapple is different, feel free to adjust the amount of the sugar accordingly). Cook over medium high heat. Stirring constantly until most of the moisture has evaporated. Don’t forget to adjust the heat level based on the water content that was left in the pan.
    *I suggest using a non-stick pan as it is sticky after when it becomes concentrated.
  3. When the pineapple is about to dry, looks translucent and a bit brownish, lower the heat, add in the butter. Stir continously until the butter melted and incorporated in the pineapple (the butter makes the pineapple fillings smoother and easier to handle during wrapping).
  4. For the binder, sprinkle in some of the glutinous rice flour. Add it gradually, to make sure that the flour are distribute evenly. Mix until well combined.
  5. Take it off from the heat, spread the fillings thinly on a large plate to cool completely.


Basic Dough

  1. In a large bowl, cream the butter and icing sugar until light and smooth.
  2. Add in the egg yolks, mix well 
  3. Pour in All-Purpose Flour and milk powder, mix until all the ingredients just combined and create a dough ball (do not overmix to avoid the formation of gluten, which will make the pastry less flaky).
  4. Cover them with a plastic wrap to prevent the dough dry. Set aside


Colouring Dough

  1. Combine the butter, condensed milk and egg yolks, mix well.
  2. Pour in the all-purpose flour, mix until it’s form a smooth dough.
  3. Colour it as needed (remember to always cover the dough with a plastic wrap to keep their moisture).


Wrapping, Decorating and Baking

  1. Divide pineapple filling into portions of 20 grams each, and basic dough 25 grams each.
  2. Roll each portion of pineapple filling into a ball.
  3. Flatten a portion of basic dough (you can do this in your palm or with a small rolling pin).
  4. And then place a portion of filling into the centre of the flattened dough. 
  5. Gently wrap the dough around the filling, pinching away and setting aside excess dough at the top and where the edges meet. 
  6. Gently roll the filled dough between your palms to form a smooth oval ball. 
  7. Using some basic dough and white colouring dough for the ears.
    Apply some white colouring dough for the face.
    Black dough for the nose, mouth and eyes.
    Soft pink for the cheeks and tounge.
    Using love shape plunger cutter to create the heart shape.
    And finally, use some basic dough to create her hands and legs.
    *Make sure the details sticks really well otherwise it will tilted or fall down while baking.
  8. Bake in the preheat 160°C oven for 20 minutes.
    Remove from the oven, allow  to cool slightly on the pan for about 20-25 minutes, and then transfer them onto a cooling rack to cool completely.


NOTES

  1. The dough will expand a bit when baked in the oven.
  2. You can use any food colouring for the “Colouring Dough” (powder, gel, liquid).
  3. Store the cakes at room temperature in an airtight container, the crust will have become more tender.
  4. Pineapple cakes turning mouldy even when stored in an airtight containers is due to the presence of too much moisture.
    Store pineapple cakes which are cooled to room temperature in an airtight container away from the sunlight for 3-4 days.
    Keep them refrigerated for up to 1 months.


Puffy Bear Ichigo Daifuku (Strawberry Mochi)

Hi Guys, I miss you Guys so much. Hope you and your family are healthy and safe during these uncertain and unprecedented times.

Today we are making these Puffy Bear Ichigo Daifuku or commonly known as Strawberry Mochi.

Daifuku is a popular traditional Japanese sweet and there are many varieties of Daifuku. They usually come with the same soft and chewy mochi exterior with different stuffing.  

During the springtime, Japanese confectionery shops sell a seasonal Strawberry Mochi called Ichigo Daifuku with a whole strawberry as the filling. 
The combination of fresh juicy strawberry, sweet bean paste and soft chewy mochi is a match in heaven.

They are smooth and springy, a nostalgic reminder of my childhood and all the happy memories in Japan.

Instead of sweet bean paste as a filling, I’m gonna show you how to make my homemade chocolate paste, which is very delicious and match perfectly with these lovely strawberry mochi.

The chocolate paste has supper deep rich chocolaty flavor, it’s really easy to make and tastes great on everything specially for bread filling.

Making daifuku is very much like a craft. The process can be fun and Soothing.
When working with mochi dough, make sure that you do not stretch it too thin to prevent tearing.

Sweet Treat Showcases

Pick fresh strawberries and also choose medium small round ones, because they are easy to handle and look cute when wrapped with bean paste and mochi.

You can use any type of strawberries which is available in your country. I personally fall in love with Korean Strawberry, because wherever I eat strawberry; the taste is never be so great like this, it’s light yet smooth juicy texture gives an excellent balance with unique berry fragrance and sweetness.

Japanese sweets “Daifuku” are best served with green tea, matcha green tea, or you could try matcha latte and hojicha as well.
I hope you enjoy making Strawberry Mochi. Take care and stay safe everyone! Love you all!!

PUFFY BEAR ICHIGO DAIFUKU (STRAWBERRY MOCHI)
Yield: 6 pieces
Active time: 1 hours
Total time: 3 hours

INGREDIENTS
Chocolate Paste:

  • 60 grams Granulated Sugar
  • 1 1/2 tablespoons Milk Powder
  • 20 grams Unsalted Butter
  • 25 grams Cocoa Powder
  • 75 grams Eggs
  • 1 teaspoon Vanilla Extract (optional)

Mochi Dough:

  • 100 grams Glutinous Rice Flour
  • 10 grams Tapioca Starch
  • 20 grams Corn Starch
  • 200 grams Milk
  • 80 grams Granulated Sugar
  • 5 grams Vegetable Oil
  • A pinch of Salt
  • Food Colouring (Brown and Red)

Assembly:

  • 6 Pieces Medium Strawberry
  • Potato or Corn Starch
  • Melted White Chocolate or White Food Colouring


INSTRUCTIONS
Strawberry Chocolate Filling

  1. In a small saucepan, combine sugar, milk powder, unsalted butter, cocoa powder, eggs, and vanilla extract. Mix it all through until no lumps remain.
  2. Cook over medium low heat, stirring constantly until the mixture thickens and it’s forms a smooth paste. 
  3. Take it off from the heat, pour it into a bowl, cover it with plastic wrap and store it in the fridge for about 1 hour.
  4. After 1 hour, divide the chocolate paste into 25 grams balls. Flatten the chocolate paste and place a strawberry on the center.
    Wrap the strawberry with the chocolate paste and shape it back into an oval shape, cover each strawberry chocolate with a cling wrap (like a piece of candy).
    Store them in a fridge to set for 1 hour.


Mochi Dough

  1. In a microwave proof bowl, combine the glutinous rice flour, tapioca starch, corn starch, along with milk and sugar. Mix that all through.
    Add in the vegetable oil, mix well until well combined and completely smooth.
  2. Cover the bowl loosely with cling wrap and microwave it on 1000 Watt for 1 minute. After one minute, removed the bowl from the microwave and stir (you can see the mixture will be still runny and floury). 
  3. Once you’ve stirred well, put the bowl back into microwave for another 1 minute. Take the bowl out of the microwave and stir again (by now, it should look partly floury and partly should be starting to resemble mochi texture).
  4. Cover again and microwave it for the last time, for about 45 seconds to 1 minute. The colour of the mochi should change from white to almost translucent.
    Stir well with a spatula (temperatures may vary, if centers still runny and undercooking, add cooking time for a few second). If the mochi has a translucent texture, that’s means it’s done.
  5. Mochi pounding; cover the work surface with large cling wrap and brush some vegetable oil to prevent stickiness, apply some oil to all areas that will contact with the hot dough and then transfer the hot cooked mochi on top, cover it with plastic wrap.
    Gently use tapping and rolling method with a rolling pin to even out the thickness, fold it into thirds (it’s very similar to folding on a letter that goes in an envelope or laminated dough process in making pastry).
    Repeat the tapping rolling and folding action for about 9 more times to create a smooth dough.
    To finish the process, I just wrap the dough, roll into a log, and then transfer it into the fridge (2 hours) or freezer (45 minutes). 


Assembly and Decoration

  1. Prepare some potato or corn starch for coating purpose (if you are worried about eating raw starch, you can heat the starch in the pan for about 5 minutes). 
  2. Cover the work surface with large cling wrap and brush some vegetable oil to the surface and scraper to prevent stickiness. Don’t forget to also put some oil and starch on your hands to prevent the dough from sticking.
  3. Divide mochi dough into 60 grams each, round it into a ball. Using rolling pin and place a piece of cling wrap on top of the dough, gently flatten and roll it into 3-inch diameter disc, make sure that the middle is slightly thicker that the edge of the dough (please note that the smooth surface underneath will be the outer skin of the head). 
  4. Place one portion of the strawberry chocolate paste filling at the center of the mochi disc, start covering the strawberry from all sides and use your thumb to hold the mochi on top, gather the mochi and pinch together to complete seal the filling.
    Gently shape the mochi as oval as possible, and then cut off the excess mochi dough underneath. Repeat this process for the rest of Daifuku.
    *You can dust off the excess potato or corn starch with a pastry brush, or if you find some sticky part, cover the area with starch first and then dust off.
  5. For decorations and details; colour some dough with dark brown, soft pink and deep pink.
    – Roll some white and soft pink dough for the ears, 2 pieces each and stick it together, cut the edge of the ears, brush some water and stick it to the head.
    – For the cheek, cut some soft pink dough with small round cutter.
    – For the nose, cut some deep pink dough with my tiny small heart cutter.
    – Using dark brown dough to create the eyes and mouth expression.
    – Add the spark of the eyes and teeth with some melted white chocolate or white food colouring. 


NOTES

  1. Steaming Method: If you’re using a steamer, cover the steamer lid with a towel so the condensation won’t drop into the mochi mixture. Put the bowl into a steamer basket and cover to cook for 20-30 minutes. Half way cooking, stir with spatula and cover to finish cooking. The color of mochi should change from white to almost translucent.
  2. The daifuku keep well for a day or two in the refrigerator.