Mocha Mousse Cake

Not only this cake is so tasty, but it also has two of my favourite things that I need every day; coffee and dark chocolate. This one is for all the chocolate and coffee lovers.
This is definitely not a quick recipe as it has a few different elements However, it is also not highly technical or complicated (this cake requires a little patience 😉).

One important tip when making it, make sure that you bake the Chocolate Sponge Cake in advanced so it has time to cool because Mousse is very susceptible to heat.
Don’t rush the chilling times. If anything is too warm when assembled, it will melt and you won’t get that light and fluffy mousse texture.

Chocolate cake is incomplete without decoration, don’t you agree? 😉

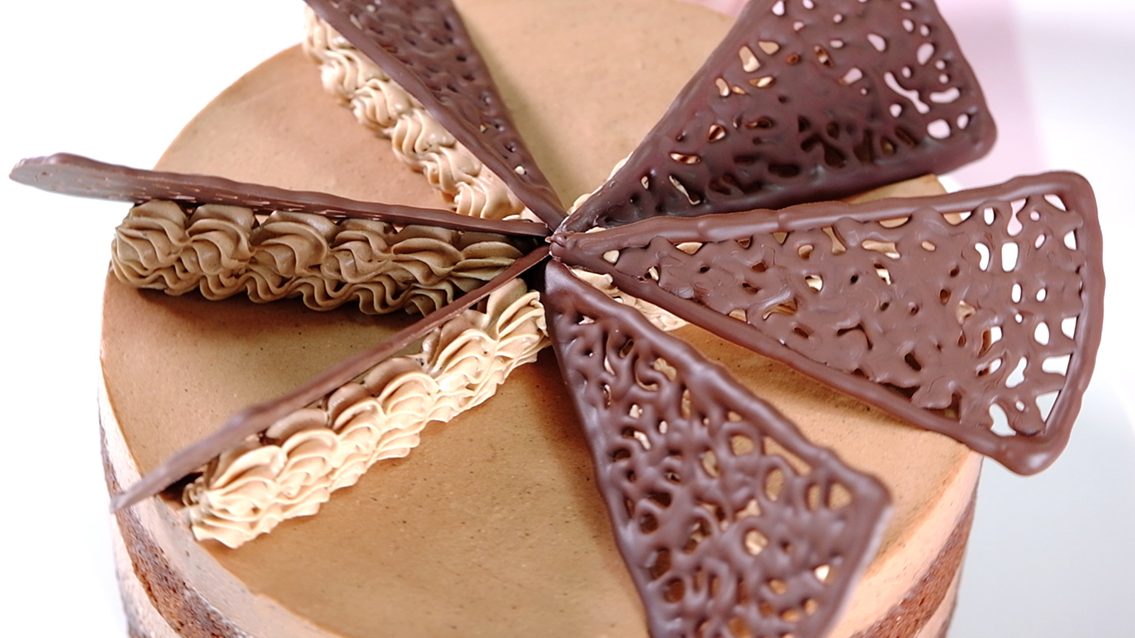
And if you like to decorate the cake, I will show you the simplest way to make an attractive chocolate decorations.
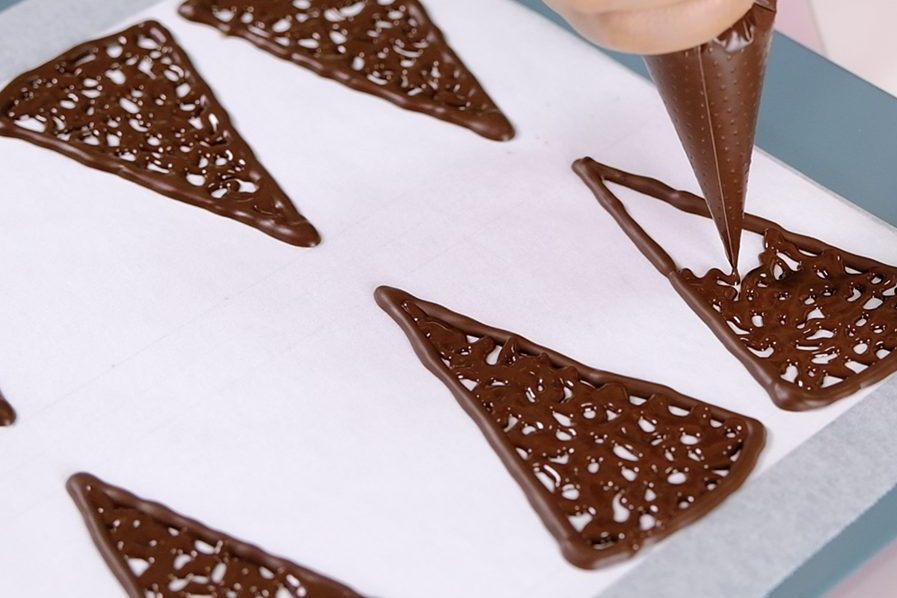
This chocolate decorations is best frozen at 17 to 21 degrees Celsius.
Once it’s done, let it harden at room temperature for best results. It will take longer, but this way the chocolate can maintain its shape and shine.
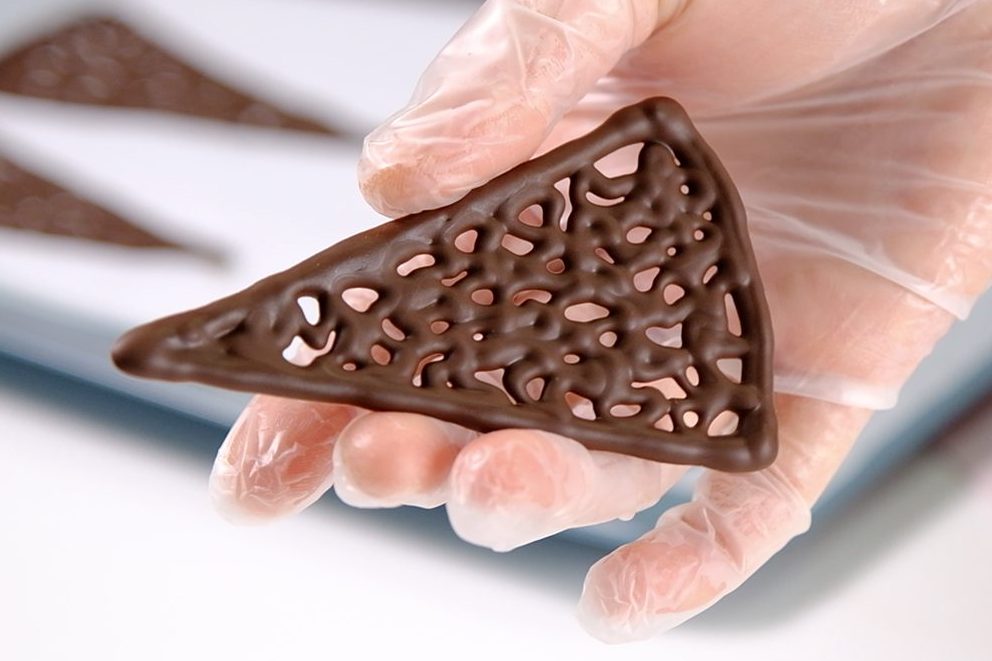
So pretty!! 🥰

If the room temperature is too warm, the only way is to put it in the fridge, however the chocolate will sweat and lose its shine.

This cake is delicious and creamy … 😍

Chocolate and coffee have always made such a great pair and it is heavenly

🤤

This rich chocolate cake is light, fluffy, and decadent…

The mocha mousse is creamy and airy, brings some softness to this cake.

I hope you can share this beautiful cake with someone you love 😘

WATCH HOW TO MAKE “MOCHA MOUSSE CAKE”

RECIPE

MOCHA MOUSSE CAKE
Yield: One 16 cm Diameter (7,5 cm tall) Cake

INGREDIENTS
🍫 Cake
7-Inch Fluffy Moist Chocolate Sponge Cake 

🍫 Sugar Syrup
25 g Caster Sugar
25 g Coffee Liquid
1 tsp Dark Rum 


🍫 Mocha Mousse
30 g Coffee Liquid (cold)
5 g Gelatine Powder
70 g Dark Chocolate 60% (chopped)
100 g Coffee Liquid
40 g Milk
200 g Heavy Whipping Cream
1 tsp Finely Ground Coffee 


🍫 Decorations
150 g Dark Chocolate Compound
Chocolate Buttercream

INSTRUCTIONS
Cake

  1. Bake the Chocolate Sponge Cake in advance so that it has time to cool as Mousse is very susceptible to heat.
  2. Once the sponge is baked, transfer it to a cooling rack and leave to cool completely.
  3. Wrap the cooled sponge cake in a cling film and Ziplog Bag then let it rest overnight in the fridge.
    This will ensure that all the moisture is sealed and the sponge is perfect firm texture for trimming and layering.

    NOTES: If you are in a hurry or have to make the cake on same day, let the cake cool for at least 30 minutes before wrapping and place in the fridge to chill.
    Don’t rush the chilling times.
    If anything is too warm when assembled, it will melt and you won’t get that light and fluffy mousse texture.


Sugar Syrup & Mocha Mousse

  1. Start by brewing your favourite coffee
    1 tablespoon of ground coffee with 155 grams hot water (we will need 155 grams of coffee liquid)
    Let it cool completely.
    * If you want a stronger coffee taste, you can use 2 tablespoons of ground coffee
  2. Finely chop the Dark Chocolate
    Place the chopped dark chocolate in a medium sized heatproof bowl (I recommend using 60% dark chocolate for a divine taste or you can use Dark Chocolate Compound)
  3. Once the coffee liquid has cooled, divide it into 3 portions
    – First for the Sugar Syrup
    Mix 25 grams Coffee Liquid with Caster Sugar; stir until all the sugar dissolved
    Add Dark Rum for extra kick (if you don’t want alcohol in your cake, you can just omit it)
    – Second to bloom the Gelatine
    Mix 30 grams of Coffee Liquid with Gelatine, set aside
    – Third
    Place the remaining 100 grams of Coffee Liquid with milk in a medium sauce pan
    Cook over medium heat;
    Once it starts to bubble, pour this mixture over the chopped Chocolate;
    Stir until the chocolate has fully melted into the liquid;
    Immediately add the bloomed Gelatine and mix again until everything is dissolved;
    Then let it cool completely (please note, this mixture needs to be fully cooled but not stiff
    before you fold into the Whipped Cream; It will take for about 30 minutes to 1 hour)
  4. In the meantime, we can prepare the cake layers and moulds to assemble them

    Cake Layers
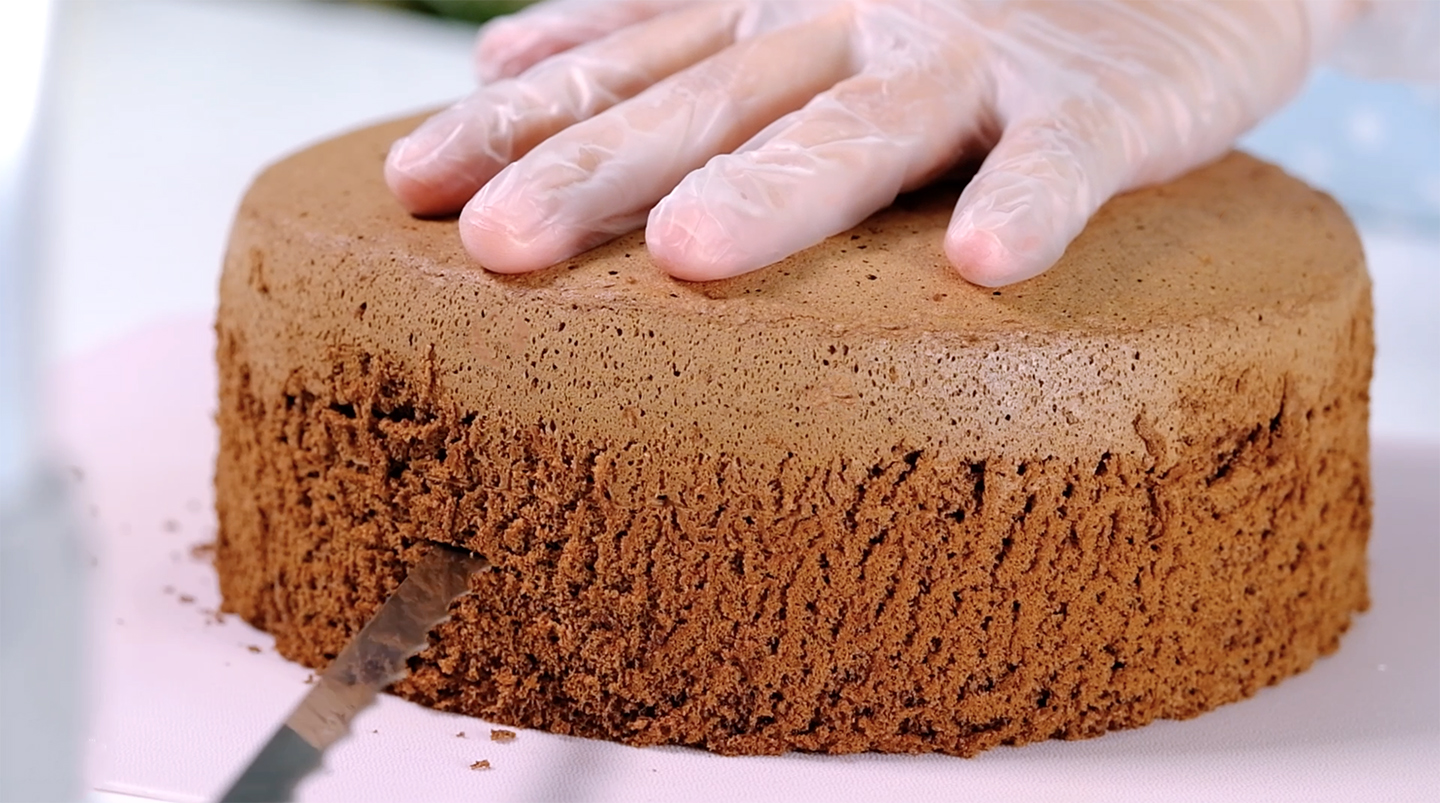
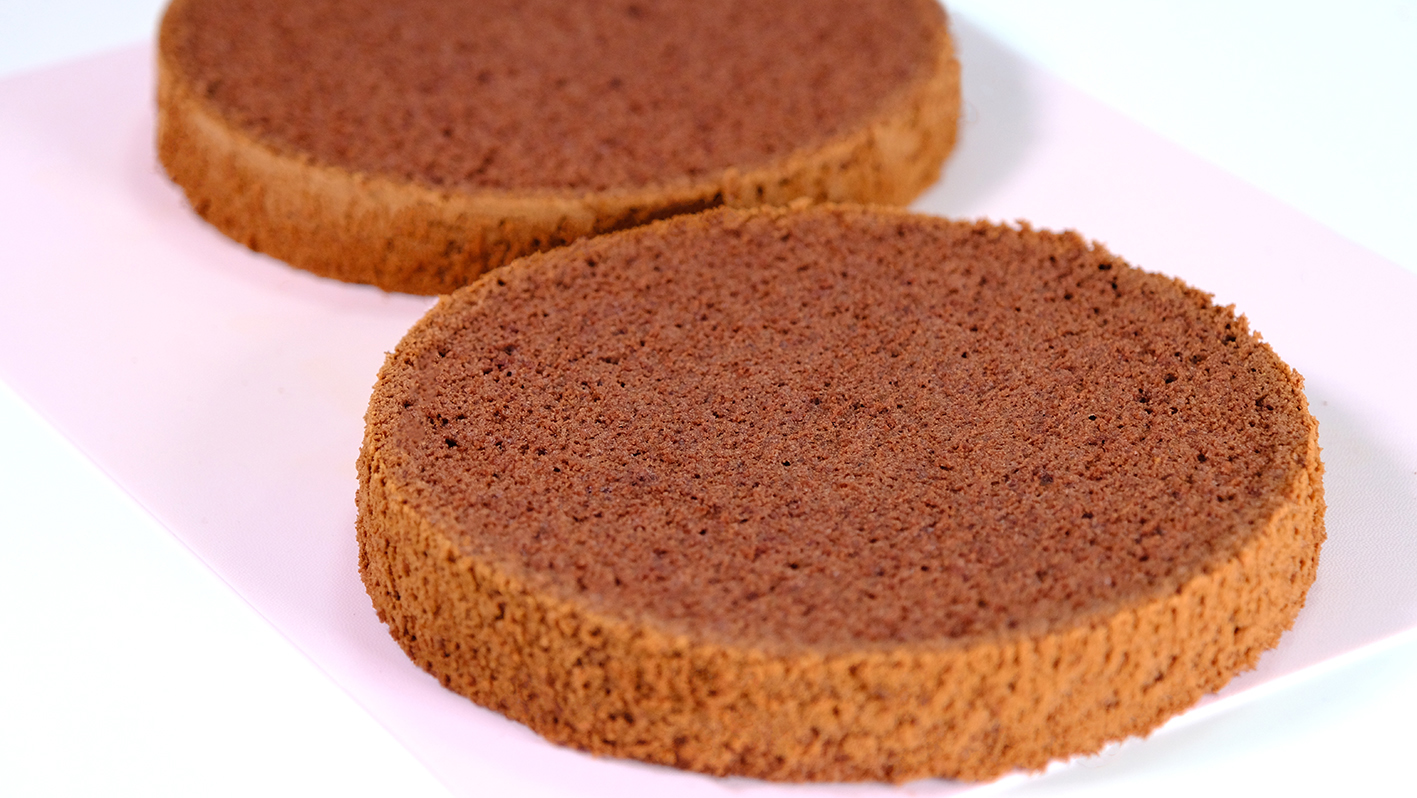
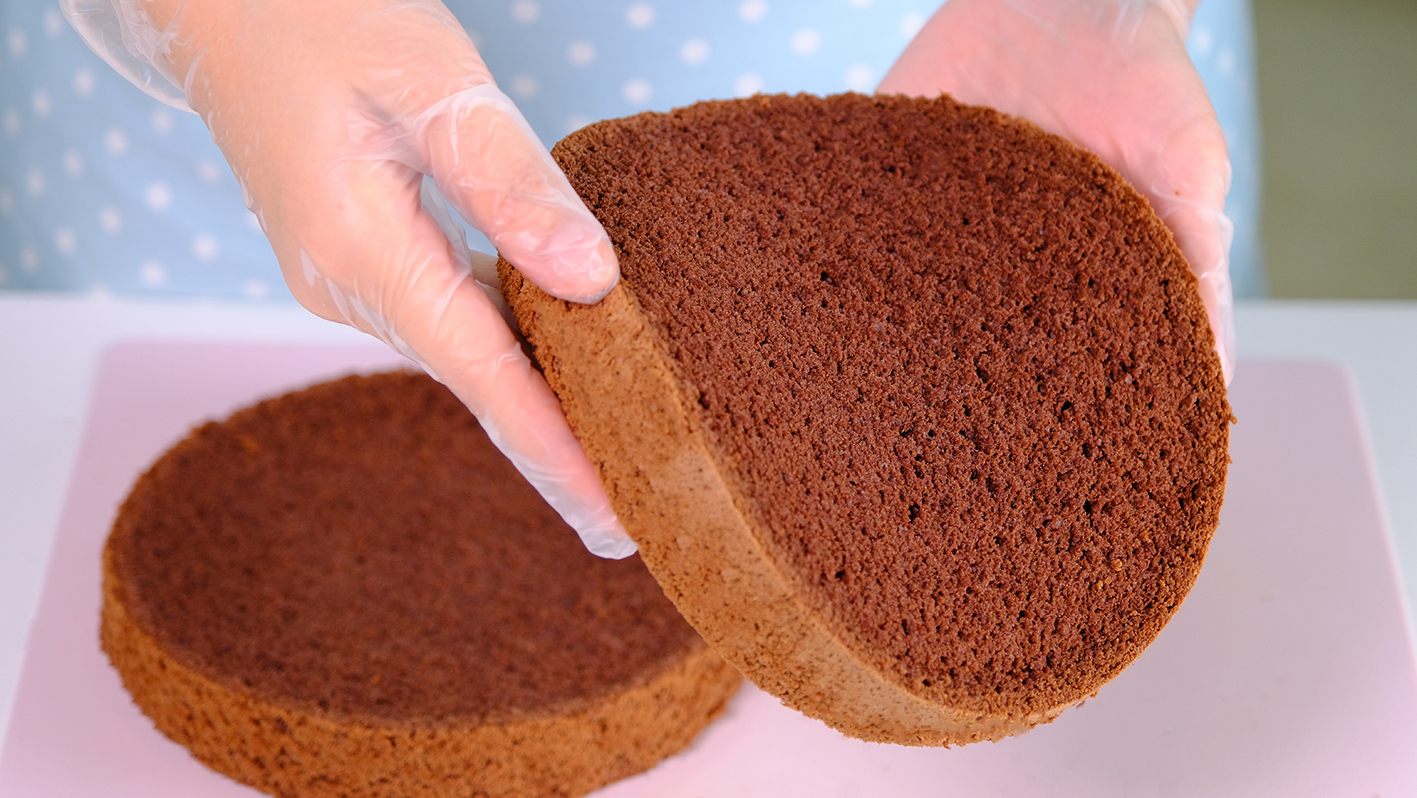
    Cut the chilled Chocolate Sponge Cake into two equal layers, about 1-inch thick (you can use the top of the cake for other purposes)
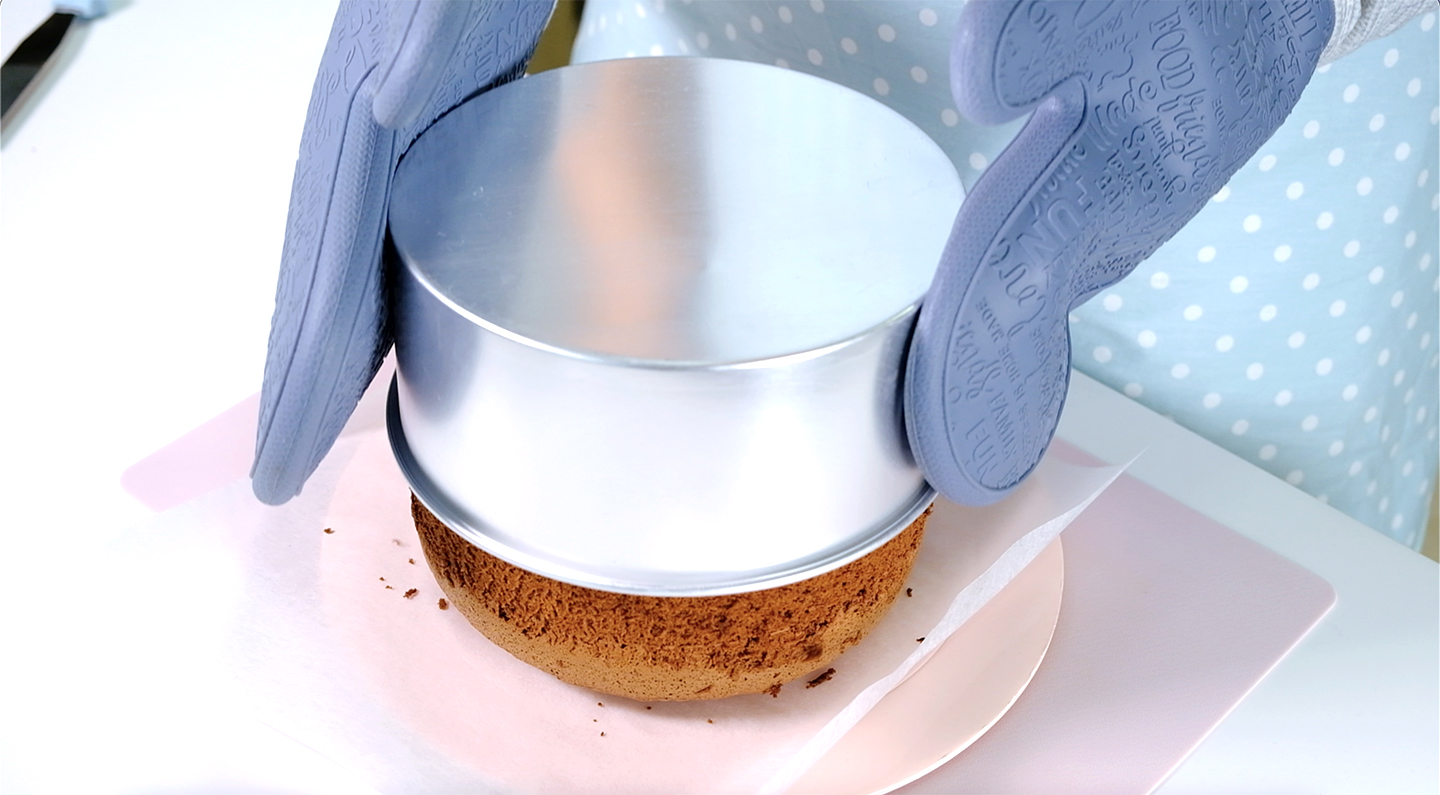
    Place the ring mould on top of the cake;
    Using the outside edge of the ring mould as a guide, trim the sides of the cake (use a sharp knife)
    * This trimming method ensures there are no gaps between the cake and the ring so the mousse doesn’t leak over the sides
    Once it’s done, wrap cake layers in a cling wrap to prevent from drying out

Mould for assembly
Cover one side of the ring mould with a cling wrap (the side with the cling wrap is the bottom of
the cake). Place this ring on a sturdy cake board.
Then place a sheet of Reusable Non-Stick Baking Paper on the bottom for easy removal.
* Remember to prepare this first; Don’t let by the time the mousse starts to sets, the ring isn’t
ready yet; That would be a disaster!

5. Once the coffee-chocolate mixture cooled to room temperature, we can start beating the
Whipped Cream. On medium-high speed, whip the cream until stiff peaks form.
* I highly suggest to whip the cream over an ice bath, this will helps stabilized the cream longer;
Especially when the weather is hot and you’re whipping by hand

6. Using a wide rubber spatula, gently fold the cooled coffee-chocolate liquid into the Whipped
Cream in two additions
* Don’t stir the mixture or you will deflate the cream and make a dense filling

7. Add finely ground Coffee, mix well; Then immediately remove the bowl, don’t let the mousse sit
too long and harden in the ice bath; then we are ready to assembly the cake


ASSEMBLY THE CAKE

  1. Place the first cake layer to the lined plate ring mould
  2. Brush with some Coffee Sugar Syrup (this will keep the cake moist and add extra flavour to the cake)
  3. Pour half of the Mocha Cream over the first layer (use the back of the spoon to smooth out and bring it all the way to the edges)
  4. Place the second layer of cake over it (press down on the top layer of cake so that it lies level and firmly on the mousse)
  5. Repeat the same process for remaining syrup and mousse
  6. Once it’s done, place the cake back in the fridge for at least 8 hours or preferably overnight


MAKING CHOCOLATE DECORATIONS
(kindly watch the video for completed instructions)

  1. Place a piece of non-stick baking paper on top of the template, secure them with some tape
    Feel free to use any design according to your taste
  2. Place the bowl of chopped dark chocolate over a pan of hot water, make sure that the bowl doesn’t touch the water
  3. Stir the chocolate until it’s completely melted without any lumps (don’t let the water drip on the chocolate, it will cause it to seize, becoming stiff and grainy instead of smooth and silky)
  4. Pour the melted chocolate into a piping bag
    Trace the shapes according to the template
    When tracing it, make sure the outer frame is thicker so they don’t break when lifted
  5. Chocolate is best frozen at 17 to 21 degrees Celsius
    Once it’s done, let it harden at room temperature for best results. It will take longer, but this way the chocolate can maintain its shape and shine
    * If the room temperature is too warm, the only way is to put it in the fridge, however the chocolate will sweat and lose its shine


UMOULD AND FINISHING
(kindly watch the video for completed instructions)

  1. After 8 hours in the fridge, the mousse has hardened
    To unmould, place the ring mould on an inverted 6-inch round baking pan
  2. Peel away the cling film
  3. Then using hot towel, wrap around the outside of the ring for a few seconds to loosen it
    Gently push the ring down
  4. Then carefully transfer the cake to a display plate
  5. Beautify with some buttercream and chocolate decorations

NOTES

  1. Always store the cake in the fridge
  2. This cake can be made a day or two in advance, but I recommend eating it within 4 or 5 days

Fluffy Moist Chocolate Sponge Cake

Craving chocolate cake, who doesn’t?
This fluffy, moist chocolate cake with a deep chocolate flavour is perfect for chocolate lovers.
I recently uploaded my “Fluffy Moist Vanilla Sponge Cake” and it was so loved by all of you that I thought you would love a chocolate version as well! 

🙃 So soft… and chocolatey 🤤

This chocolate cake is so spongy and quite flexible.
It’s an incredibly soft and light cake which can be used with any frosting and filling, a perfect base for any celebration cakes you want to make.

I usually use this basic chocolate cake to build my Black Forest or Chocolate Fudge Cake 😋.

When you make this cake, please note that it is important to use fresh eggs that are room temperature.
Egg whites are most effective when beaten at room temperature to stiff peaks. When eggs are cold, they will be difficult to expand.

Always remember DO NOT grease or use a non-stick pan. Essentially your sponge cake batter is using the sides of the pan to help it climb up so it doesn’t collapse.

Make sure all utensils clean and grease free, any residue of fat will prevent egg whites from beating up properly.

😱

Once it’s baked, remove the cake immediately from the pan so that the moisture can escape and not damage the structure of the cake.
Scrape the sides of the pan, turn it over and let it cool completely on a cooling rack.

Sponge cake is a type of cake that dries easily. Once it’s cool, this cake can be use immediately to build your cake of choice or wrap it tightly in a cling wrap and freeze until ready to use it

To keep it moist, I brush it with simple syrup before using it as a cake base.
This cake is not too sweet, light and stays moist even if stored in the fridge for several days.

While this cake might look simple, it’s the small steps and details that can trip you up; so please follow the steps for the perfect cake!
Kindly watch my video on how to make it 😉
🍰 Love you All !

Watch How To Make “Fluffy Moist CHOCOLATE Sponge Cake”

Tips for Success (Please Read First):

  • Line the bottom of the pan with parchment paper (don’t grease of use a non-stick pan)
  • Make sure all utensils clean and grease free (wipe the bowl and utensil with lemon juice or vinegar to helps remove grease)
  • Preheat your oven before you start
  • Use fresh eggs that are room temperature (other ingredients also must be at room temperature)
  • Beat egg whites until stiff peak
  • Sift the dry ingredients
  • Mix each batches of the dry ingredients evenly until there are no lumps
  • Make sure the wet ingredients are combined well with the batter
  • Make sure the batter is stirred well (pay attention to the flow and consistency)
  • Don’t let the batter sit too long before baking, bake it immediately
  • Resist the urge to open the oven door while baking
  • Once it’s baked, remove the cake immediately from the pan
  • Let the cake cool completely on a cooling rack before wrapping
  • Wrap the cooled cake tightly in a cling wrap so it doesn’t dry up

Recipe

CHOCOLATE SPONGE CAKE
Yield: One 7-Inch (8 or 9 cm tall) Round Pan
* You can use 6-Inch (10 cm tall) Round Pan for taller cake

❄️ Ingredients
5 Egg Whites (165-175 g) ~ room temperature
1 tsp Lemon Juice
200 g Caster Sugar
5 Egg Yolks (85-95 g) ~ room temperature
120 g Cake Flour
19 g Cocoa Powder
1/4 teaspoon Baking Soda
40 g Milk ~ room temperature
25 g Vegetable Oil
1/2 tsp Vanilla Extract
Notes: you can substitute Lemon Juice with 1 tsp White Vinegar or 1/2 tsp of Cream of Tartar

❄️ Instructions
Preparation

  1. Place a piece of parchment paper on the bottom of the pan (don’t grease or use a non-stick pan)
  2. Make sure all utensils clean and grease free (wipe the bowl and utensil with lemon juice or vinegar to helps remove grease).
  3. Take the eggs out of the fridge, separate egg whites and egg yolks; then let them come to room temperature.
  4. Preheat the oven 150°C fan/ 170°C/ gas mark 3.
  5. Combine the dry ingredients (Cake Flour, Cocoa Powder and Baking Soda)
  6. Mix the wet ingredients (Milk, Oil and Vanilla Extract)


To make Vanilla Sponge Cake

  1. Beat the Egg Whites over high speed for about 30 seconds until foamy.
  2. Add Lemon Juice (or white Vinegar or Cream of Tartar) and continue beating for another 30 seconds.
    * Acid in Lemon Juice/ Vinegar/ Cream of Tartar will help stabilizing the egg whites
  3. Add sugar in 3 batches every 1 minutes.
  4. Once all the sugar is added, continue beating on high speed until stiff peak for about 3 minutes (the mixture will gradually thicken and look shiny).
  5. Pour in the Egg Yolks; Using a hand whisk, stir gently until evenly mixed.
  6. Add sifted dry ingredients in 3 batches (don’t skip this process; by sifting the flour, it will break up any lumps, create a light, delicate, and fluffy results).
    Stir gently; Make sure that you scrape the entire surface of the bowl so that there is no flour residue on the sides and bottom of the bowl (mix each batches evenly until there are no lumps).
  7. Then take about 2 cup of this egg-flour mixture into the wet ingredients; mix really well.
    * By using this pre-mix method, the milk-oil mixture will incorporated easily with the egg mixture.
    It prevents the oil and milk from falling directly to the bottom of the bowl, which would cause the cake didn’t rise properly
  8. Pour the pre-mix mixture back to the egg-flour mixture; using a hand whisk stir gently.
    Then using spatula, scrape all the bottom and sides of the bowl, make sure it is evenly mixed.
    How much you mix is very important
    When you drop the mixture and it doesn’t flow; that’s means you haven’t mix enough and the batter won’t rise properly.
    Drop it with a spatula and check, pay attention to the flow and thickness; When it flows smoothly, that’s means it’s ready.
  9. Slowly pour the batter from a position of about 15 cm from the pan so that the excess bubbles can burst.
  10. Using a skewer make this circular motion to flatten the batter and break the large bubbles.
  11. Tap the pan to remove excess bubbles.
  12. Then immediately bake in the preheated 150°C fan/ 170°C/ gas mark 3 oven on the bottom rack for 55 minutes.
    After 55 minutes, increase the temperature to 170°C fan/ 190°C/ gas mark 5 and continue bake for another 10 minutes.
    * Resist the urge to peek until your cake is done; Opening the oven door while you bake will release some of the heat, this can lead to the cake being too damp in the middle or even falling
  13. Once it’s done, remove the cake immediately from the pan (so that the moisture can escape and not damage the structure of the cake).
    Using spatula, scrape the sides of the pan; turn it over and let it cool completely on a cooling rack.
  14. Once it’s cool, this cake can be use immediately to build your cake of choice or wrap it tightly in a cling wrap and freeze until ready to use it.

Notes

  1. Cool the cake completely before wrapping (wrap in a cling wrap then put in a ziplog bag) for freezer storage up to 1 months or use immediately.
  2. Cake without filling can be store in the fridge for up to a week (the filling and icing will determinte storage time).

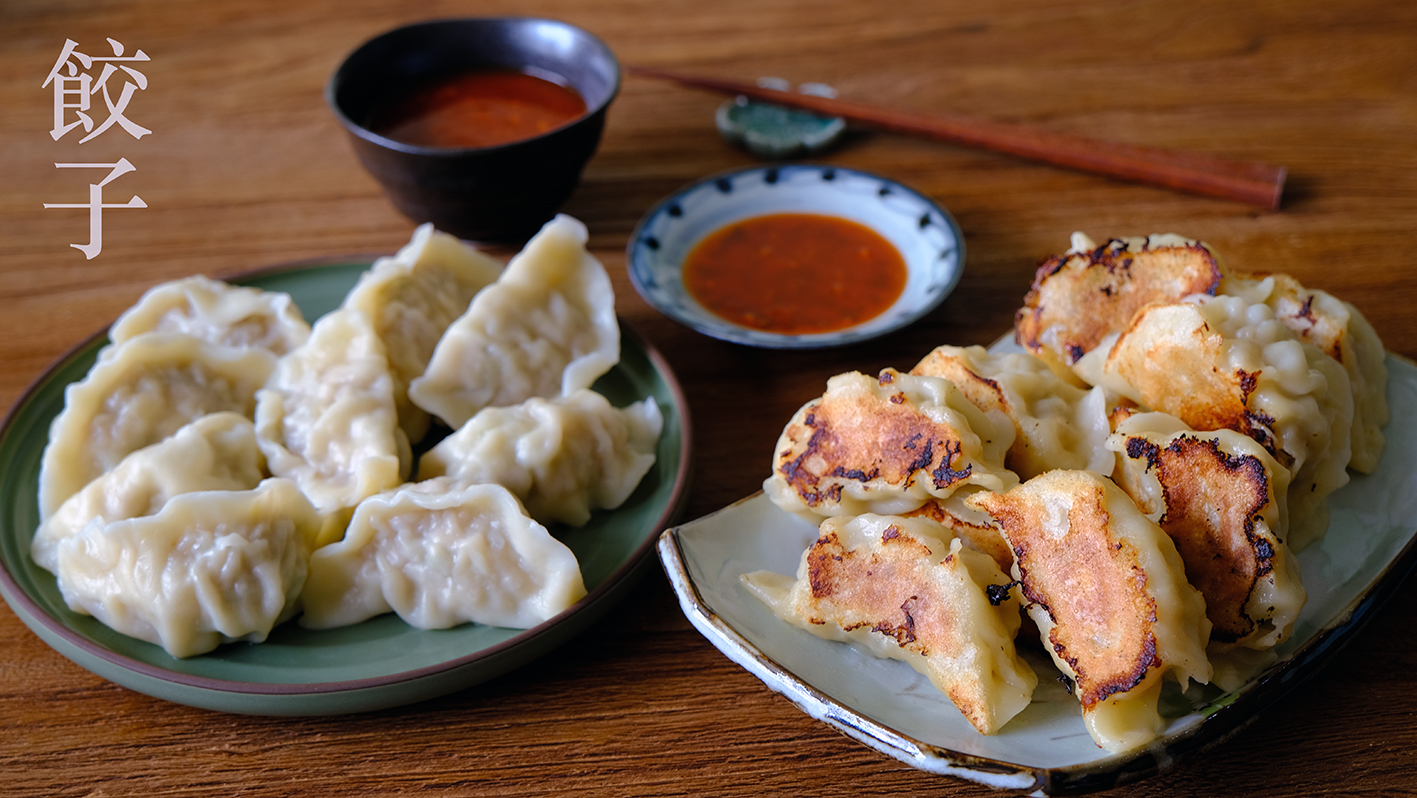
Traditional Chinese Dumpling 饺子 (Gyoza) from Scratch

“We’ve eaten a lot of dumplings in restaurant but somehow, we always come back to these recipe“

These are little pockets of light, joy and deliciousness; My little nephew can literally devour them by the plateful. 🥲😄 Maybe… this is the dumpling recipe that you need.“

The original Chinese dumplings are called Jiaozi (饺子) (also known as Gyoza in Japanese Language).

These dumplings consist of ground meat and vegetable filling that are wrapped into a thinly rolled piece of dough, which is then sealed by pressing the edges together.

I remember sitting in my Mom’s kitchen, learning to fold these.
My fingers clumsily stumbling over everything, getting the wrappers way too wet, putting in too much filling 🤣
And after a couple times trial and error, I manage to learn it and never imagined that I could sold them quite well  😂

Chinese dumplings (Jiaozi) may be divided into various types depending on how they are cooked.

  • Boiled or Water dumplings called 水饺 (shuǐjiǎo)
  • Steamed dumplings called 蒸饺 (zhēngjiǎo)

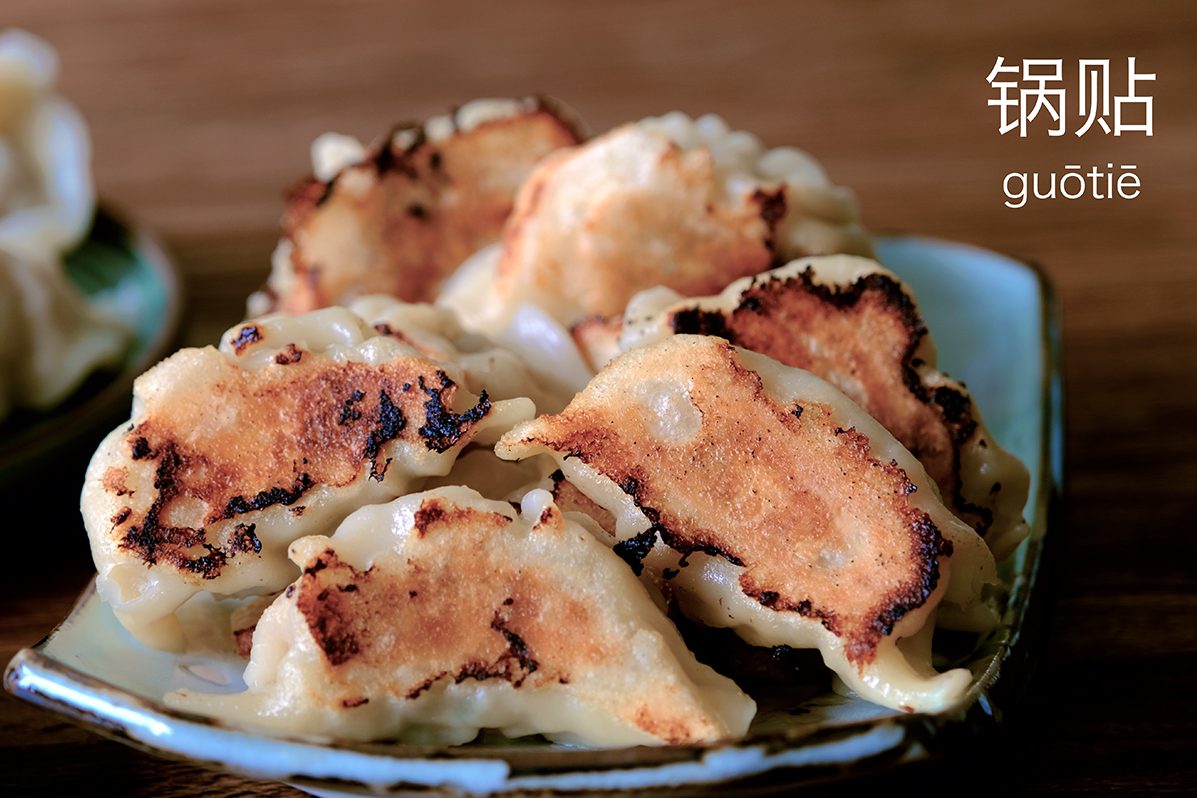
  • Pan-fried or Pan-Stick dumplings called 煎饺 (jiānjiǎo) or 锅贴 (guōtiē); also referred to as “Pot-Stickers”
  • Deep-fried dumplings called 炸饺 (zhà jiǎo)
  • Soup dumplings called 汤饺 (tāngjiǎo)

So what is the japanese version like?

The method of cooking Gyoza actually almost similar to Pan-Fried Method.
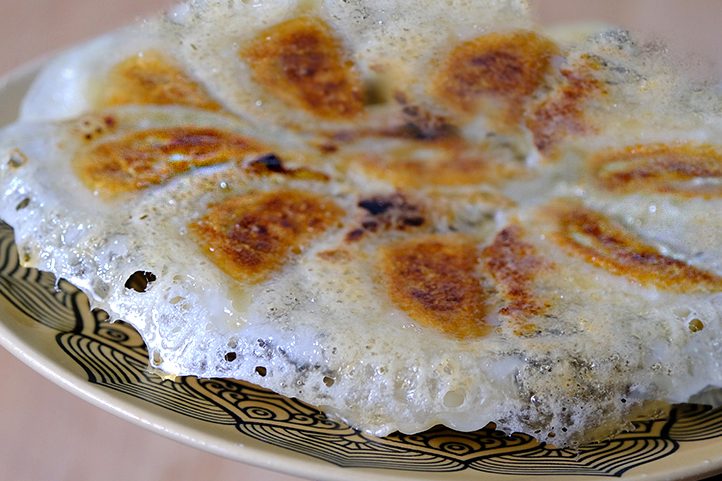
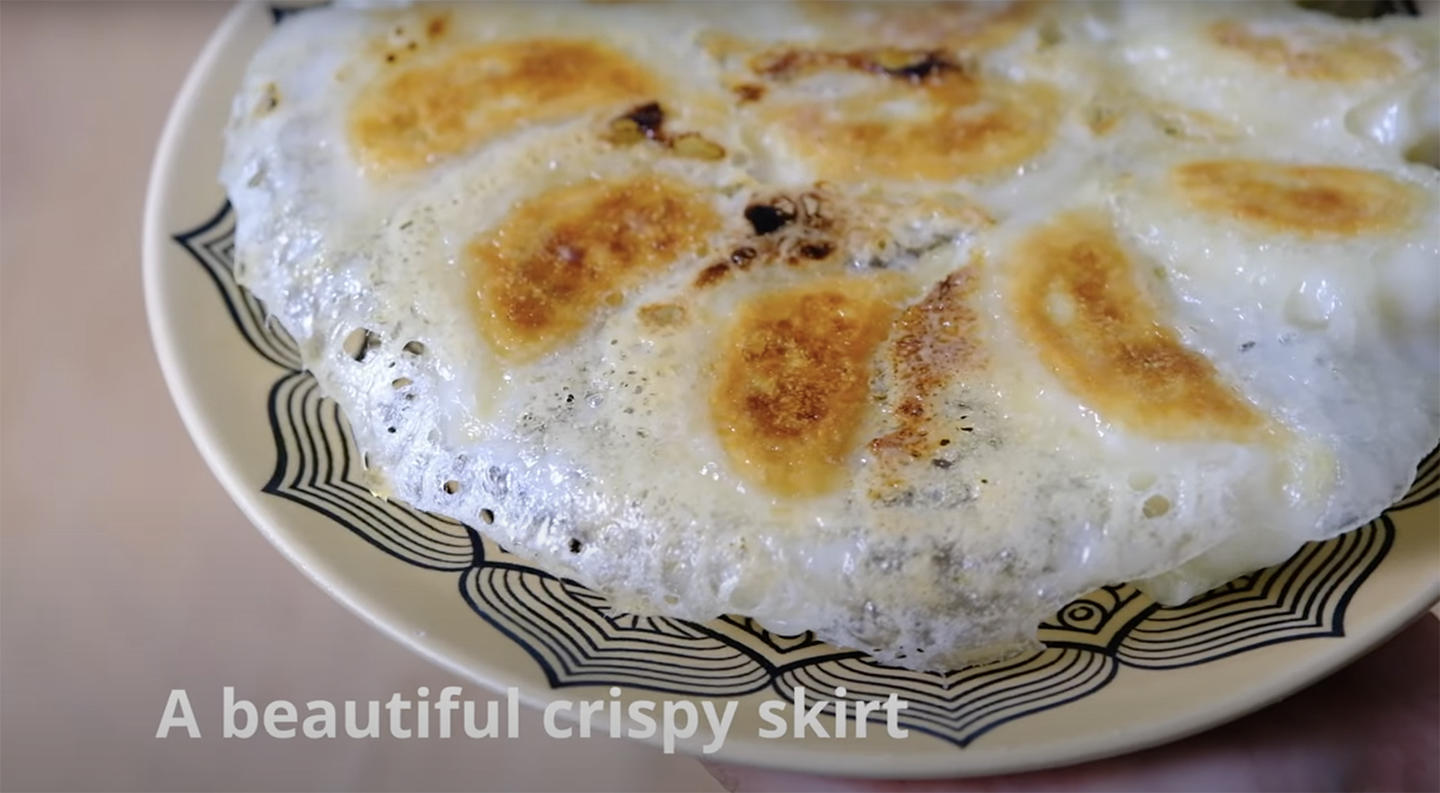
The difference is that Gyoza has a “golden skirt” surrounding the fried dumplings, gluing all the dumplings together.

Gyoza with “skirt”

They are first fried in a hot pan until crispy brown on the bottom sides, then starch mixture is added before the pan is covered to quickly steam the entire dumplings.

The skirt of Gyoza itself is made with flour or starch mixed with water

This technique gives Gyoza the best mix of textures, where you get crispy bottoms and tender soft tops that encase the juicy filling inside

This recipe produce 65-70 pieces.
I will guide you step by step on how to make it and also show you 3 methods for cooking the dumplings; Pan Fried, Boiled and Gyoza style.
Different method will produce slightly different texture but all of them are appetizing.


Dumplings are so handy to have, I really encourage you to make a big batch if time permits. 
I hope this recipe provides all the information you need for a successful outcome (CLICK this link and  follow instructions in the video for more details)
🥟 Love you All

Let’s Talk about Dumpling Fillings

  • Pork –While the original Chinese dumplings use ground beef, pork, lamb, chicken, fish, and shrimp for fillings; classic Gyoza usually consists of ground pork.
    I prefer mixing pork and shrimp to develop and add a deeper umami flavour to the overall filling.
  • Cabbage –Chinese dumpling use Napa cabbage, but regular cabbage is commonly used for Gyoza.
    As cabbage leaves are thick and hard, we use different ways to make the cabbage leaves wilted. I’m prefer to sprinkle salt to dehydrate the cabbage and squeeze the water out before mixing with meat.
  • Chinese Chives –Some people adds Chinese chives to their dumpling, but I usually skip the chives as my family don’t like its strong taste.
    Instead, I add more green onions to the filling.
  • Aromatics –Garlic is commonly used in dumpling.
    My mom always adds grated ginger and Coriander leaves too, so I do the same for my recipe.
  • Seasonings – The seasonings are simple, with just Fish Sauce, Light Soy Sauce, Sugar and a pinch of Salt and Pepper.
    This way you can just enjoy the flavour and freshness of the main ingredients.
  • Binder – A bit of Sago or Tapioca Starch will make the insides of your dumplings super tender. It’s the secret to juicy, tender dumplings!
    When you mix the water & starch and mix everything, it will come together into a homogenous paste, that’s what you want!
  • Vegetable and Sesame Oil – A little secret that can not only lock in the moisture of the vegetable fillings, but also enhance the aroma of the dumpling fillings.

Be Creative –  There is plenty of room for creativity when comes to making dumpling. Feel free to experiment with different ingredients or seasonal vegetables.
For example, you can add some shiitake mushrooms to the filling. I like the meaty texture and juicy umami flavour from shiitake mushrooms.


How to Make the Skin Dough

All-Purpose or Plain Flour works very well for dumpling skin or wrapper.
It’s possible to use bread flour, but you might find the cooked wrappers a little too chewy. 
You can also use a special dumpling bleached flour for a whiter results.
I personally don’t prefer to use it for a healthy reason.
You can make dumpling dough either by hand or in a stand mixer with a dough hook.

Simply combine 500 g All-Purpose Flour and 260 g Water
Once you don’t see any leftover dry flour you can stop mixing it (Don’t worry if the dough looks rough at this point)
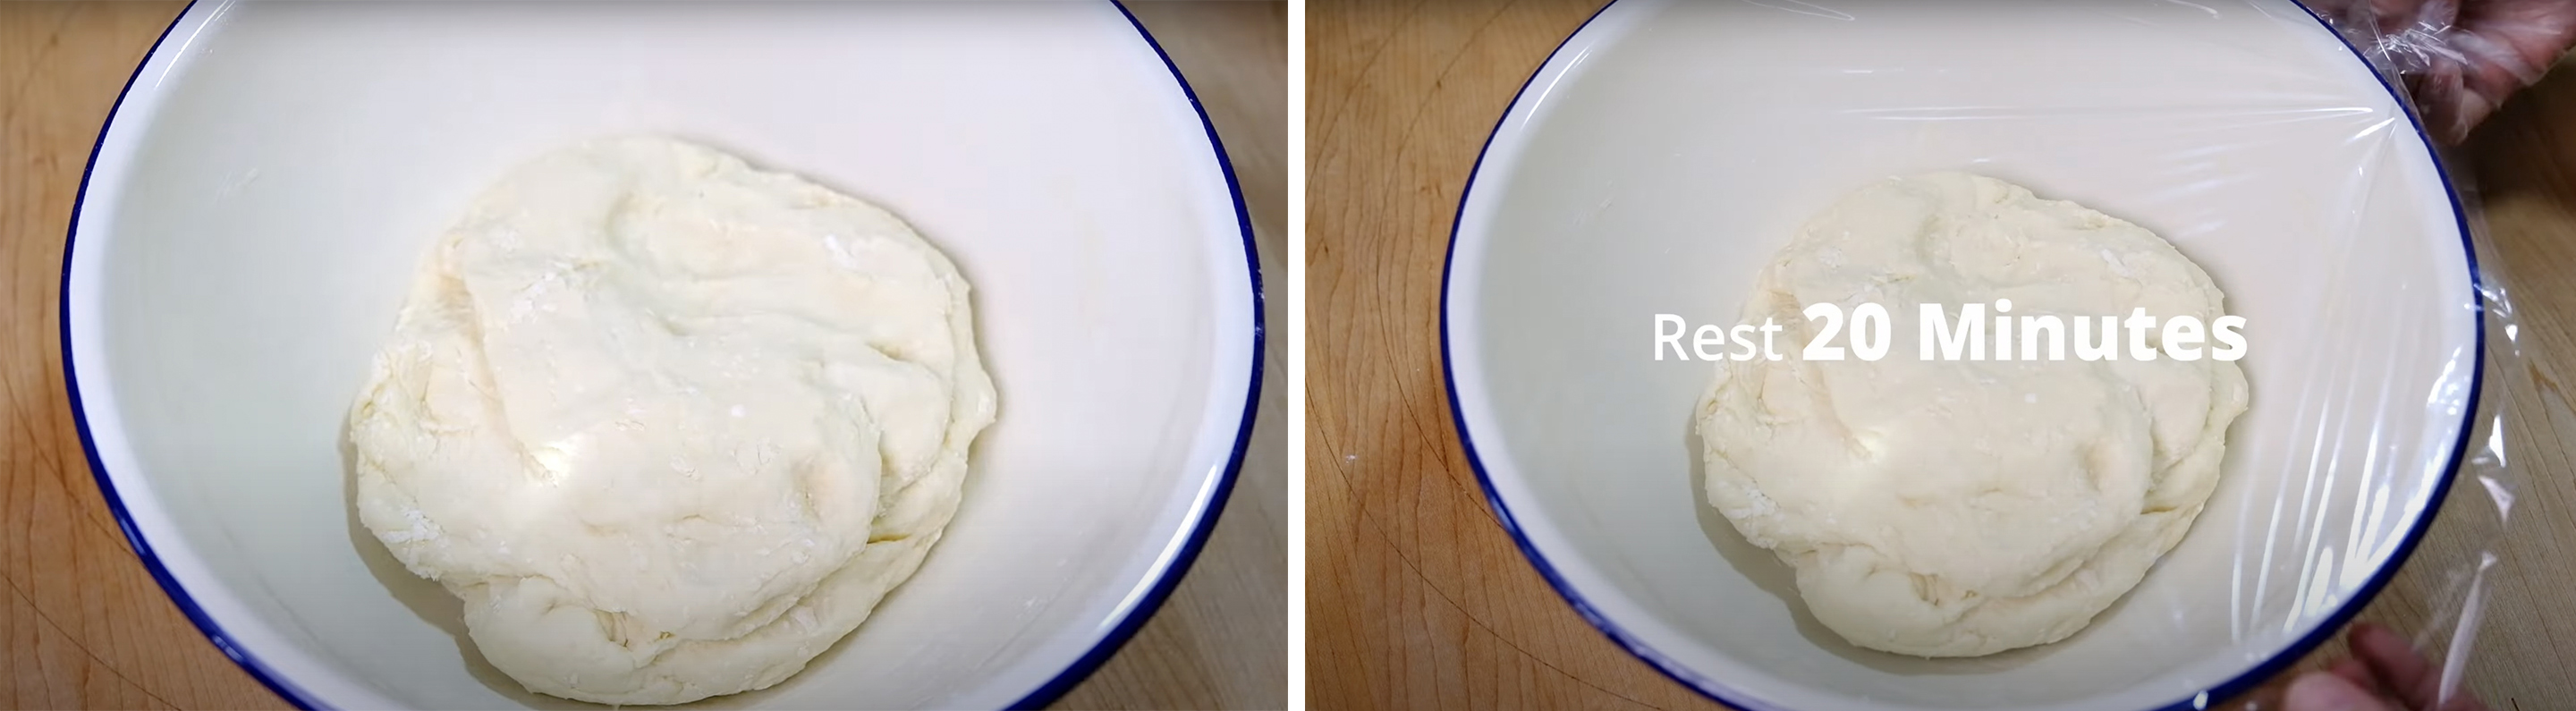
Cover with a cling wrap and let it rest for 20 Minutes
(By letting the dough rest, gluten bonds will begin forming, the dough will start to smooth out and soften)
After 20 Minutes the dough become softer.
Knead it again for about 1-2 min until it’s form a smooth medium-firm dough
Then cover and leave to rest for a further 60 minutes (max. 2 hours) before shaping

How to Prepare the Filling

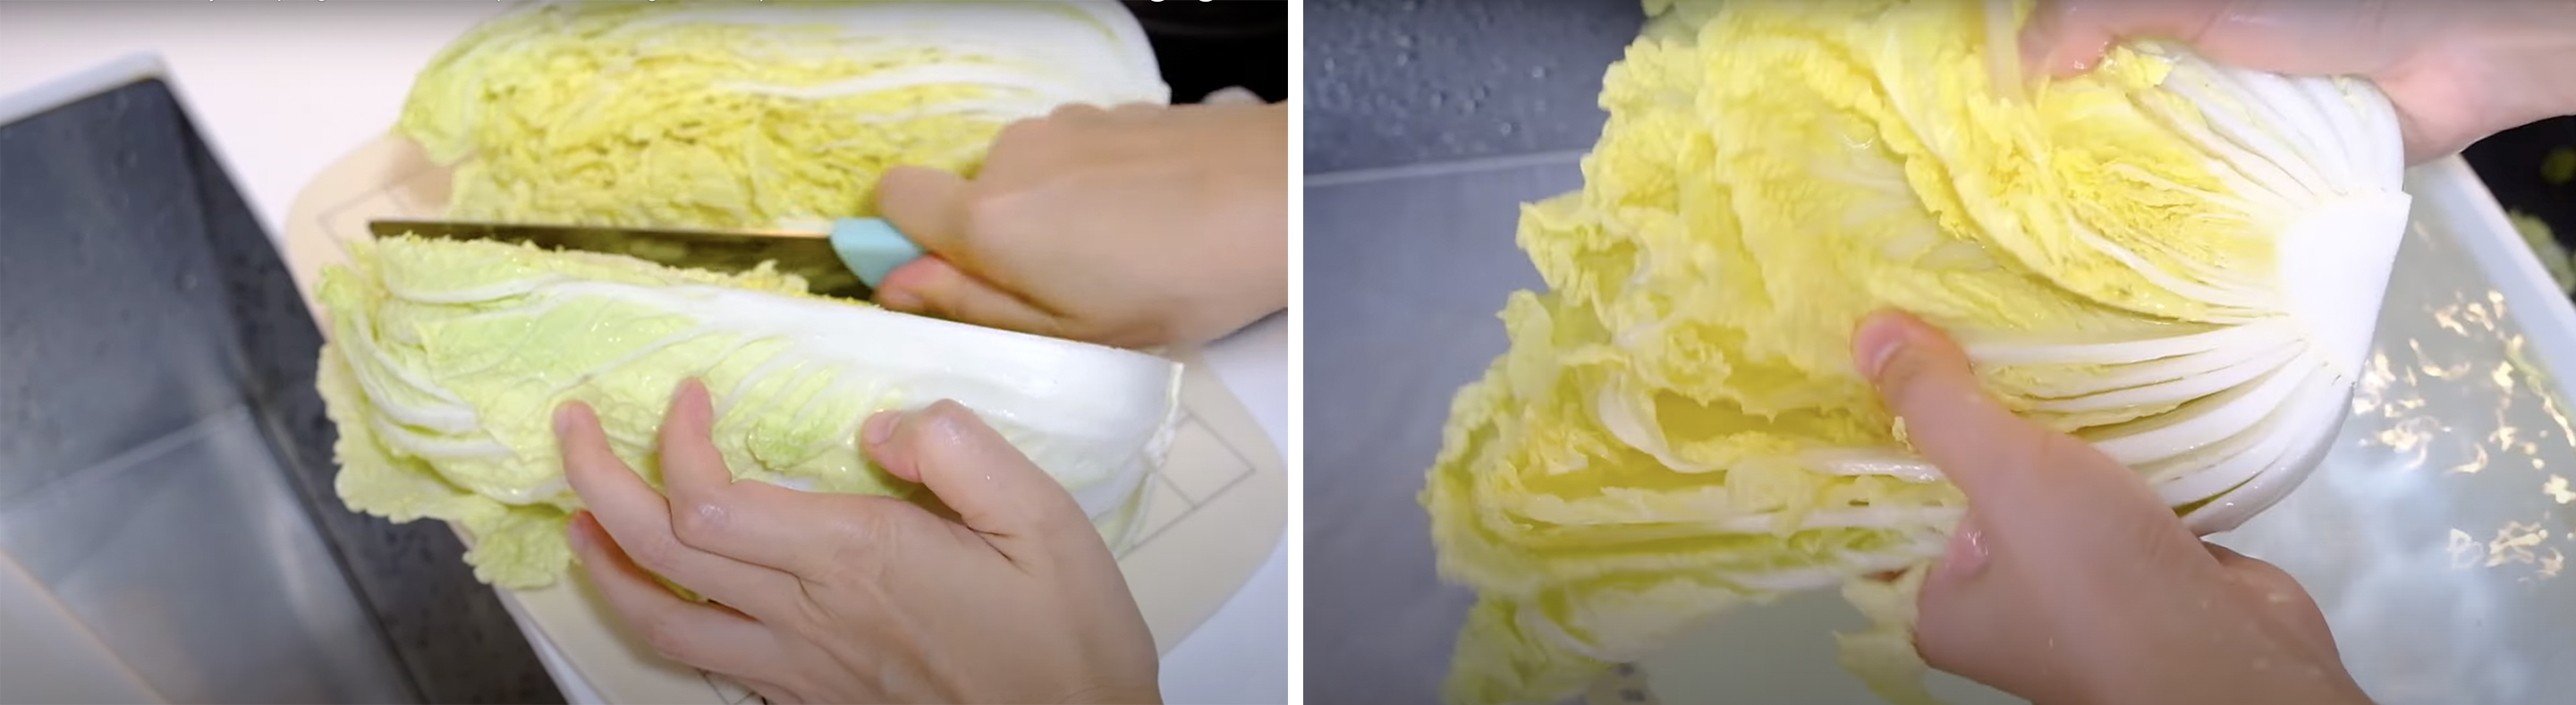
Cut 1 kg cabbage half lengthwise, rinse it under running water to remove any excess debris or dirt
Chop the cabbages lengthwise (1 cm wide);
Turn it over, and then chop as finely as possible (about 1 x 1 cm)
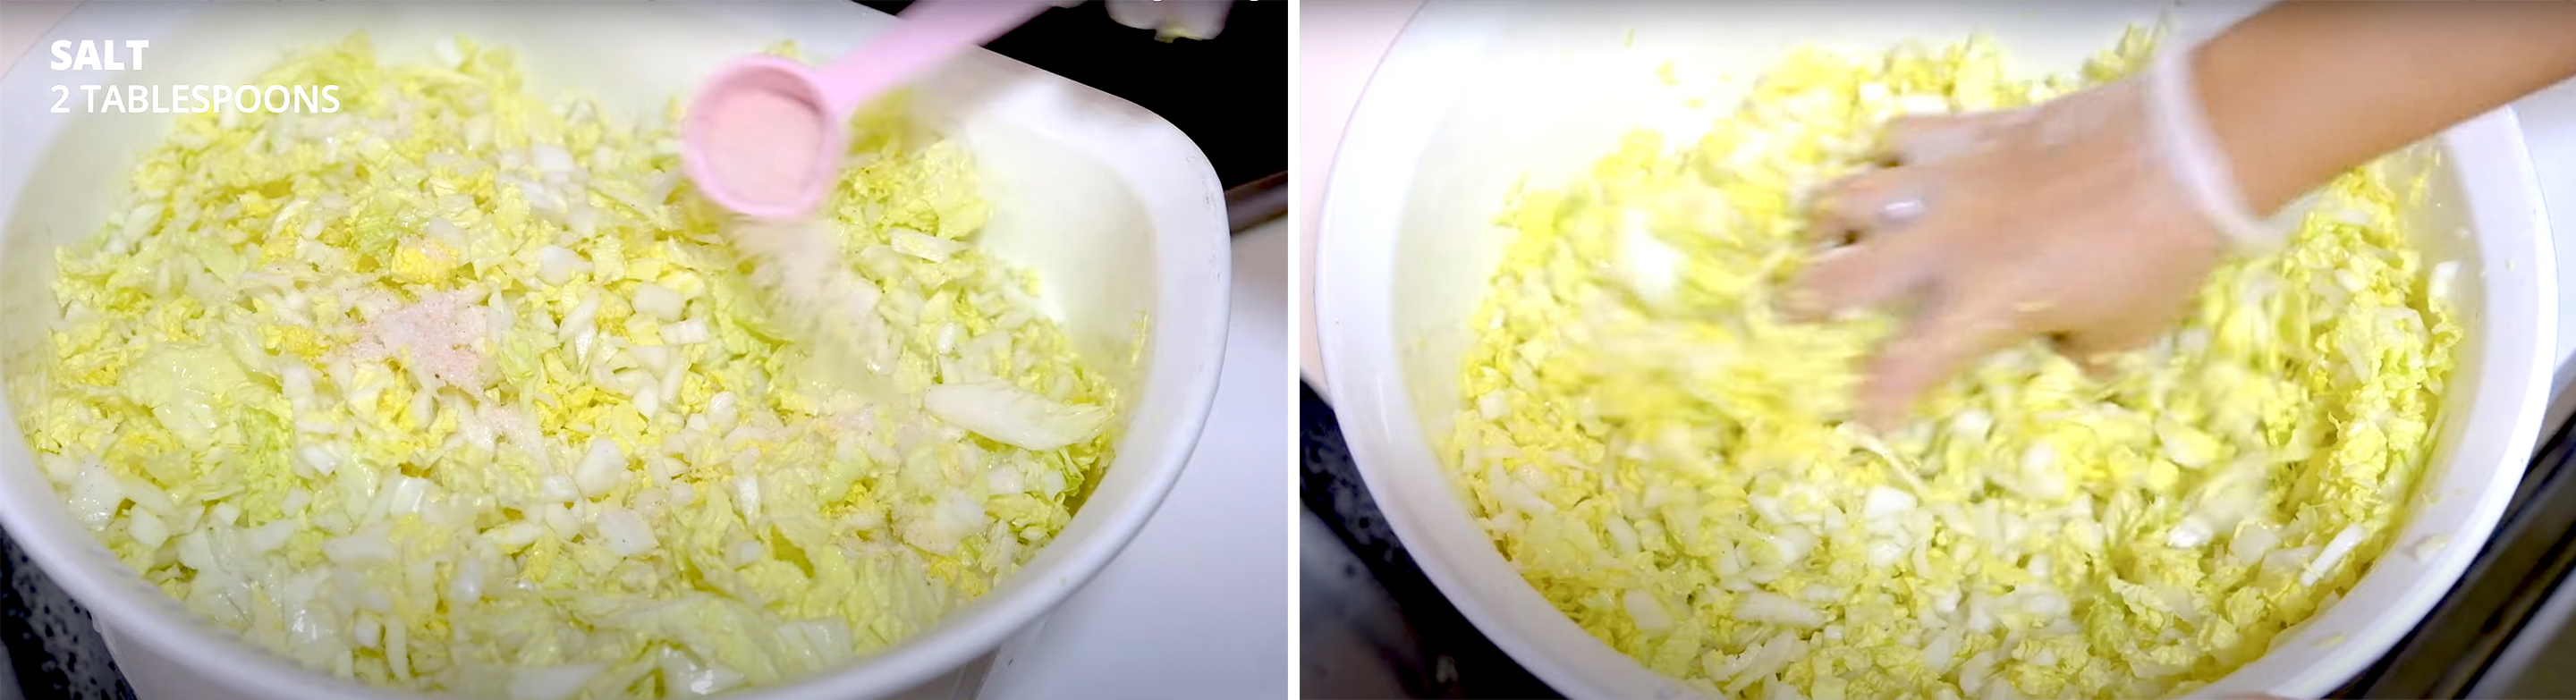
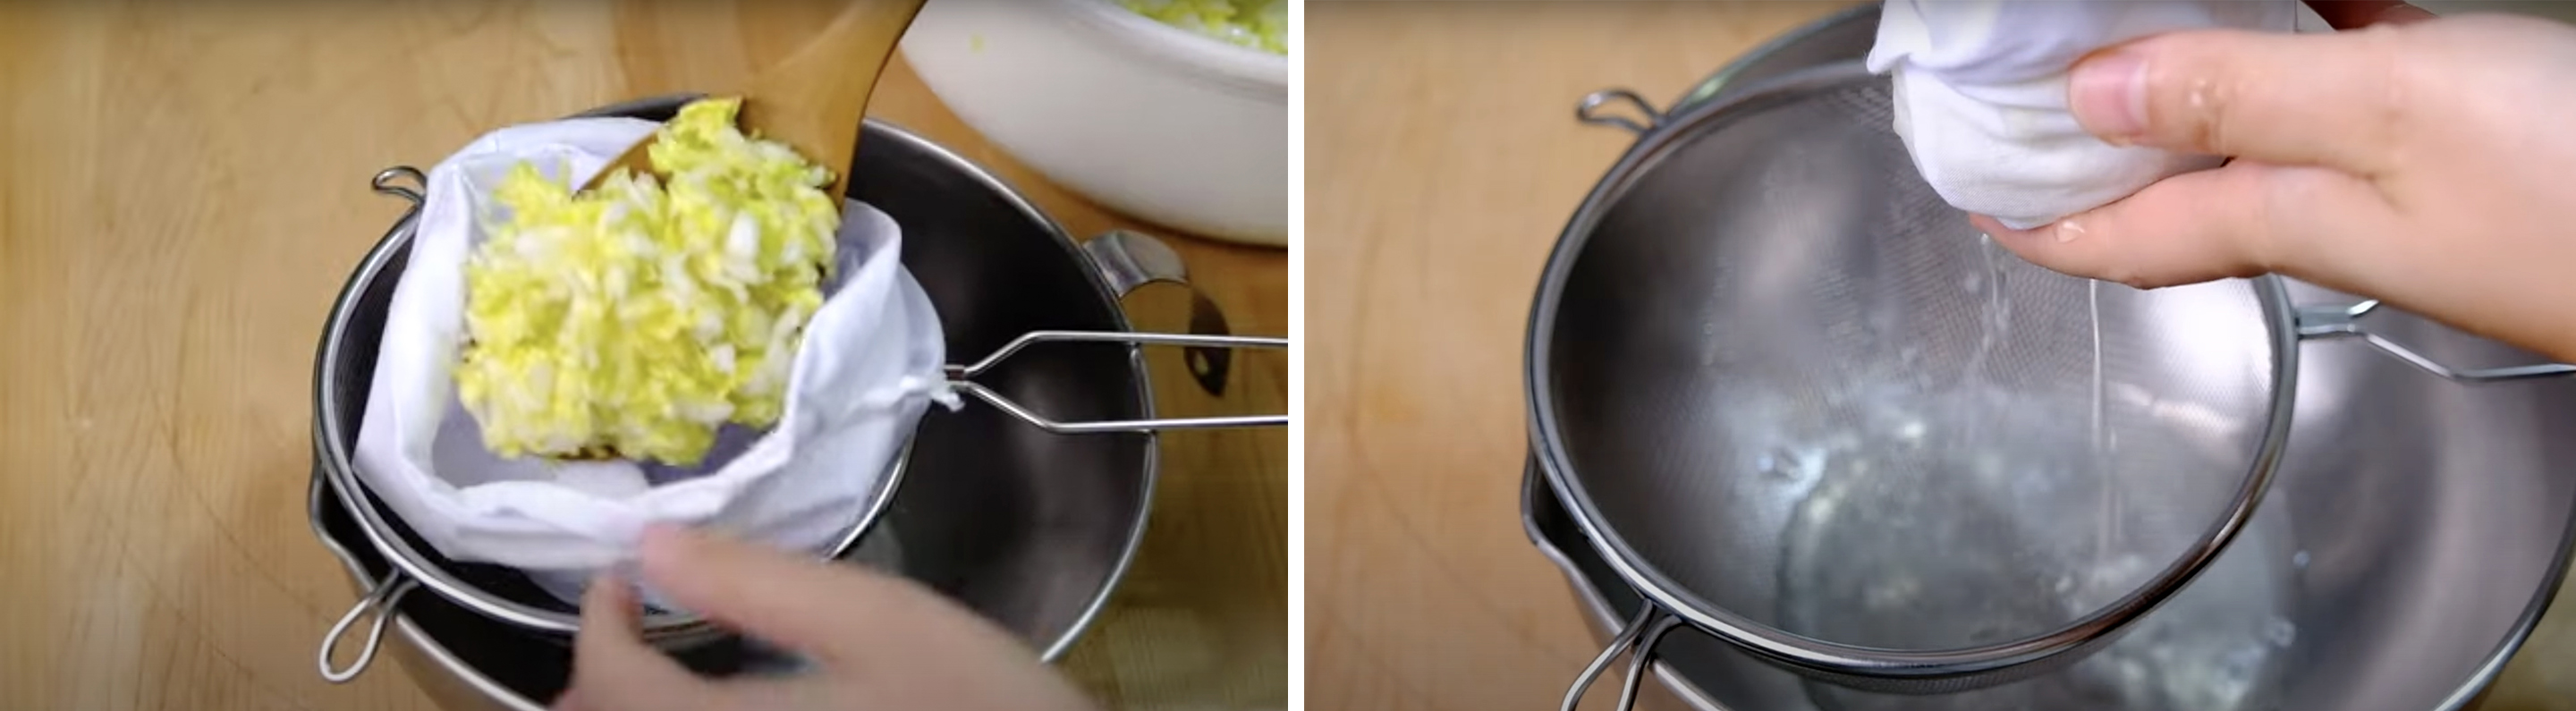
Place the chopped cabbages in a big bowl, scatter them with 2 tablespoons of salt; massage the salt through (the purpose of adding the salt is to draw the excess moisture out)
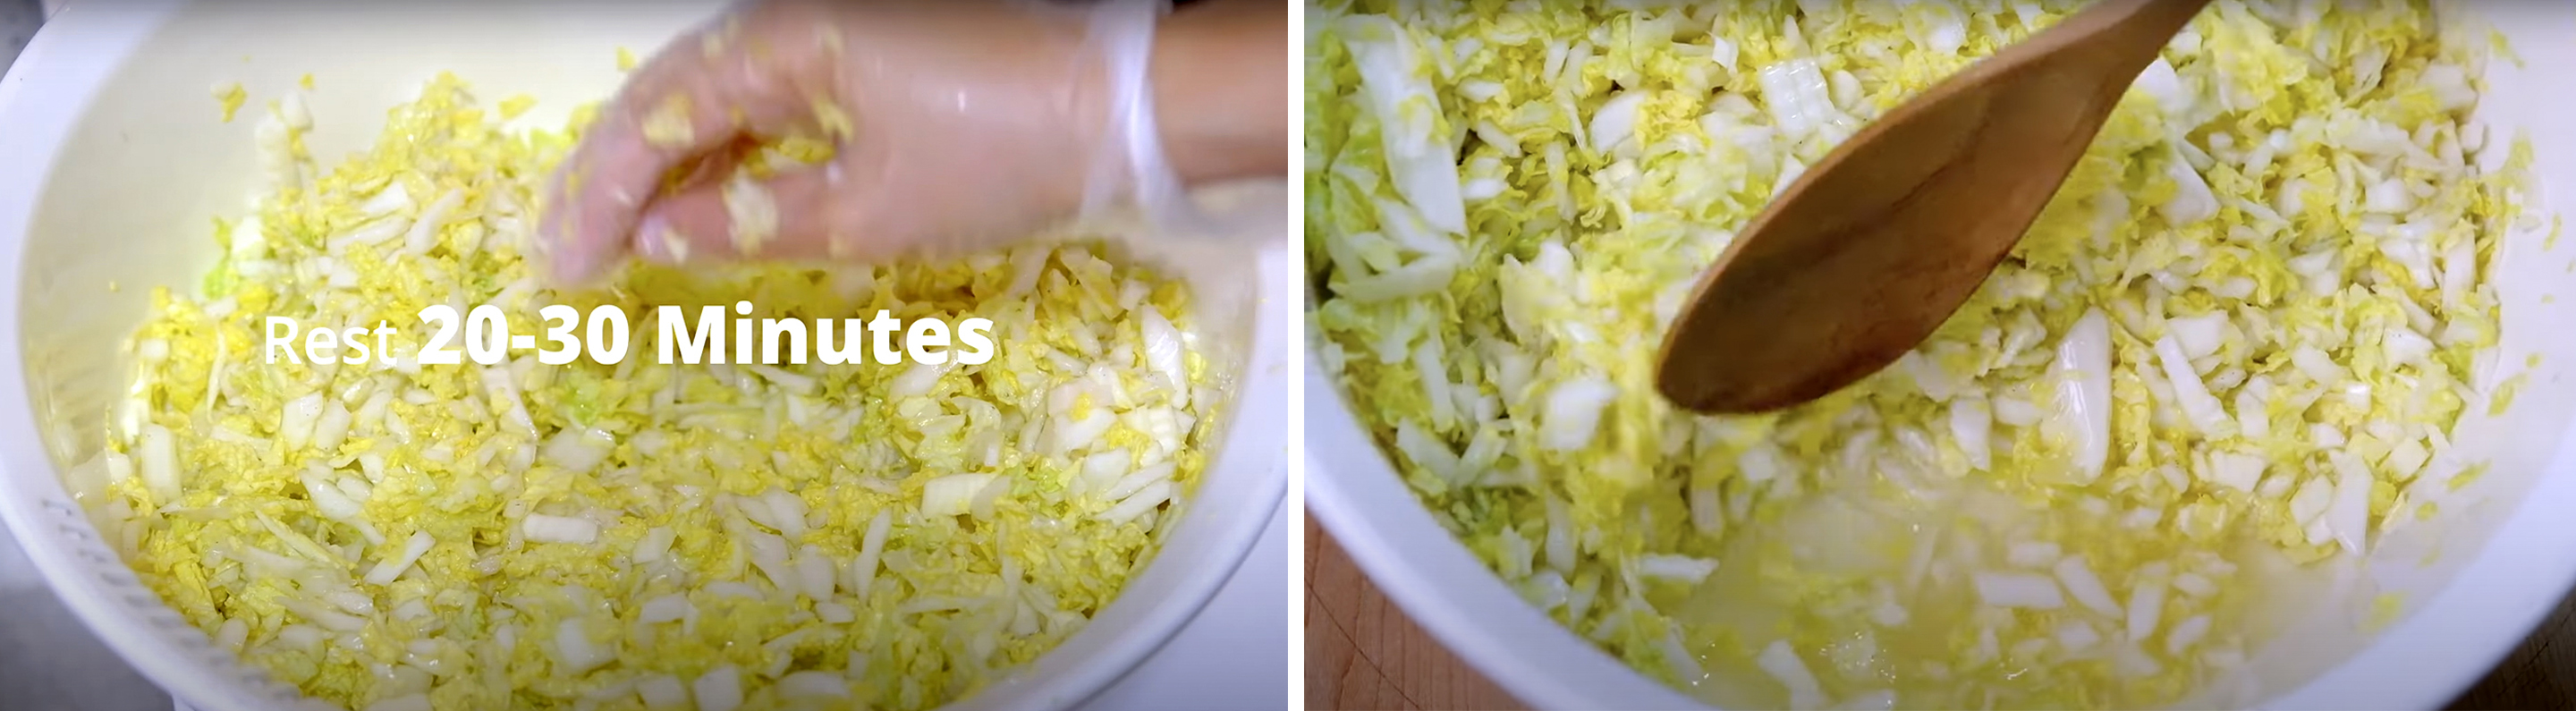
Once the salt is incorporated, let it sit for about 20-30 minutes
After 20 minutes, you can see a lot of liquid coming out of the cabbage
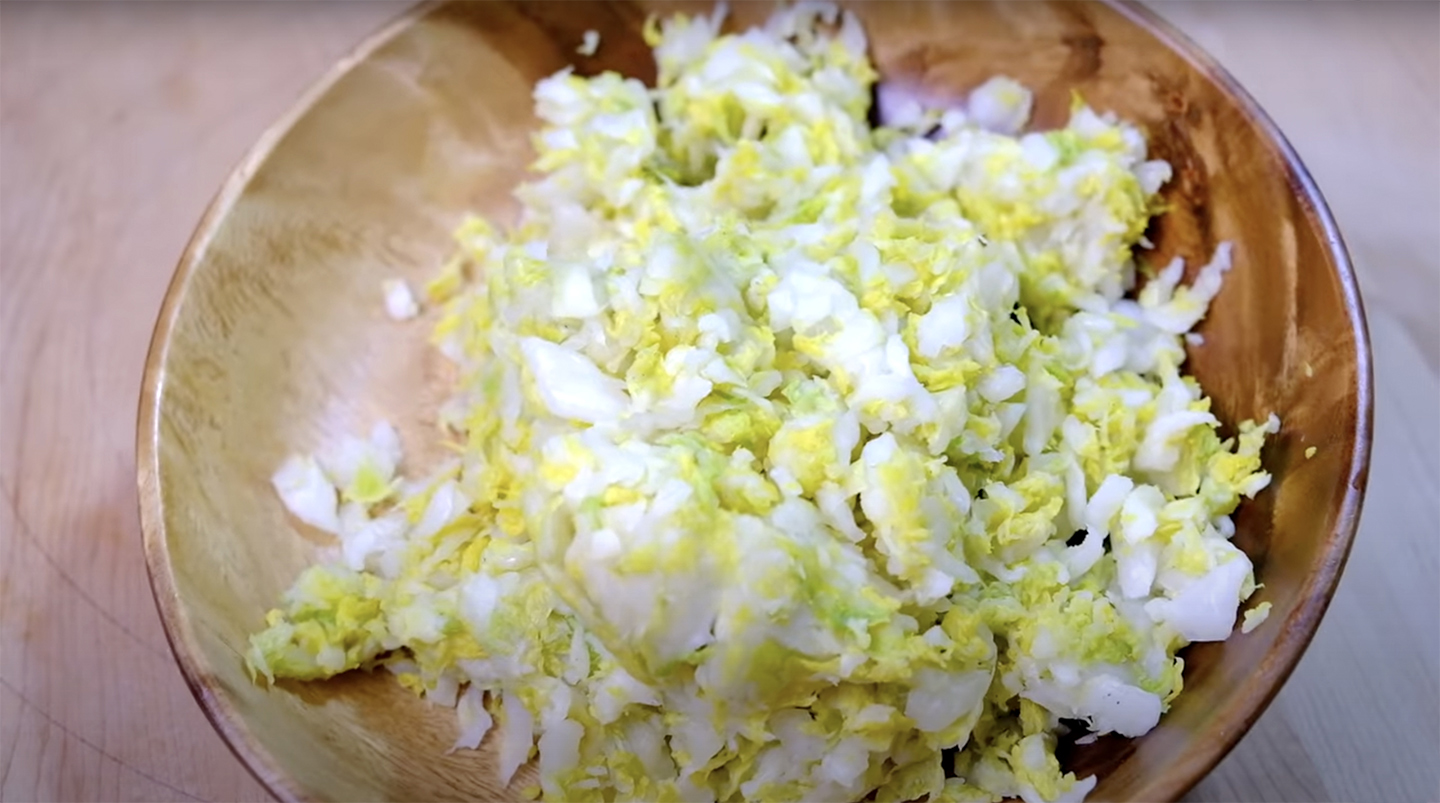
Use a muslin clothes of strainer, squeeze all the liquid ( I like to use muslin cloth because I can squeeze it all at once in large quantities)
Squeeze out all the liquid as much as you can (it’s a bit tiring, be patient 😚)
Set that aside…
Clean the 125 g Prawn (remove the head and the outer shell, legs and the tail). Using a kitchen scissor cut along the back of the prawn, discard the dark vein that runs under the surface.
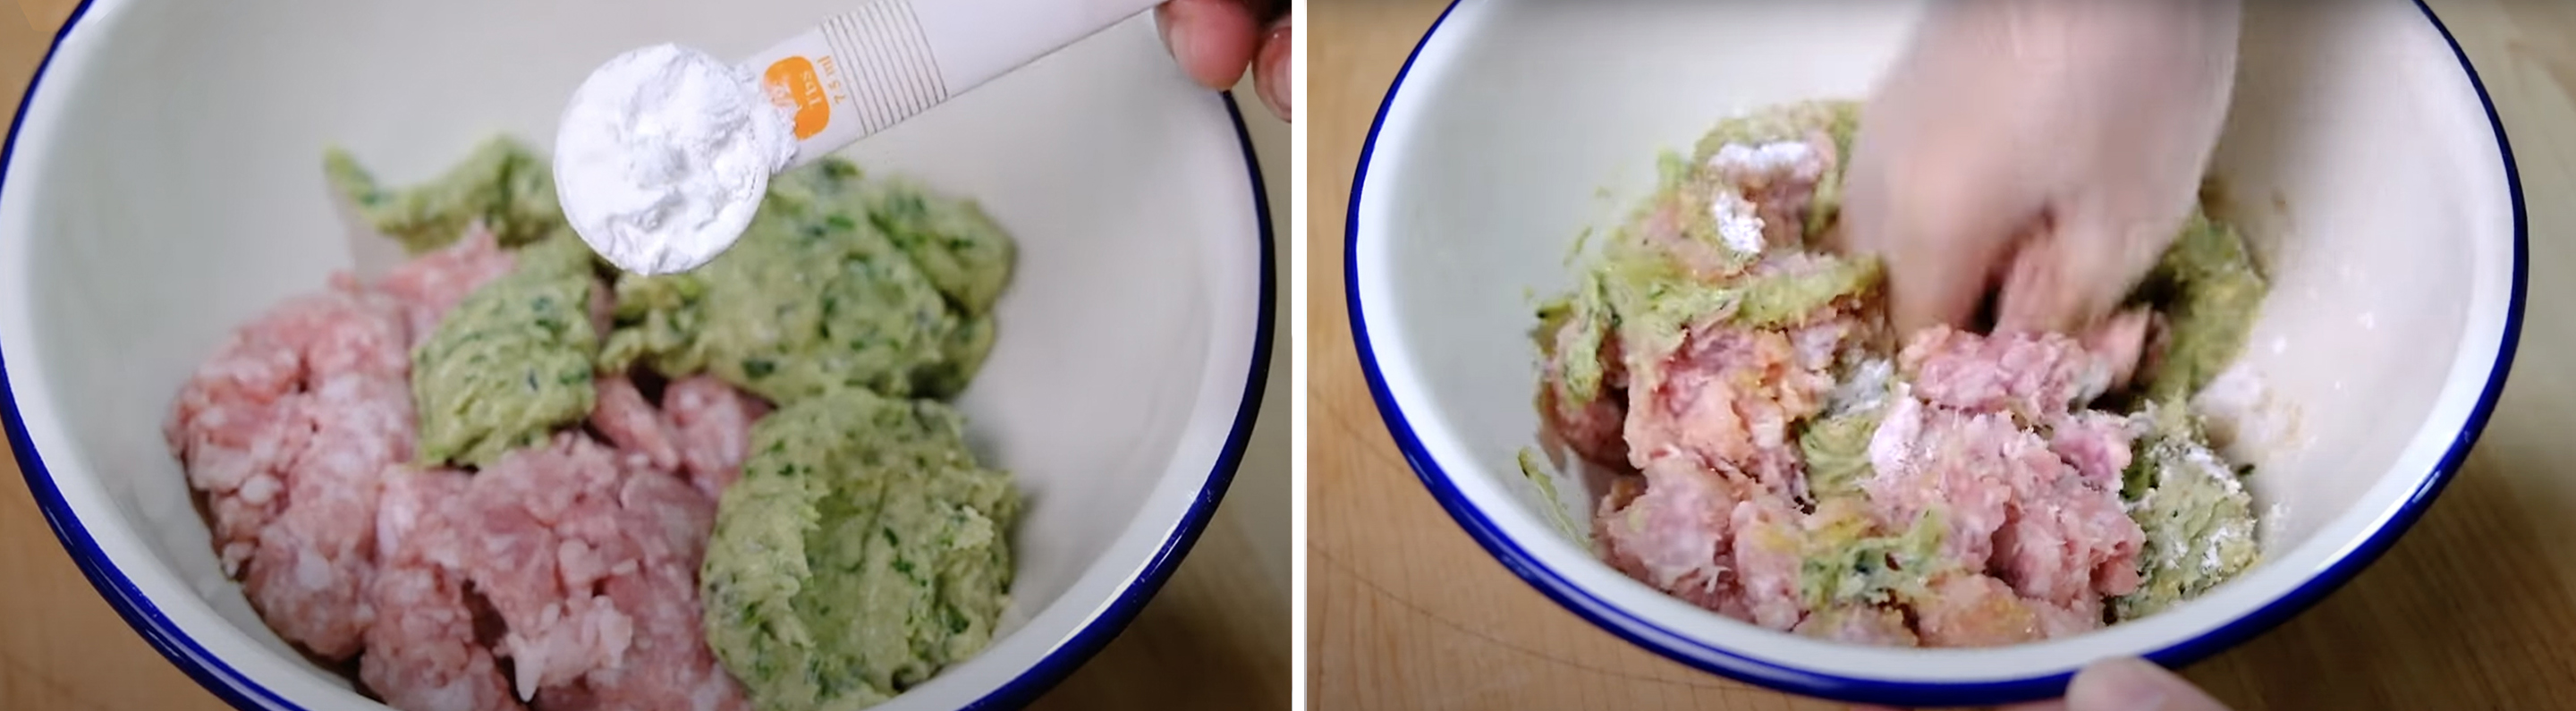
For the Prawn Paste, blend 125 g Prawns, 1½ tbs Coriander Leaves, 1/2 tsp Ginger, 1½ tbs Green Onion, 1 tbs Garlic, 1 tbs Sesame Oil, 1/2 tbs Fish Sauce, 1/2 tbs Light Soy Sauce and 1/2 tbs Vegetable Oil in a food processor
Now, let’s combine all the filling ingredients
Mix 250 g Minced Pork (with fat), Blended Prawn Paste, 1/2 tbs Sago or Tapioca Starch, 1/2 tbs Salt, 2 tbs Sugar and 1/2 tsp White Pepper Powder
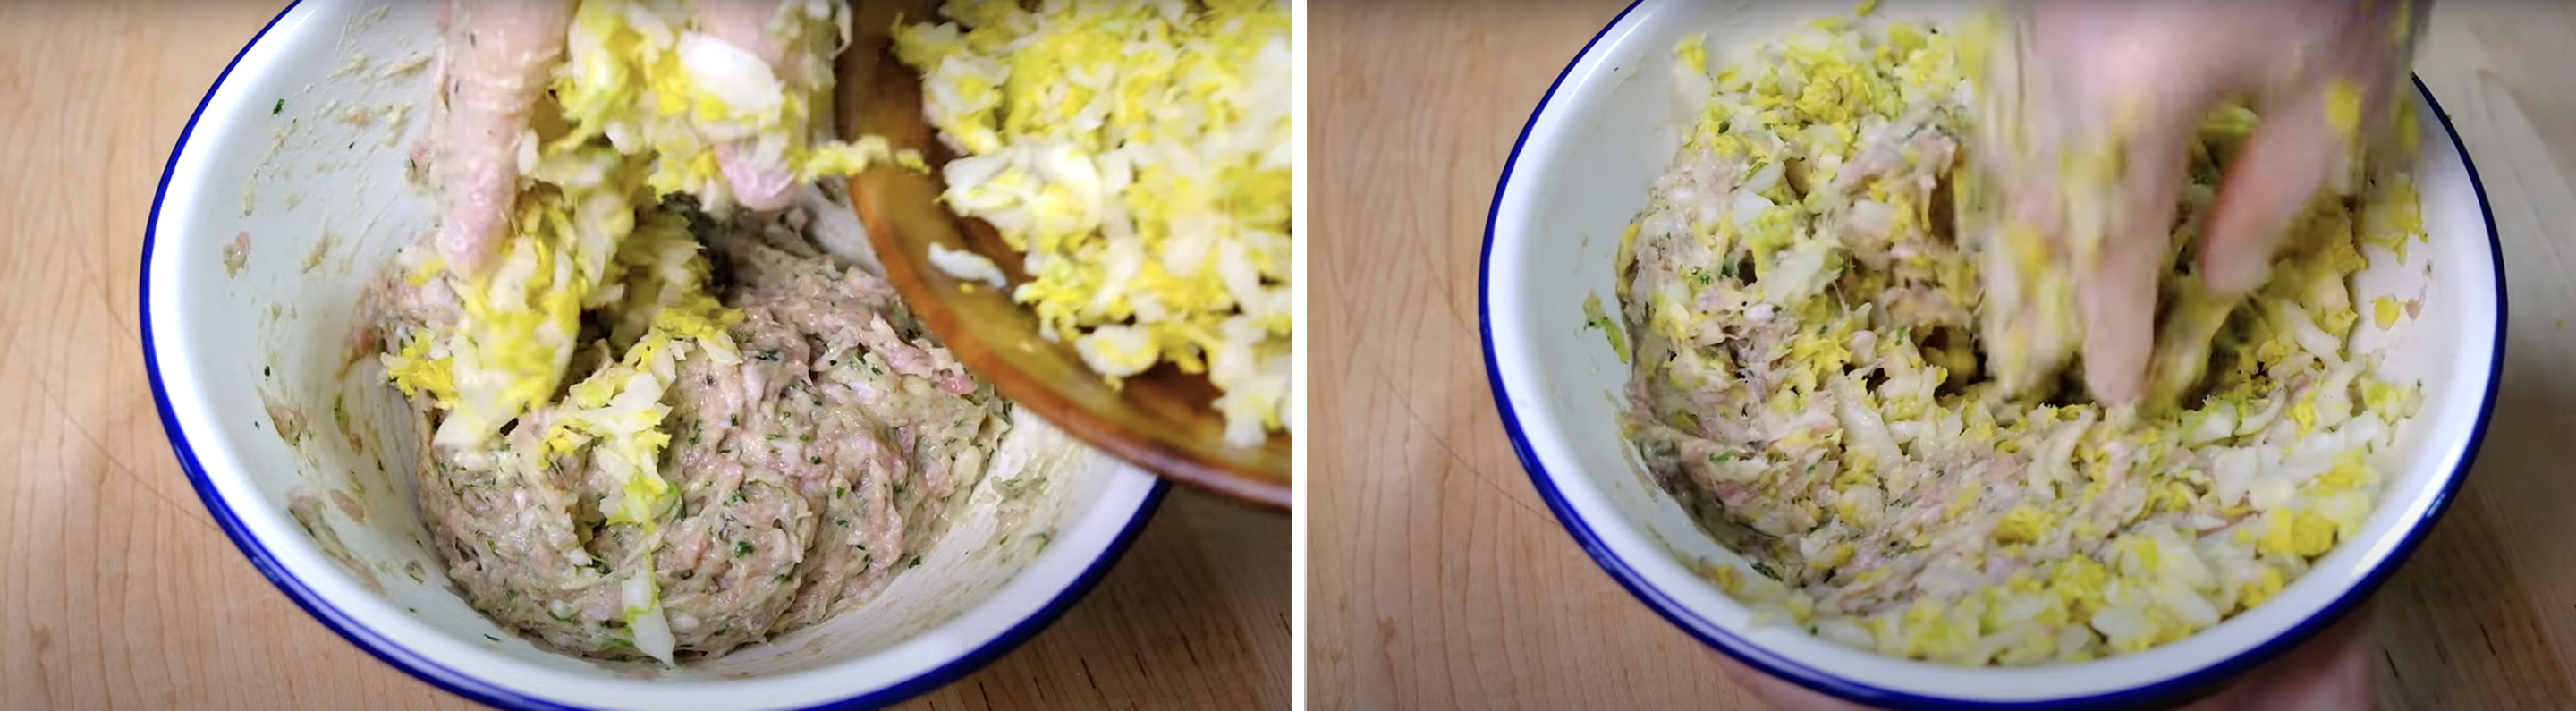
Mix it really well
Add in the Squeezed Cabbage, mix again until fully incorporated with the meat mixture
Your filling is ready! 😉

Roll and Shape the Dumpling Skin

Cut about 1/3 of the dough (make sure that you keep the rest wrapped up so it doesn’t dry out).
Roll the dough into a 2 cm diameter ropes; and then cut it into small equal pieces (about 1 cm wide). There’s no need to be perfect or exactly even.
Flatten each piece into a round disc with the palm of your hand (this basic shape will make it easier when you roll it).
And then roll them into thin wrappers with a rolling pin; I use a roll & turn technique which produces wrappers that are thinner on the edge but slightly thicker in the middles (perfect for dumpling folding). If the dough sticks to the work surface or the rolling pin, dust with a little flour.


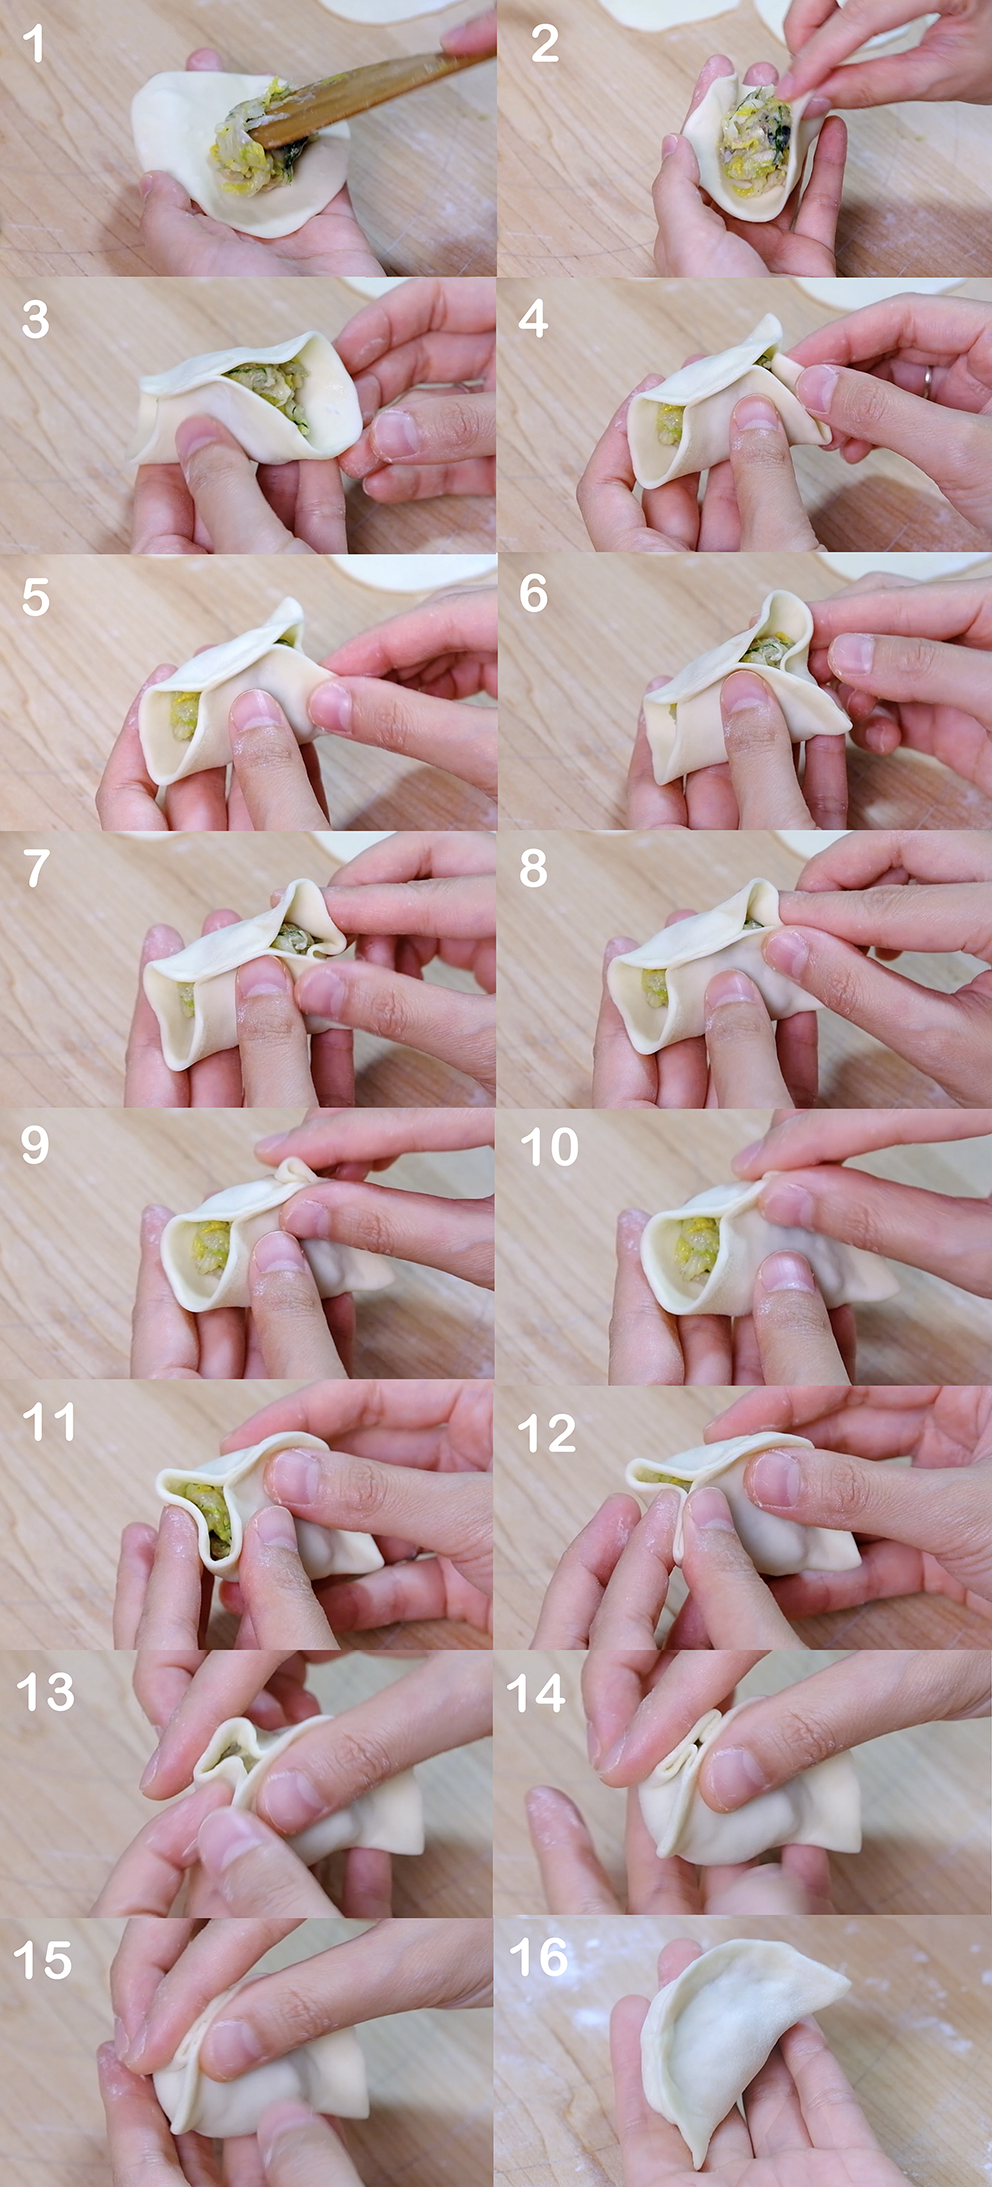
Dumpling Folding Techniques


If you planned to eat them fresh, just place the finished dumplings on a floured surface to keep them from sticking

But if you like to freeze the uncooked dumplings, place them on a container or baking sheet lined with Parchment Paper and a bit of flour (make sure non of the dumplings touch each other)
Wrap the container or baking sheet tightly, allow to freeze overnight
On the next day, they will be hard as rock.
Transfer them to Ziplog Bag and throw them back into freezer for use later (consume within 3 months)

Cooking Method

A thick heavy bottom NON-STICK pan with a lid is a perfect way to fry the dumplings.
This kind of pan is important to ensure the even distribution of the heat so that every dumpling can be cooked to a similar golden colour.
You can use regular pan, but you run the risk of the dumplings sticking to the bottom of the pan; you don’t want to ruin your hard work 😒

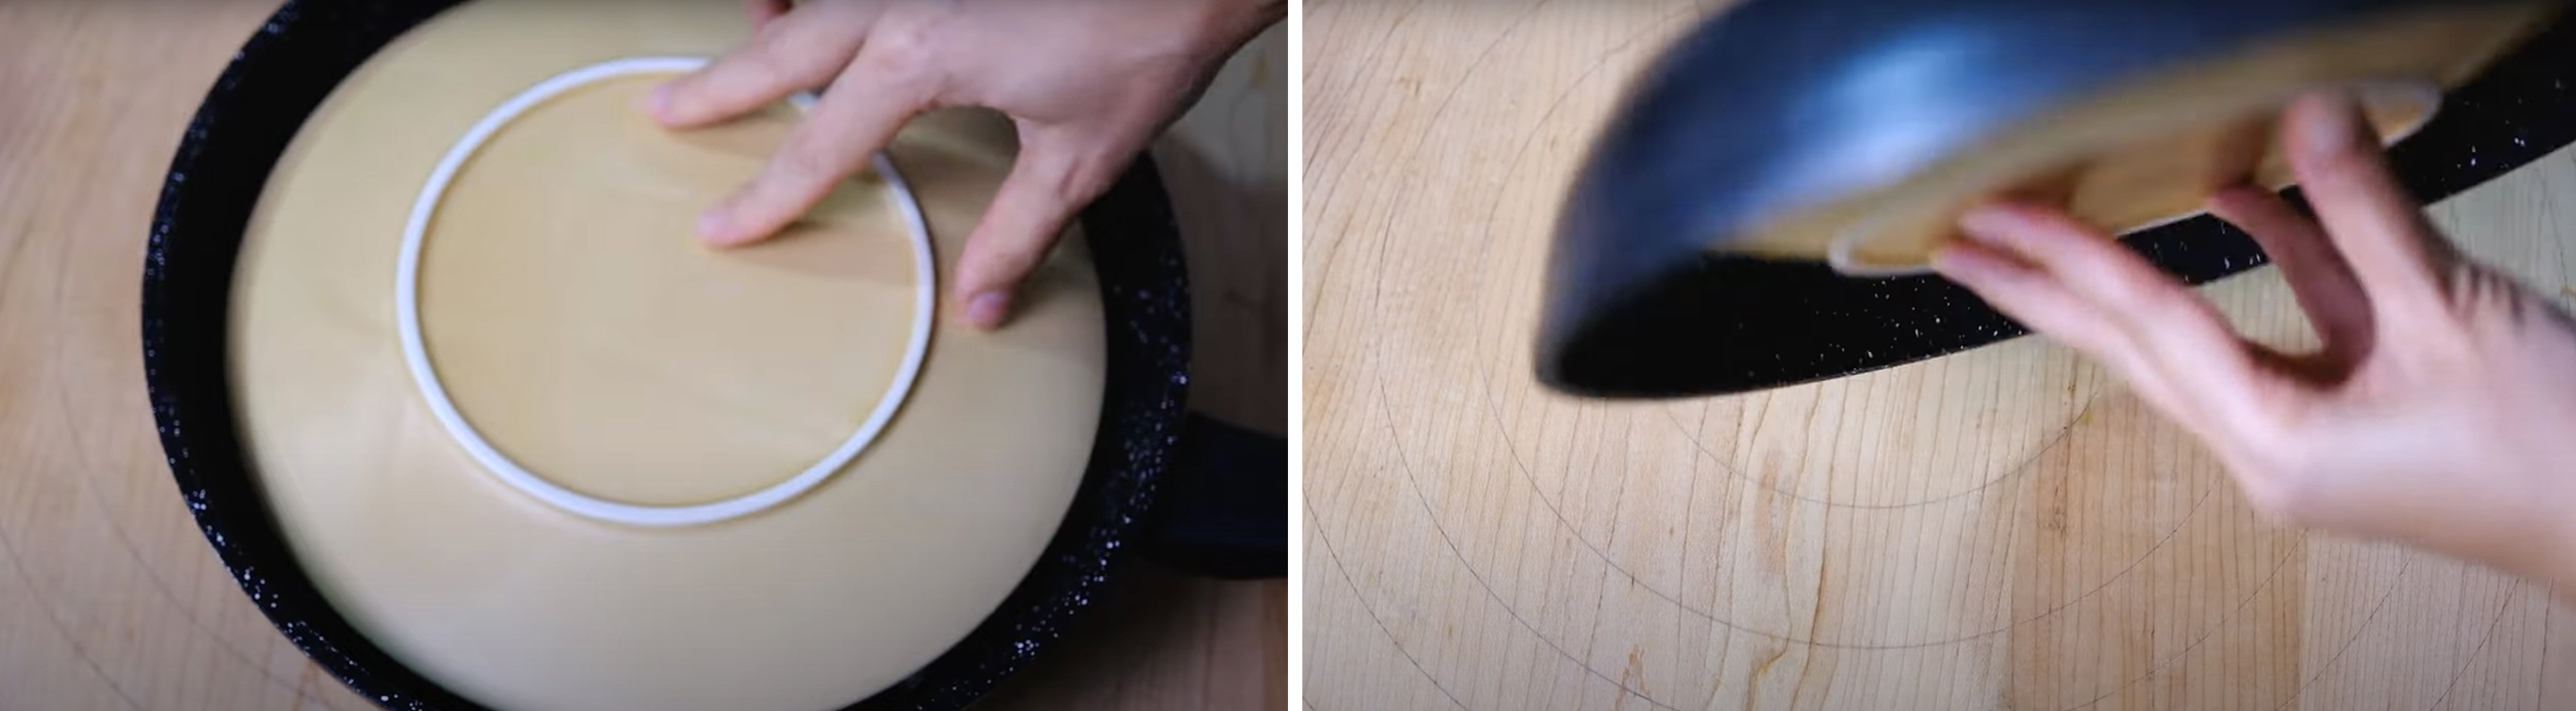
And for the Gyoza, whatever the size of your pan, make sure you’ve got a plate that fits on top of it;
Because you are going to turn out a Gyoza at the end, so if your plate is not the right size, you can end up with a bit of mess.
And make sure you use a deep pan and enough water to boil the dumplings 😉

No matter how you wish to cook them, frozen dumpling don’t need to be defrosted beforehand
Let’s start cooking!

PAN FRIED (Guo Tie) 锅贴

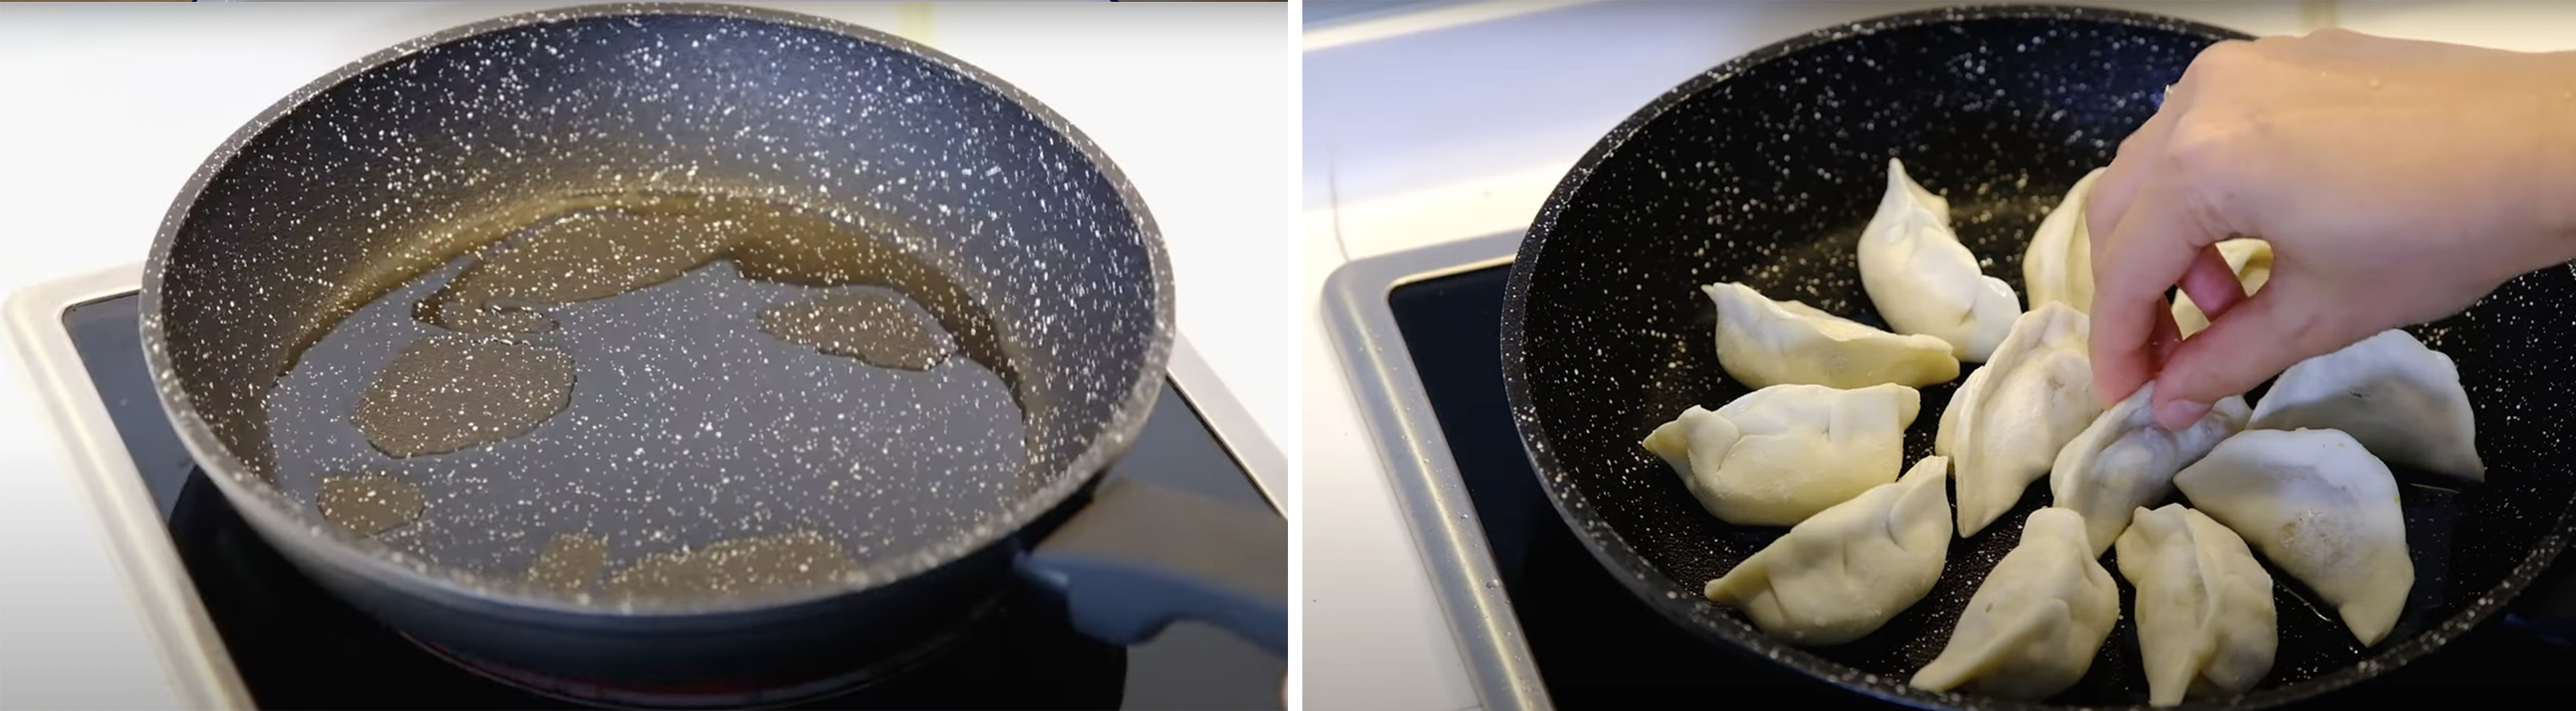
Heat the NON-STICK pan over MEDIUM HIGH heat, add about 2 tbs of Vegetable Oil
Place dumplings in a circular formation (make sure each bottom of the dumplings is in touch with the oil) leave a little bit of space between each one
Allow them to fry for a couple minutes
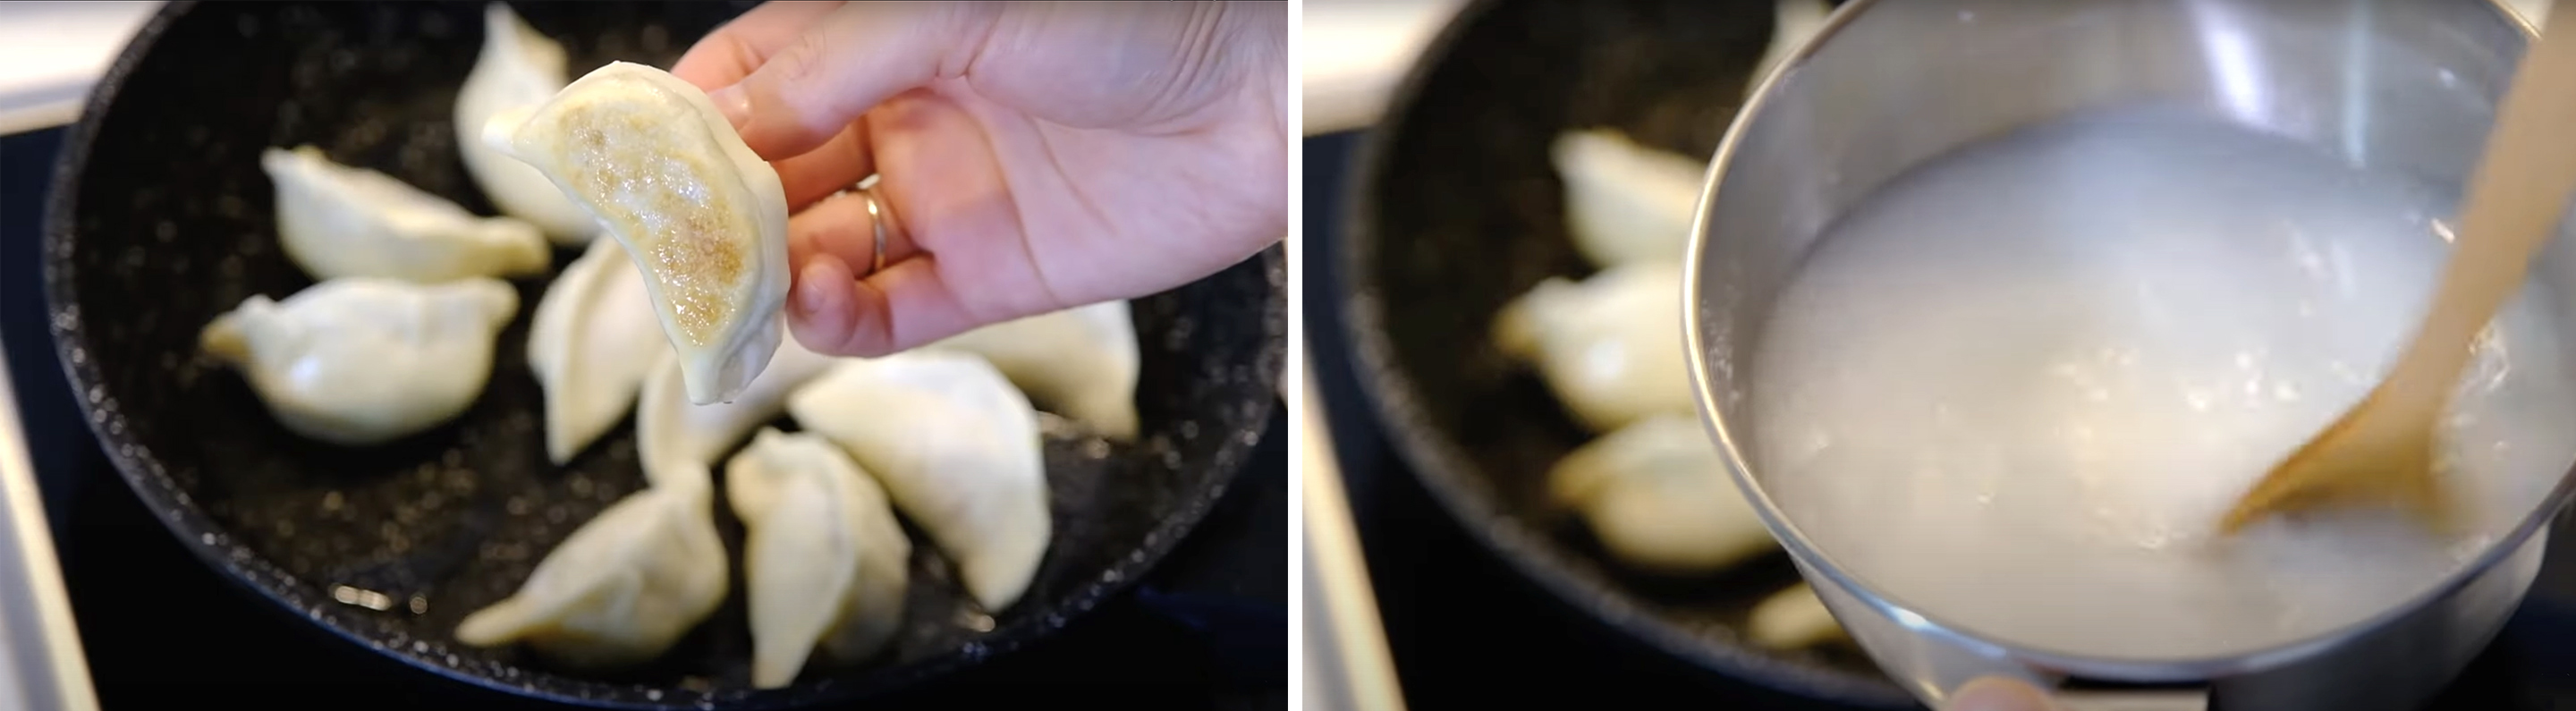
Check the bottom part of the dumplings
Once it turned light brown, pour in the Water (make sure it cover one half part of the dumplings)
Cover it with the lid and steam over HIGH heat for about 10 minutes
After 10 minutes, you can see that the water has reduce quite a lot (shake the pan to make sure there’s nothing sticking to the pan)
After 10 minutes open the lid, lower the heat to MEDIUM LOW and continue cook until the water is fully evaporated
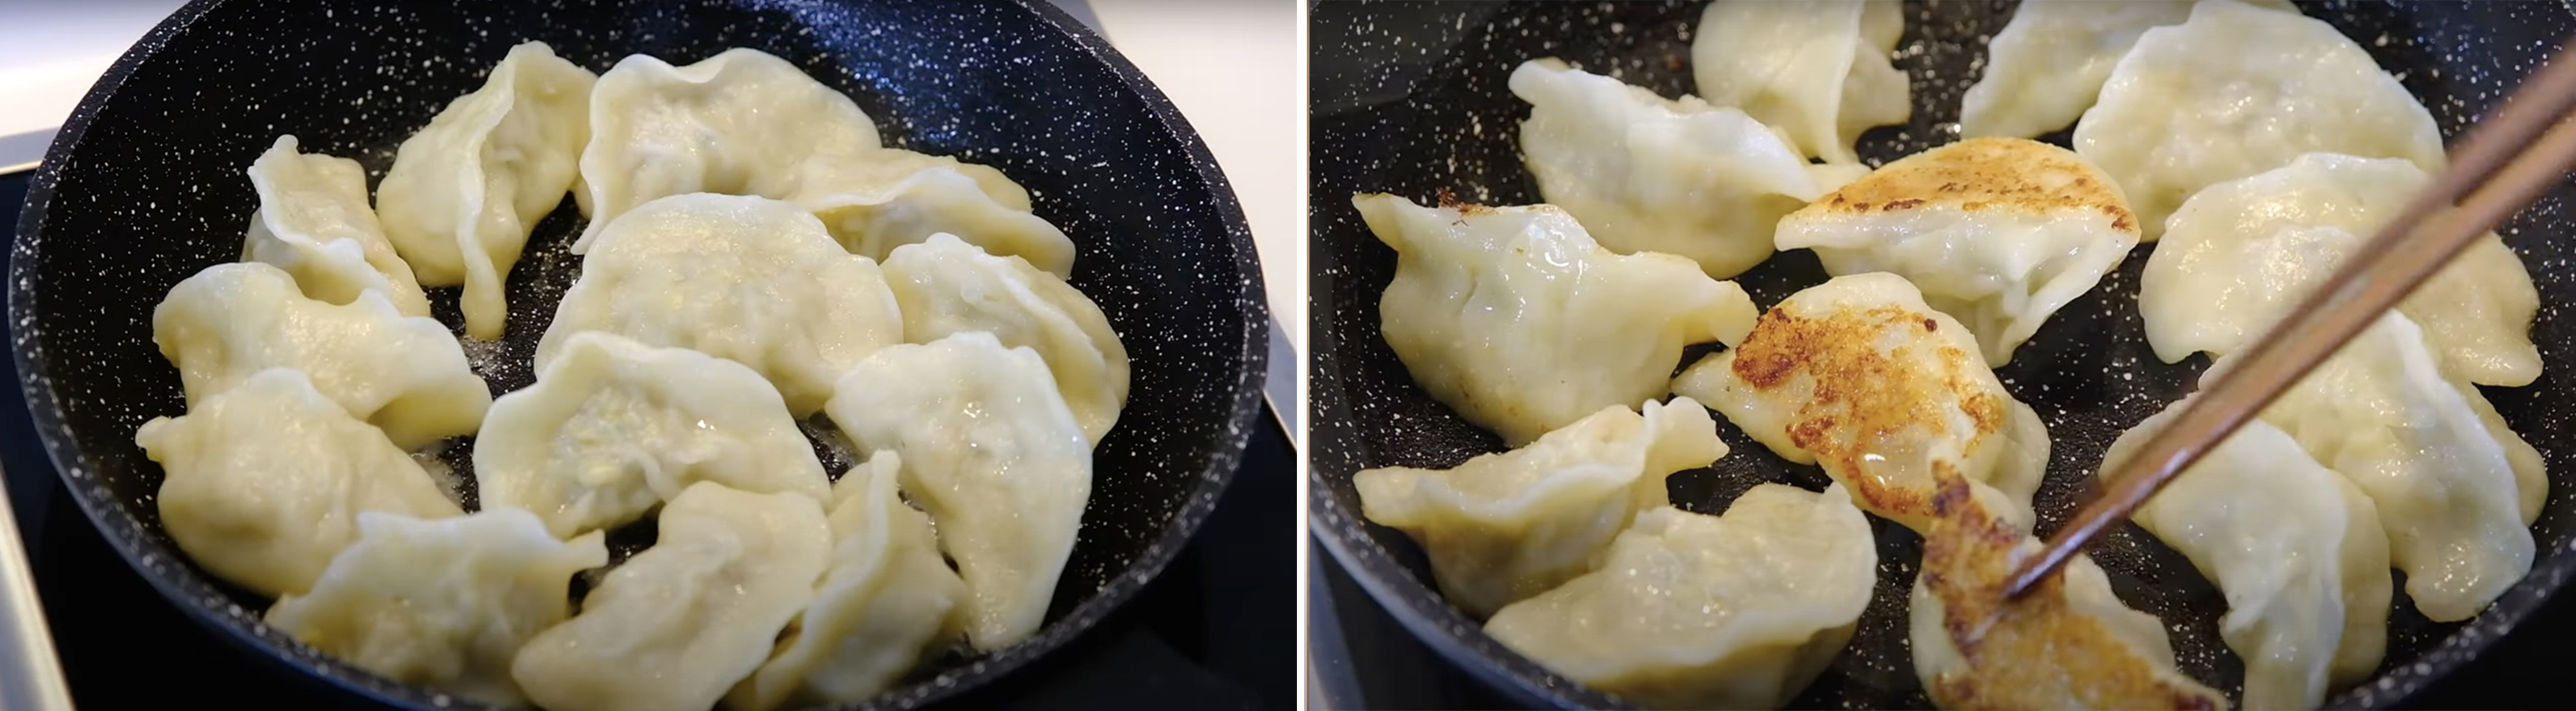
Check the bottom part of the dumplings, when they are golden brown and crips, its done!
The filling is tender and juicy while the bottom are crispy 🥰


GYOZA 餃子

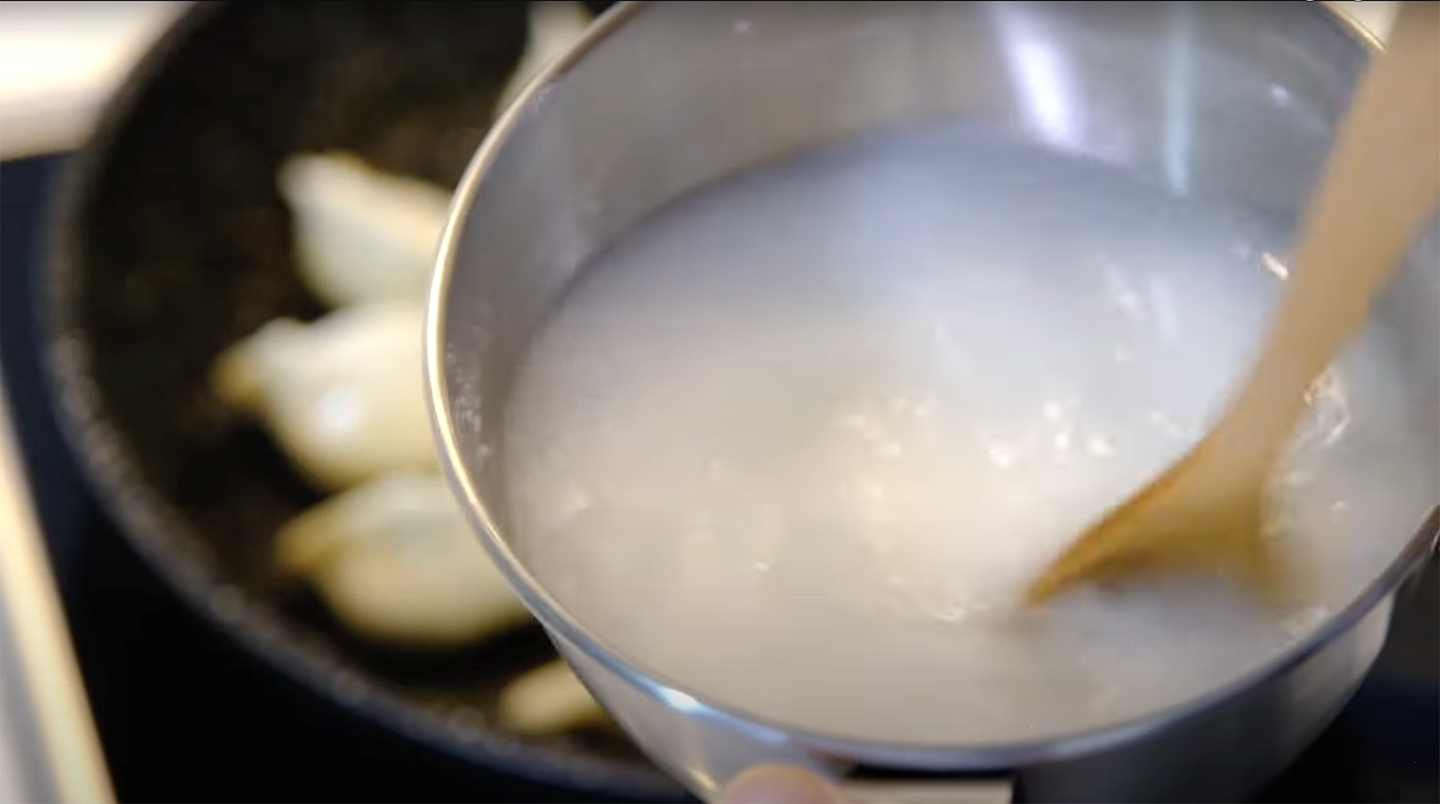
Prepare “Starch Mixture” in advance for the Gyoza “skirt”
Mix 300 g Water with 2 tbs Potato Strach (can be substitute it with Corn Starch/ Plain Flour/ Rice Flour)
Heat the NON-STICK pan over MEDIUM HIGH heat, add about 2 tbs of Vegetable Oil
Place dumplings in a circular formation (make sure each bottom of the dumplings is in touch with the oil) leave a little bit of space between each one
Allow them to fry for a couple minutes
Check the bottom part of the dumplings
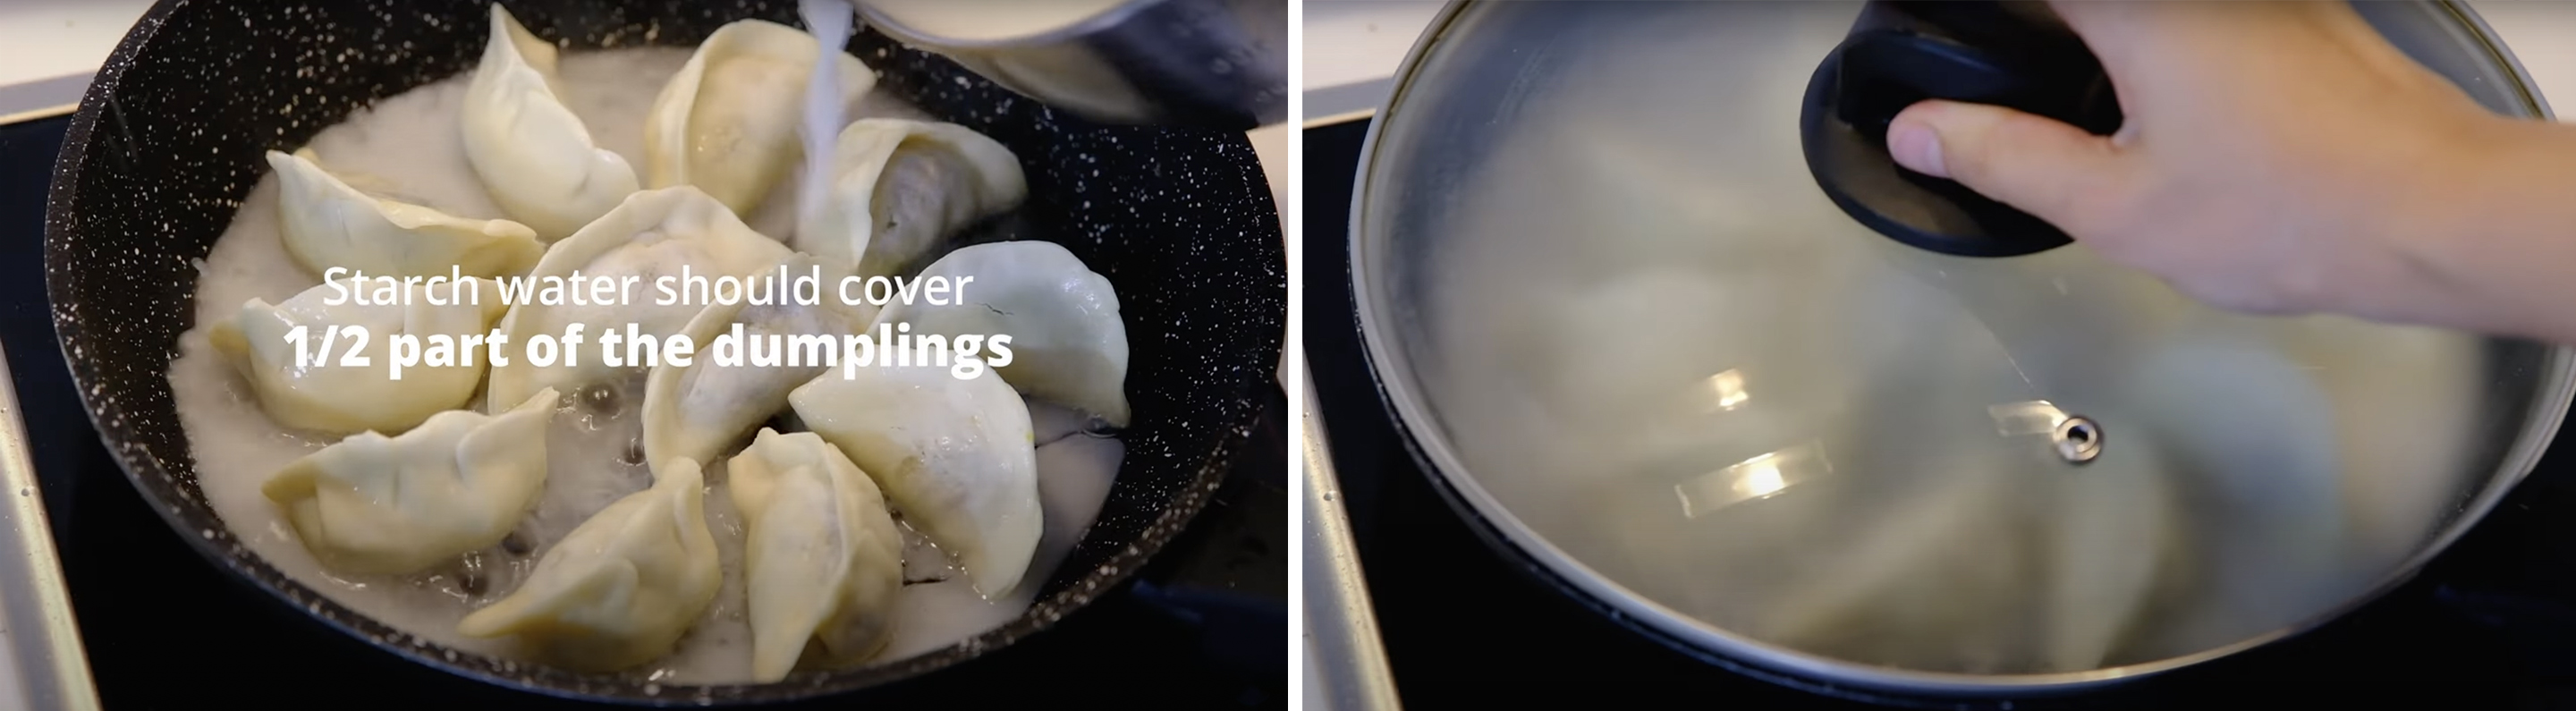
Once it turned light brown, pour in the Starch Mixture (don’t forget to stir the mixture before you pour it, to make sure that the starch is evenly distribute)
You don’t need to use all the starch mixture, just make sure it cover one half part of the dumplings (if you use bigger pan, you might need more starch mixture; kindly double the recipe as needed)
Cover it with the lid and steam over HIGH heat for about 10 minutes
After 10 minutes open the lid, lower the heat to MEDIUM LOW and continue cook until the water is fully evaporated
Watch carefully, when the skirts start to dry, drip some Sesame Oil around the dumplings (these Sesame Oil is going to help the skirt brown, make it crispier and also adds a beautiful flavour)
Cook for a further minutes, pay attention to the gaps around the Gyoza, so you can judge how brown you want it to be
Once it’s done, give a little shake, make sure there’s nothing sticking; place a plate on top and carefuly flip the Gyoza
Enjoy the beautiful crispy skirt 😘
There’s a satisfaction in making a crisp sound when breaking the dumplings apart! 🤪

BOILED (Shui Jiao) 水饺

We will use the Chinese Traditional Method called Dian Shui (点水) to boil the dumplings

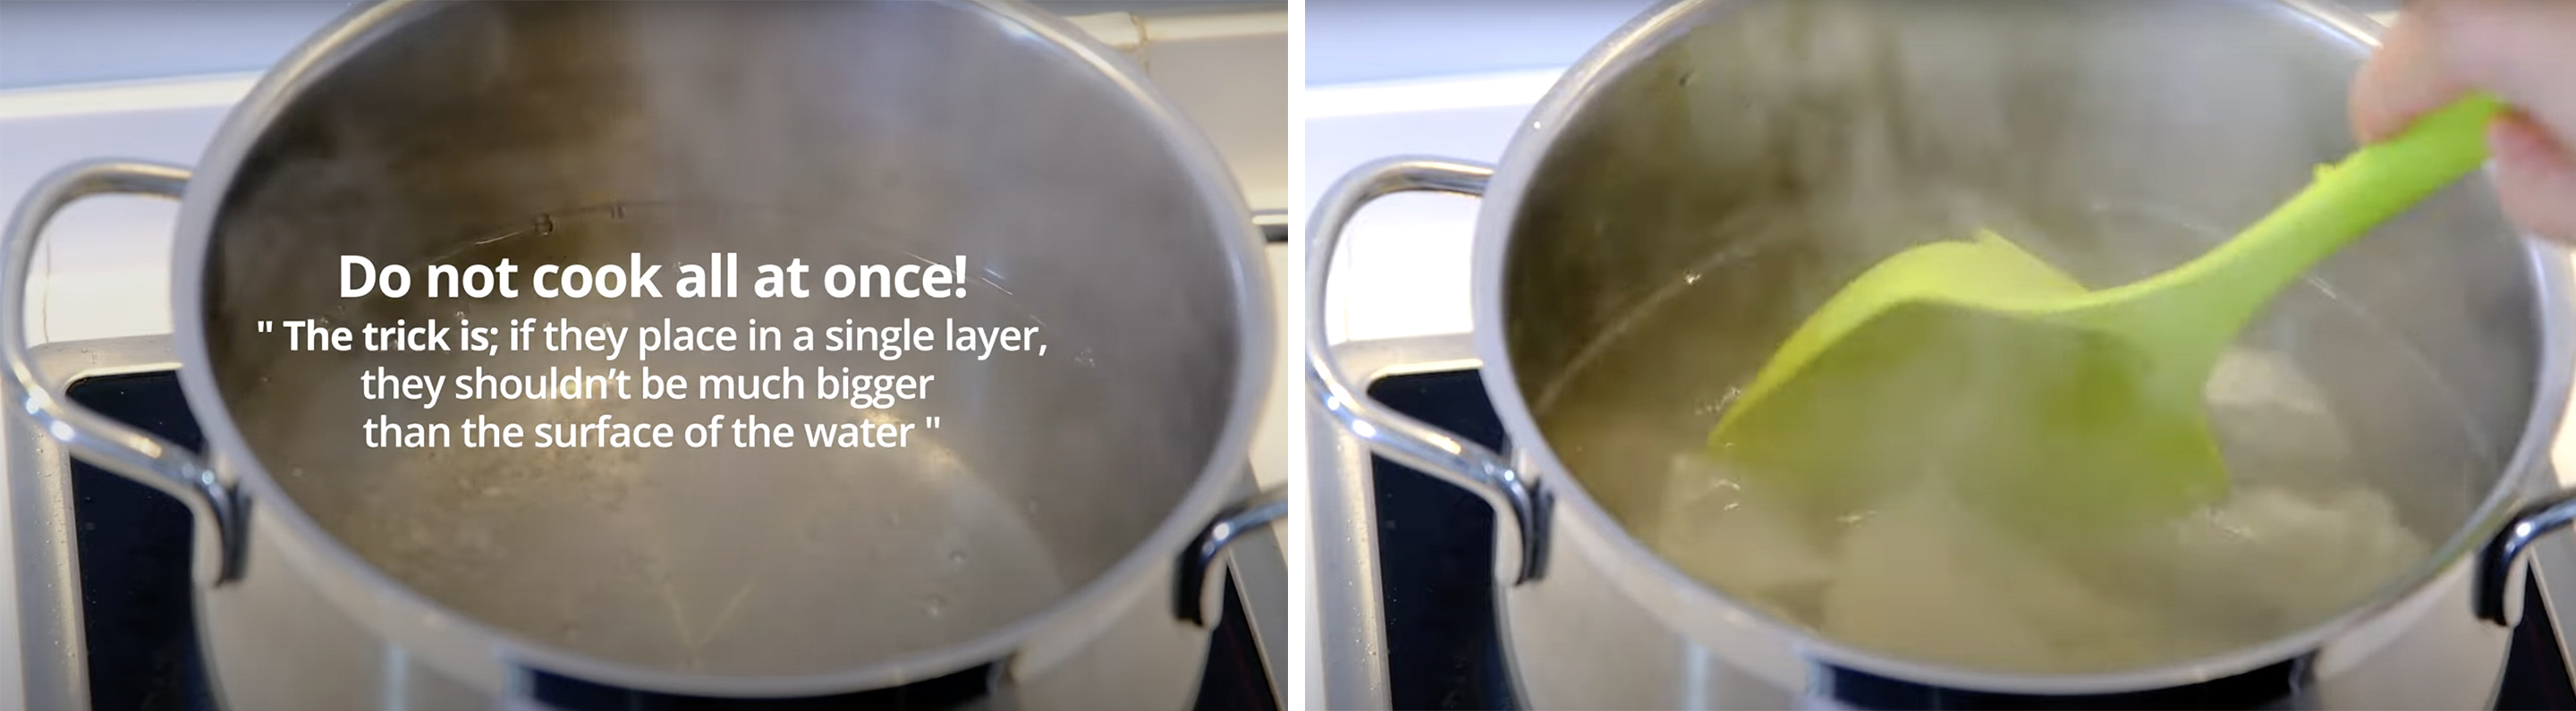
Over HIGH HEAT, bring a pot of water to a full boil and gently slide in the dumplings
Stir them gently, make sure there’s no dumplings stick at the bottom of the pan
Cover the lid
Once the water come back to a full boil, add 1 cup of Water, close the lid again and let it back to a full boil again.
Repeat the process of a boil and add water 2 more times
When they are fully cooked, the dumplings should be plump and floating on the surface
Drain it and you can serve it immediately
Although not very popular in restaurant, boiled dumpling is my favourite since childhood; as I love the soft yet slightly chewy texture and its non-greasy taste.
Don’t let them wait too long, boiled dumplings BEST SERVE when it still hot 🤩

Dipping Sauce

No dumpling is complete without a delicious dipping sauce ☺️
For my family, dipping sauce is very important for dumplings, especially if you like spicy; you might interest to try my “MOM’s Special Homemade Sauce”

To make it, simply mix all the ingredients
120 g Hot Garlic Chili Sauce, 30 g Water, 1 tbs Sugar, 1 tsp Sesame Oil, 1 tbs Light Soy Sauce, 1 tsp Chinese Black Vinegar and 1 tbs Garlic (minced)

Notes

  • To Freeze the Uncooked Dumplings
    If you’d like to freeze the uncooked dumplings, wrap the container tightly ,allow to freeze overnight (freeze them in a single layer, don’t stack).
    And then on the next day, transfer them to Ziploc bags and throw them back into the freezer for use later. Freeze up to 2 months for best flavour and texture (consume within 3 months).
  • To Store the Left-Over Cooked Dumplings and Reheating
    In the refrigerator, cooked dumplings will last about 3-5 days. Always put them in an airtight container to prevent the dumplings from drying out.
  • To reheat the left-over cooked dumplings
    Pan-Fried and Gyozain the preheated 180°C oven for about 10-15 minutes
    Boiled recook in the hot boiling water for about 5 minutes.

Watch How to Make “traditional chinese Dumpling 饺子 (Gyoza) from Scratch”

Korean Traditional Rainbow Rice Cake MUJIGAE-TTEOK 무지개떡

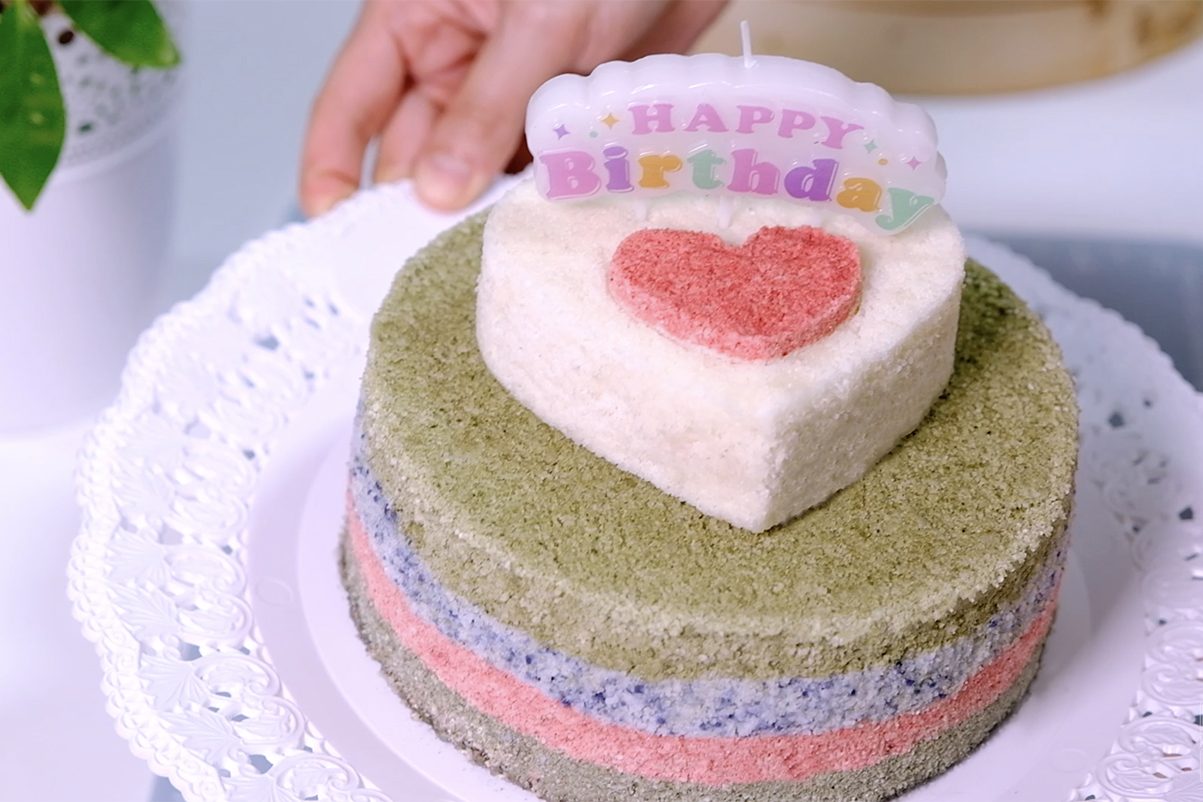
Mujigae-tteok (Korean: 무지개떡) or Rainbow Rice Cake is a layered tteok (rice cake) of different colours resembling a rainbow.
It is used for special occasions such as a banquet, party, or feast like doljanchi (baby’s first birthday), hwangapjanchi (60th birthday).

Alternative names for Mujigae-tteok include Saektteok (색떡) and Saekpyeon (색편), both of which means “coloured rice cakes”

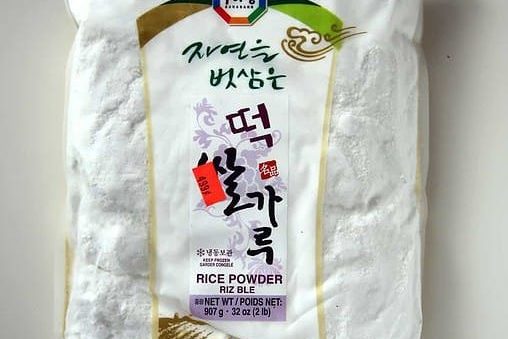
The main ingredient for making this cake is “wet milled Short Grain Rice Flour” Mepssalgaru (Korean: 멥쌀가루) which in many places is very difficult to find.

Wet milled Short Grain Rice Flour (Mepssalgaru)

In this recipe, I will show you how to mimic the texture of this rainbow cake by combining 3 kinds of basic flour (so you will be able to enjoy this beautiful rice cake wherever you are).

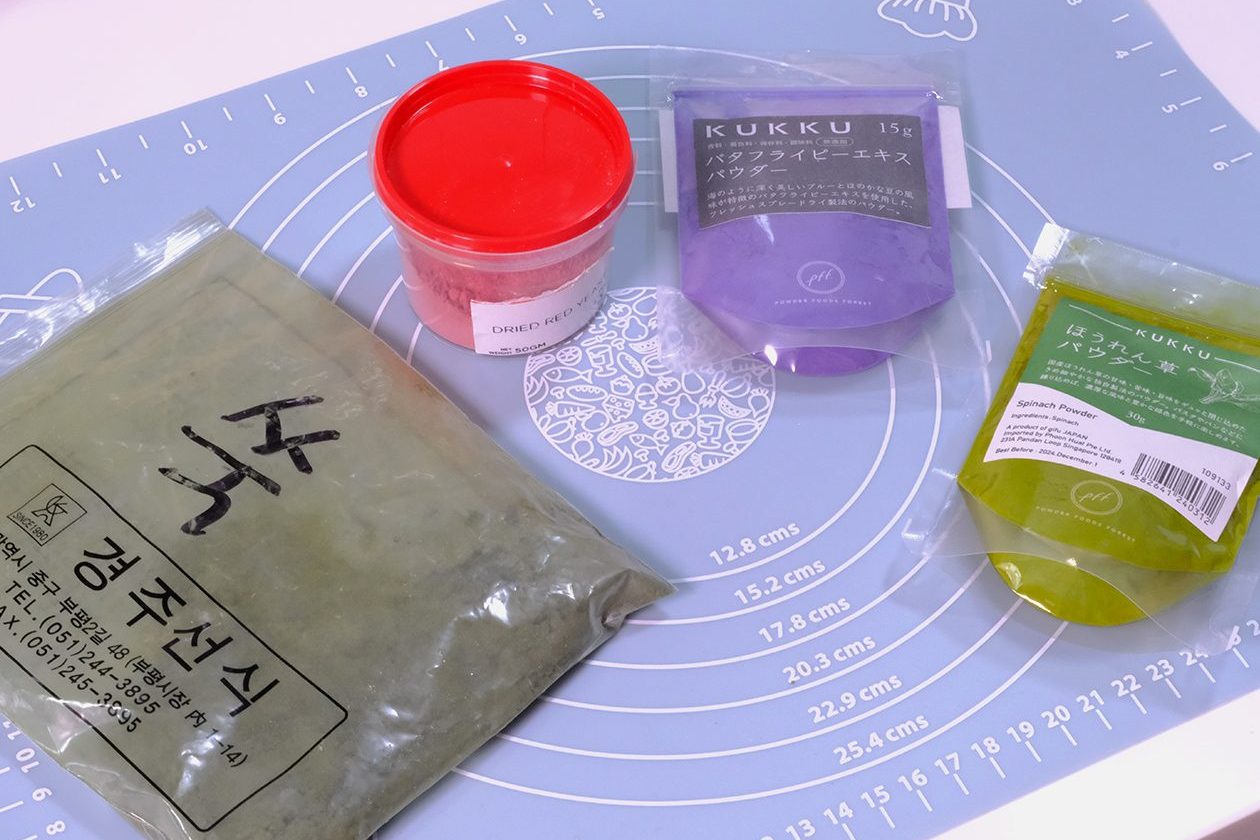
I use Mugwort Powder (dark green), Red Yeast Powder (pink), Butterfly Pea Powder (purple) and Spinach Powder (light green)

For the colouring, natural food colouring powder is commonly use for making this cake. The price is far more expensive compared to artificial food colouring powder but of course it is safer.

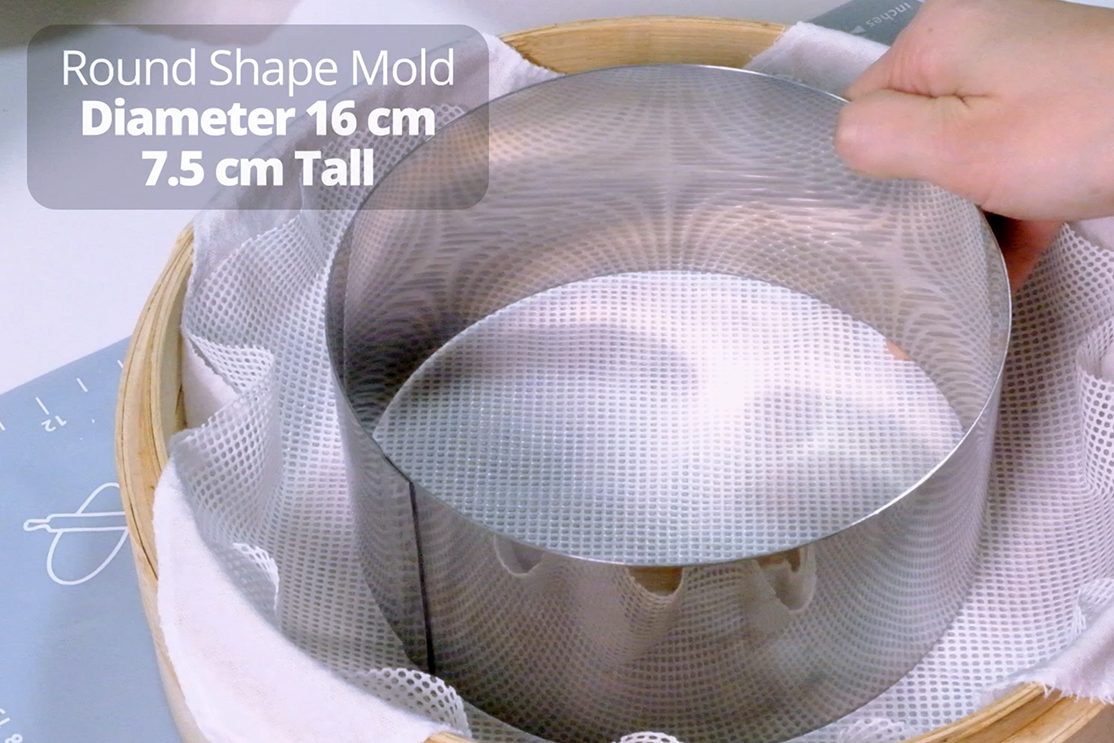
For steaming, it is important to line the steamer with a damp cotton cloth along with this reusable silicone sheet 😚
This sheet will prevent your rice cake from sticking to the bottom

I highly recommend to use bamboo steamer for best result, it absorbs condensation and prevent the cakes from getting soggy (if you are using metal or plastic steamer, make sure that you cover the lid with a piece of cloth so the water condensation doesn’t drip onto your cake).

Place the ring moulds on top (feel free to use any shape of mould according to your taste)
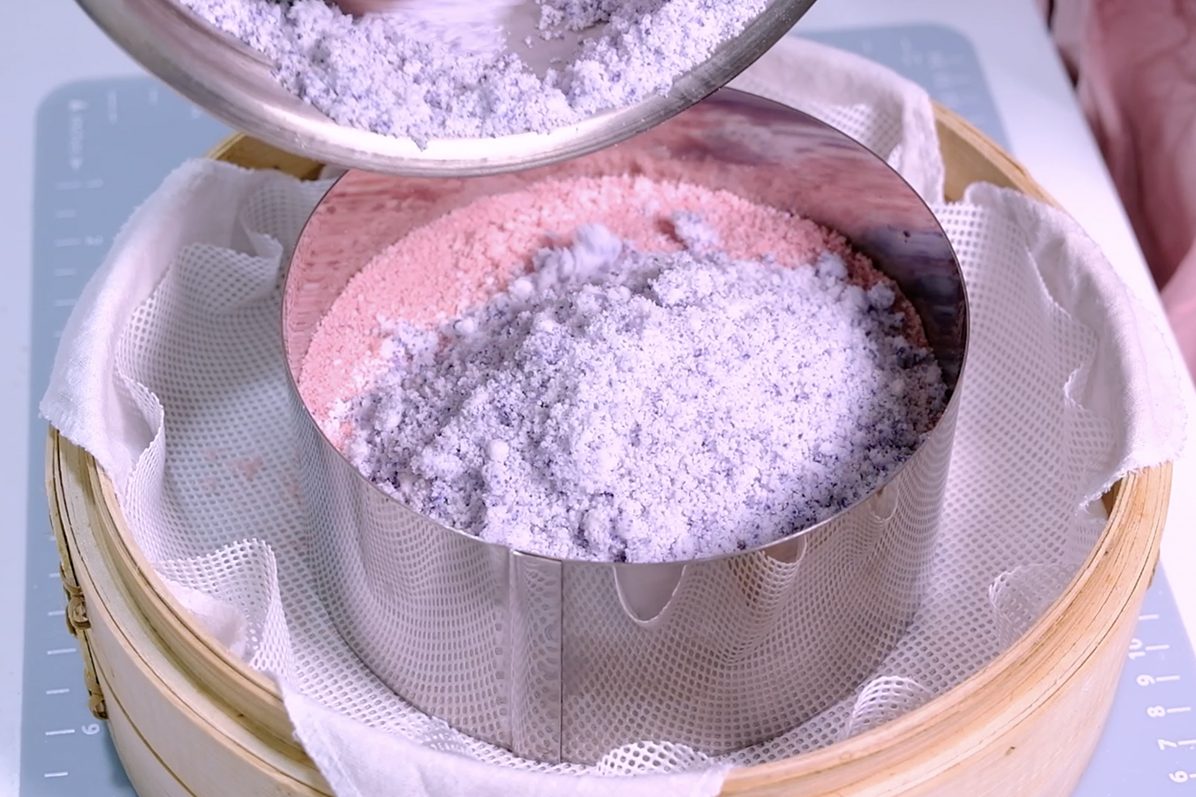
Coloured rice flour are then laid on a cloth-lined steamer, layer by layer

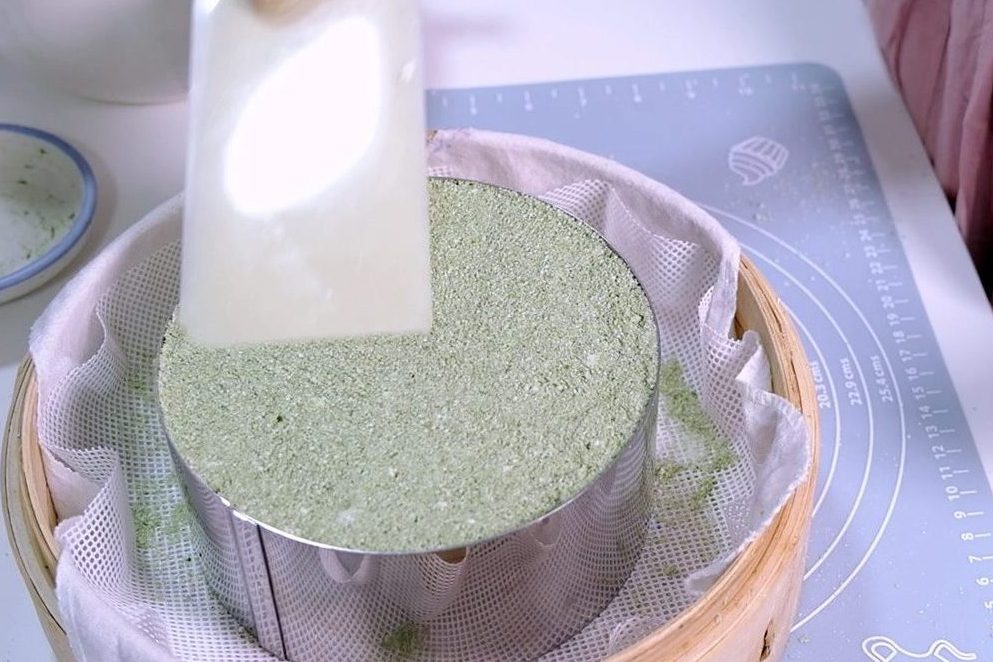
Using a scraper, spread each layer of the mixture evenly.
Please remember scrape the mixture lightly, DO NOT press or tamp the mixture (it will make the cake dense and not fluffy).

DO NOT PRESS the mixture 😉

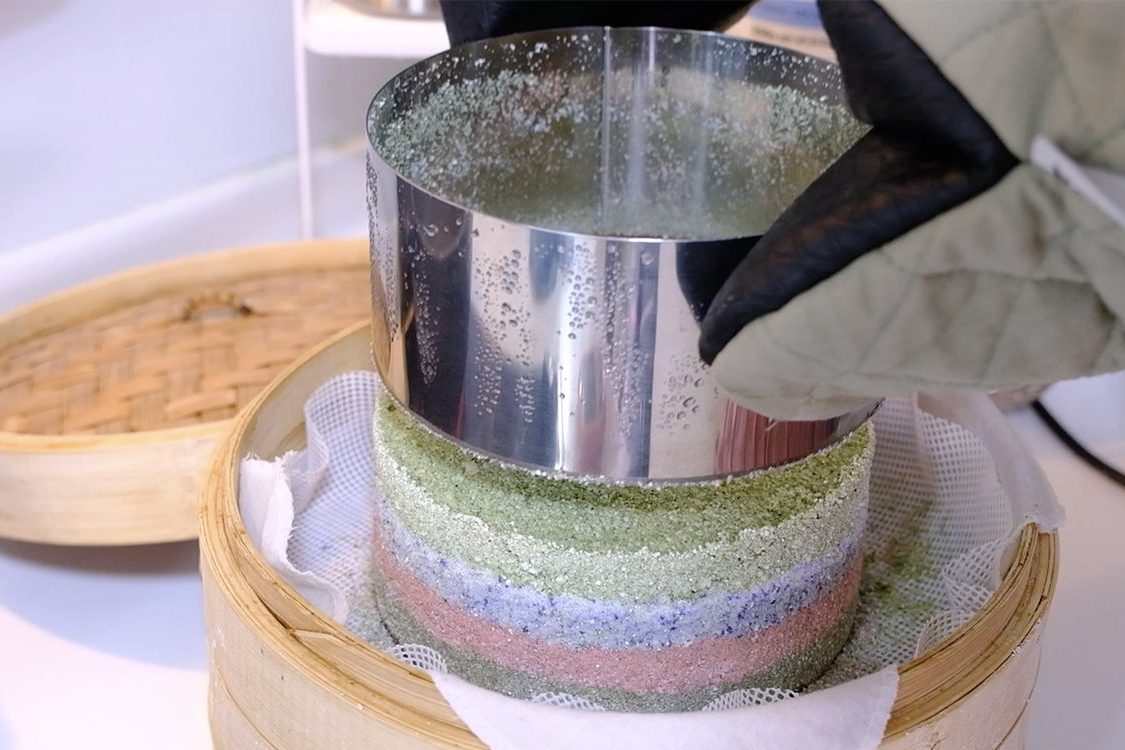
After 8 minutes of steaming time; don’t forget carefully remove the ring mould so that the sides can cook well.

Please pay attention, you may need to add some water halfway through the steaming process (don’t let your steamer burn) 😣

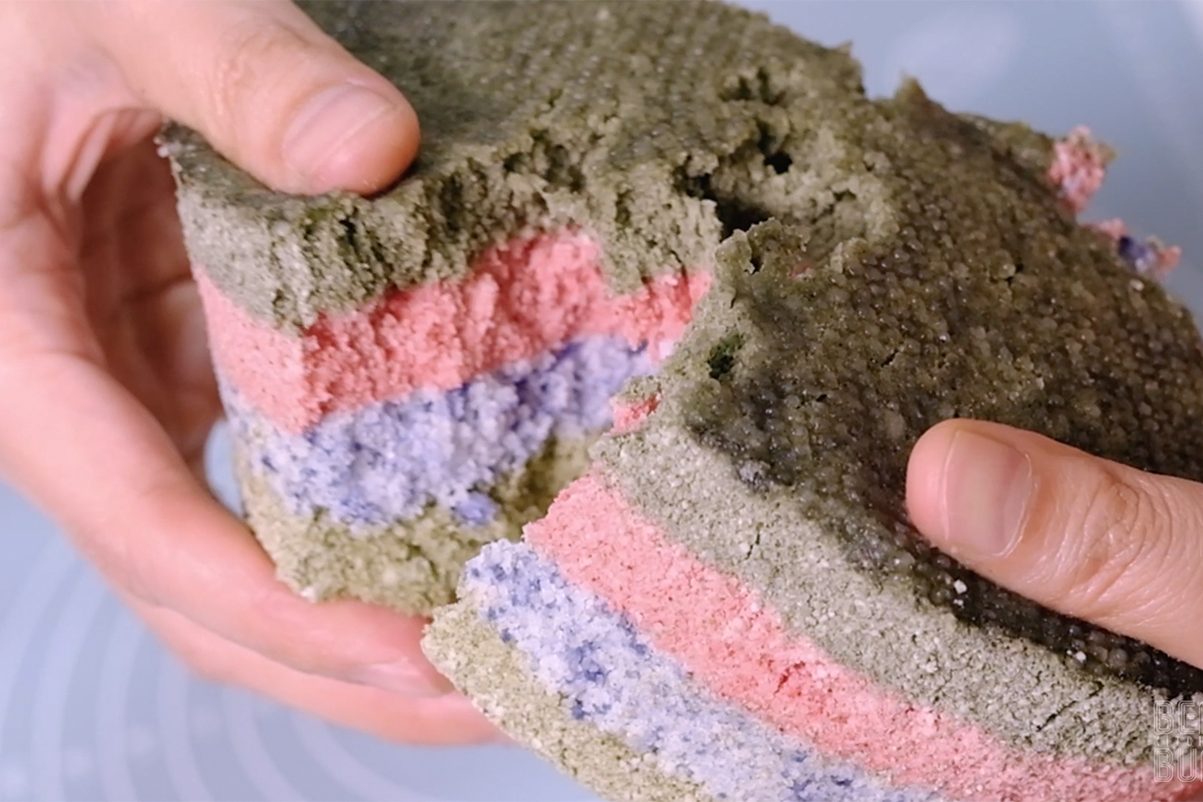
🤗 These delicate and subtly sweet rice cake not only beautiful and colourful, it is also tender with a light chewy consistency, it’s not very sweet.

The perfect birthday cake for those who don’t have a sweet tooth.

🤤 I’m already DROOLING

Look at the colour 🥰 How pretty it is!
You can create your own colours according to your preferences !!

The colours makes me happy 🤣

This cake is one of my favourite…. I really can finish it by myself 😳🤫 I hope you will give it a try and I’m sure you will like it! 😀

Watch How To Make “Korean Traditional Rainbow Rice Cake MUJIGAE-TTEOK 무지개떡”

recipe

RAINBOW RICE CAKE (MUJIGAE-TTEOK) 무지개떡
Yield: One 10 cm Heart Mould (3.5 cm tall) & One 16 cm Round Mould (7.5 cm tall)

INGREDIENTS
🌿 Basic Mixture  
2/3 tsp Salt  
275 g Water  
220 g Rice Flour
220 g Glutinous Rice Flour
110 g Potato Starch
195 g Caster Sugar
Natural Food Colouring Powder (Mugwort, Red Yeast, Butterfly Pea, Spinach)

🌿 Filling
10 g Brown/ Palm Sugar
1 tsp Cinnamon Powder

INSTRUCTIONS
Basic Mixture

  1. Prepare the steamer
    Line bamboo steamer with a damp cotton cloth along reusable silicone sheet.
    Place the ring moulds on top (feel free to use any shape of mould according to your taste).
    Notes: If you are using metal or plastic steamer; make sure that you cover the lid with a piece of cloth so the water condensation doesn’t drip onto your cake.
  2. Mix 2/3 tsp Salt with 275 g Water until the salt completely dissolved, set aside.
    * This step is important, otherwise you will taste grains of salt in your cake, which is NOT GOOD.
  3. Then, in a large bowl combine 220 g Rice Flour with 220 g Glutinous Rice Flour and 110 g Potato Starch, mix well.
  4. Add salted water that we made earlier to the flour mixture; mix roughly (you will see now that the dough has a lot of lumps).
  5. Using your hands, press out any wet lumps by rubbing it gently between your palms for uniform mixing (by doing this, the moisture will be distributed evenly).
  6. Then using the coarse mesh strainer sift the mixture (I don’t recommend using fine mesh because it will complicate the sifting process).
  7. Every flours have different water needs, weather is another factor.
    After sifting this mixture once, you can test whether the water content in the dough is sufficient.
    Take a handful of dough and squeeze it; If it doesn’t break right away when you throw it, that’s means it’s good to go.
    * On the other hand if it breaks, that’s means you need to add more water (add 1 teaspoon at a time until the dough clumps up well).
    And then, you can sift the mixture again at least 2 times.
  8. Once it’s done, pour in 195 g Caster Sugar, mix it really well and this basic white mixture is ready.
  9. For the heart shape mould 10 cm (3.5 cm tall)
    Fill half of the mould with the basic white mixture.
    Using spatula, spread the mixture evenly
    Scrape the mixture lightly (DO NOT PRESS or TAMP the mixture, it will make the cake dense and not fluffy).
    Add some Cinnamon Brown Sugar filling in the center (10 g Brown/ Palm Sugar, 1 tsp Cinnamon Powder), then fill the rest with the mixture up to the top of the mould; Using a scraper level it.
    Place a small heart mould on top for the decorations; fill with a little bit of pink mixture and spread evenly.
  10. For the big round mould 16 cm Round Mould (7.5 cm tall)
    Divide the remaining basic mixture into 4 equal portions.
    For the first layer; add Mugwort Powder to the first batch, mix it really well
    Put this dark green mixture into the ring mould and spread it evenly (remember do not press the mixture, scrape it lightly).
    * Continue with another layers; and in the meantime you can start preheat the water for steamer (it is better to fill the water a little over half; if you fill it up too much, the bottom of the rice cake will become stiff).
  11. After all the colours is done; slide each ring (heart and round) up and down, left and right to give clearance so that the mould can be easily removed later.
    For more details please follow video instructions
  12. When the water boils, place the steamer
    STEAMING METHOD & TIME
    (Please pay attention, you may need to add some water halfway through the steaming process; Don’t let your steamer burn)
    – First: Over HIGH HEAT for 8-10 Minutes; then carefully remove the ring moulds.
    – Second: After remove the ring moulds, back to the pot and continue steaming over HIGH HEAT for 25 Minutes.
    – Third: After 25 Minutes, turn OFF the heat and let it sit in the hot pot for another 5 Minutes.
  13. After 5 minutes the rice cake is ready, carefully lift and flip the cake onto the plate. Place the pretty love shape rice cake on top and serve.
    * You can wrap this cake in a plastic packaging or an airtight cake box so it doesn’t dry out


NOTES

  1. It taste best on the day they are made (they cannot be kept for long).
  2. Freeze any leftover rice cake
    If you are unable to finish the cake, you can cut it into slices (wrap them individually with an airtight plastic wrap) and store the rice cakes in the freezer for 1-2 days.
  3. To reheat
    By placing them in a steamer (over HIGH HEAT) for 5-10 minutes.
    * I don’t recommend to use microwave to reheat it because the texture of the cake will tend to become dry.

Lion Dance Steamed Buns 舞獅包子

Lion Dance (traditional Chinese: 舞獅; simplified Chinese: 舞狮; pinyin: wǔshī) is a form of traditional dance in Chinese culture and other Asian countries in which performers mimic a lion‘s movements in a lion costume to bring good luck and fortune.
These buns usually served during Chinese New Year as a symbol of good luck and prosperity.

When making this kind of steamed buns; the temperature of your surroundings and the amount of yeast used is important

When the weather is cold, the dough will not ferment so quickly, so it is more suitable for making styled buns.

Pretty Lion Dance before steaming 🙃

In summer, even if you use less yeast, the dough will still ferment quickly (especially when it’s HOT, they really hard to be made).
So, using air conditioner in warm place is necessary and also keep the dough always be covered during the process so that it doesn’t dry out.

For the filling, I suggest to use store-bought roasted black sesame for best result.

Bored with ordinary bun fillings? 🥴
I will show you a few tips to make this flavourful Black Sesame Filling! 😉

Japanese brand Roasted Sesame is my favourite; the moment you open the package, you will be able to sense their exquisite aroma, as well as the slightly sweet and elegant taste.

CAN I USE OTHER FILLING?
Feel free to use other fillings according to your taste as long as the filling firm enough to hold their shape, that should be fine.

The buns is really soft and fluffy; You can see how spongy it is !
The thick sesame paste inside has a significant aroma and a toasty sesame flavour; Really tasty!

Contrast with the colour of the buns! So Mesmerize! 🥰

These vibrant Lion Dance Steamed Buns are truly a work of art, it is a symbol of good fortune and strength (this will be a really special gift for someone),
Wishing You Wealth and Prosperity; May the dragon bring you success and energy in the upcoming year.
HAPPY CHINESE NEW YEAR 2024 Everyone! 😇🥳

WATCH HOW TO MAKE “LION DANCE STEAMED BUNS”

RECIPE


Lion Dance Steamed Buns
Yield: 2 Buns
Total Time: 4 Hours

INGREDIENTS
🌿 Black Sesame Paste
50 g Mung Beans + 500 g Water
40 g Caster Sugar
5 g Wheat/ Potato Starch
1/8 tsp Salt
20 g Vegetable Oil
25 g Roasted Black Sesame Seeds (Crushed into powder)

🌿 Dough for Details
150 g All-Purpose Flour
1/6 tsp Instant Yeast
4 g Caster Sugar
70 g Cold Water
6 g Shortening
Food Gel Colouring (Black, Green, Blue, Yellow, Red)

🌿 Buns Dough
110 g All-Purpose Flour
1/8 tsp Instant Yeast
3 g Caster Sugar
50 g Cold Water
4 g Shortening
Red Food Colouring

INSTRUCTIONS
Black Sesame Paste

  1. Crush 25 g Sesame Seeds into a fine powder, set aside.
  2. Rinse 50 g Mung Beans until the water runs clear and transfer it to a medium pan; add in 500 g Water.
    Cook over medium high heat until the beans are tender and then blend it until smooth.
  3. Pour the blended cooked Mung Beans along with 40 g Caster Sugar, 5 g Wheat Starch, ⅛ tsp Salt, 20 g Vegetable Oil, crushed Black Sesame into a non-stick pan.
    Mix well until there are no lumps.
  4. Cook over medium high heat and keep stirring (please note, never leave it out when cooking this mixture.
    This process will takes for about 10-15 minutes. The water will slowly evaporate and the mixture start to thickened.
  5. Once the mixture formed a thick paste, turn down the heat to medium low; and continue cook until the paste comes together and no longer stick to the pan.
  6. Once it’s done, pour it into a plate; cover it with a cling wrap to prevent from drying out and then store it in the fridge for at least 1 hour to firm up.
  7. After 1 hour the fillings becomes denser.
    Take 2 portions of the paste, 60 grams each and roll it into a ball.
    * You can use the remaining filling to fill mochi or maybe spread it on your favourite bread.


Dough for Details

  1. In a medium bowl, simply combine 150 g All-Purpose Flour, ⅙ tsp Instant Yeast and 4 g Caster Sugar.
  2. Pour in 70 g Cold Water and 6 g Shortening and stir until just combined.
  3. Then using your hand gather all the dough until it form a cohesive ball.
  4. Transfer the dough on a work surface and start kneading the dough.
    Knead for about 4-5 minutes until it become really smooth.
  5. After kneading for about 5 minutes, you can see that the dough become really smooth.
    Divide and colouring the dough as needed (30 g Red, 90 g White, 55 g Yellow, 20 g Blue, 15 g Green and 15 g Black).
    * If you like to use natural food colouring powder, you may need to dilute it with a little bit of water so it blends easily into the dough.
  6. Cover each dough with a plastic wrap (to prevent from drying out) while waiting for the buns dough.

Buns Dough

  1. In a medium bowl, simply combine 110 g All-Purpose Flour, 1/8 tsp Instant Yeast and 3 g Caster Sugar.
  2. Pour in 50 g Cold Water along with 4 g Shortening and a few drops of Red Food Colouring; stir until just combined.
  3. Then using your hand gather all the dough until it form a cohesive ball.
  4. Transfer the dough on a work surface and start kneading the dough.
    Knead for about 4-5 minutes until it become really smooth.
  5. After kneading for about 5 minutes, you can see that the dough become really smooth.
    Divide Buns Dough into 2 equal portions (about 80 grams each); cover the dough with a plastic wrap so it doesn’t dry out.

To Shape the Lion Dance Head and Details

  1. Take 1 portion of the Buns Dough, roll it into a ball; Flatten it.
  2. Using rolling pin, roll the dough into 10 cm diameter thick disk
    Place the filling in the centre of the dough
  3. Then using your right hand, slowly squeeze and push the wrapper up while left thumb press the filling down.
    Pinch to seal; make sure that you seal it properly to prevent the filling from leaking.
    * DON’T FORGET ALWAYS COVER EACH DOUGH WITH A PLASTIC WRAP ALONG THE PROCESS TO PREVENT FROM DRYING OUT
    Continue with the rest Buns Dough…
  4. For the details, kindly follow video instructions
  5. Once it’s done put them in the steamer (make sure that you give some space in between the buns so they won’t stick one another after fermentation or steaming).
  6. Cover and allow to rise until doubled in size for about 20-45 minutes.
    * Proofing time will depends on room temperature, it may take longer or may not take that long.
  7. In the meantime preheat your steamer.
  8. After fermentation the proofed buns should feel lighter and doubled in size; and if you gently press it with your finger, the dough will make indentation and be able to slowly bounce back into shape.
  9. Steam over high heat for 18 minutes.
    * If you are using metal or plastic steamer; make sure that you cover the lid with a piece of cloth so the condensation during steaming won’t ruin the look of your buns.
  10. After 18 minutes, take the steamer off from the heat; Do not open the lid and let it sit for another 3 minutes (this way; the buns will not sink or wrinkle due to the sudden change in temperature).
  11. You can serve it immediately or transfer them to a cooling rack to cool completely before storing.

NOTES

  1. The Black Sesame Paste filling is best consumed as soon as possible.
    If you are not using it right away, you can keep it in an airtight container in the refrigerator for up to 5 days or in the freezer for up to a month.
  2. If you make this filling in large quantities;
    Before freezing, I suggest to divide the paste into small portions so that you can be flexible on how much to use each time.
    When you are ready to use, you can defrost in the fridge overnight.
  3. The buns can be stored in the fridge (in an airtight container) for 5 days or frozen for a month.
  4. I highly recommend to reheat the buns in the steamer
    To reheat: Place the frozen buns on a plate; put the plate on top of the trivet in the steamer and let them steam over high heat for 10 minutes or until heated through.
  5. If you want to reheat it in the Microwave
    Place the frozen buns on a plate; wet some paper towel (wring out the excess water) and place the paper towel on top of the steamed buns (to prevent the buns from drying out).
    Microwave on high for 30 seconds (add the time as needed until heated through).

Homemade Healthy Caramel Popcorn (No Bake) Free of Corn Syrup and Baking Soda

Hi Everyone, today we are making these “Homemade Healthy Caramel Popcorn” .
This Easy Homemade Caramel Popcorn is super delicious, it’s buttery, crunchy, sweet, caramely and salty all at once.

I love everything about this recipe, especially that it only requires a few inexpensive ingredients that I usually have on hand and it could not be easier to make ☺️

It’s pretty foolproof, and you DON’T need Baking Soda, Corn Syrup or a Candy Thermometer like a lot of Caramel Popcorn recipes call for.
In my opinion, this is a healthier way to make Caramel Popcorn.

😉 Unpopped popcorn kernels are super easy to find. You can generally find them at the supermarket.

I love to buy an expensive container of white kernels from Bob’s Red Mill.
That’s because Bob’s Red Mill Whole White Popcorn Kernels are contain the perfect moisture content for optimum popping.

When these premium kernels pop, they burst their hulls and transform into wonderfully fluffy blossoms of corn with a delightful crunch. https://www.bobsredmill.com/white-popcorn.html

🤩 are you ready for movie night??

I don’t know about you, but Caramel Popcorn and I are BFF’s.
It’s a super easy snack for movie night, or perfect to package up and give as gifts around the holidays!

WATCH HOW TO MAKE NO BAKE CARAMEL POPCORN


NO BAKE CARAMEL POPCORN
Yield: 8 Cups
Active time: 15 minutes
Total time: 1/2 hours

INGREDIENTS
🍿 Popcorn
100 grams Popcorn Kernels
2 tablespoons Vegetable Oil

🍿 Caramel
120 grams Granulated Sugar
30 grams Unsalted butter
1/4 teaspoon Salt


INSTRUCTIONS
🍿 Popcorn
Pour the Popcorn Kernels into 13-inch wok or bigger, then add in the Vegetable Oil, pop the lid on.
When popping starts, lower the heat to MEDIUM.
When popping slows down, turn OFF heat.
Wait till popping stops completely (which is when you think it’s stopped, plus 30 seconds) before removing cover.
Transfer corn to a bowl.

🍿 Caramel

  1. Pour Sugar into a wok. Over MEDIUM heat, cook till sugar starts to melt.
    Swirl wok to heat evenly till melted Sugar is reach just lovely rich amber colour (never stir the caramel otherwise it crystallizes)
    **Be carefull DO NOT over cooked or you might burnt the sugar
  2. Reduce heat to LOW, add Butter; stir till thoroughly mixed.
    Add Salt, mix well
  3. Tip Popcorn into wok.
    Caramel may now thicken because popcorn is cold or at most warm.
    Working fast, toss till corn is evenly coated. Turn OFF heat.
  4. Transfer Popcorn to a bowl, break into small pieces.
    Taste and sprinkle with more Salt if necessary.
    Serve immediately or keep in airtight container.

NOTES
With homemade Popcorn, you can adjust the sweetness to your preference.
I don’t have a sweet tooth, so for me this is just a perfect amount of Caramel.
Don’t reduce the amount of Sugar because the popcorn won’t be crunchy if there’s too little Caramel.
If you do have a sweet tooth, you can double the Caramel recipe.

Homemade Doraemon Marshmallow

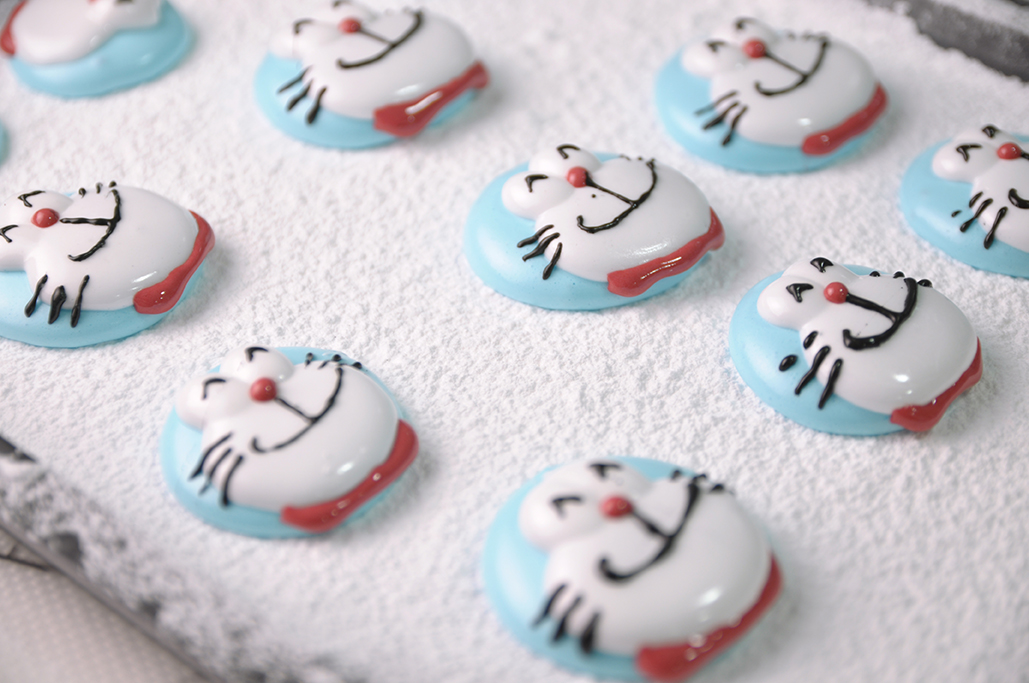
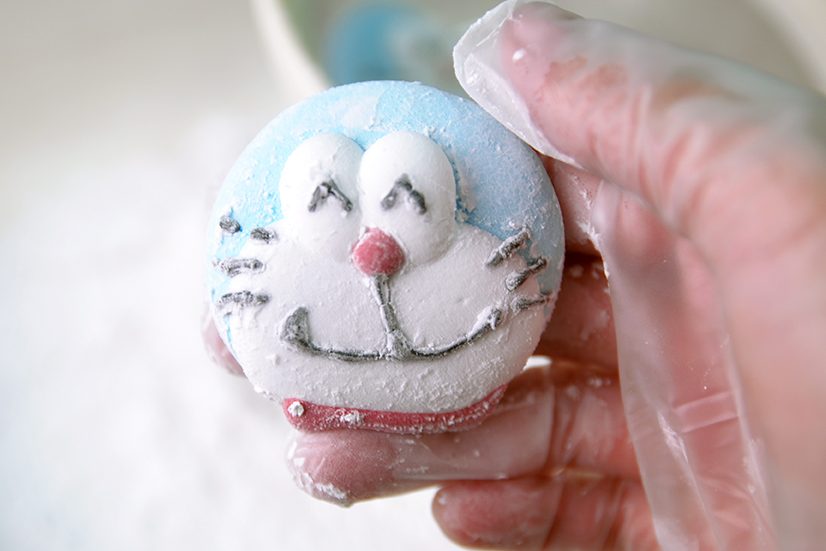
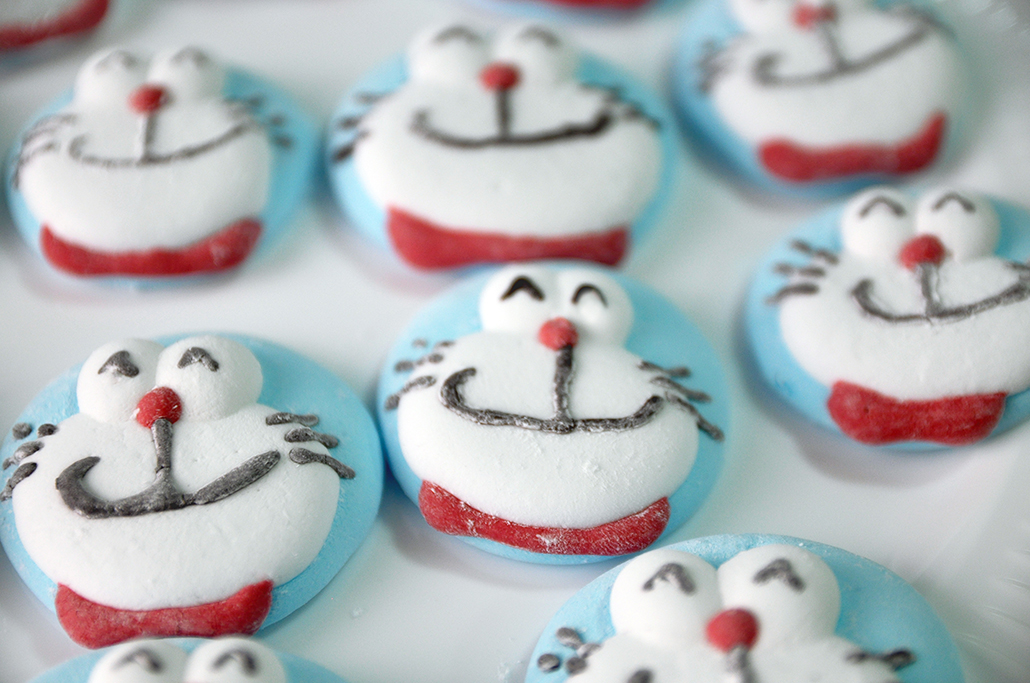
Hi guys, today we are making these adorable “Homemade Doraemon Marshmallows”.

Sweet, soft, springy, fluffy pillows of deliciousness.
So why bother making Marshmallows at home?
Well, as cliche as this sounds, they really are SO EASY and SO MUCH better than any store-bought Marshmallows.

Store-bought Marshmallows just don’t have that pure, irresistible, Marshmallow flavor or the melt-in-your-mouth fluffiness 😉

Gelatin is very important in making Marshmallows, because it is the setting agent for Marshmallows.
Whisked Egg Whites are sometimes added to Marshmallows.

The whisked egg whites make the Marshmallows extra light and fluffy and a little more manageable, especially if you want to pipe shapes with the Marshmallow

I personally don’t like to add Egg Whites,
I prefer the taste and mouthfeel of Vanilla Marshmallows made without Egg Whites 

Another reason is that Marshmallows made with Egg Whites will not keep for as long.
Since you’ve got Egg Whites in there which can go bad fairly quickly.

Where as regular Vanilla Marshmallows made without Egg Whites will keep for a VERY long time (unless you eat it all right away, of course), and it’s safer for kids and pregnant women too.

Hello… how are you? 🙄 So cute!!

Once you know the ins and outs of making Marshmallows, you can do all sorts of things with it. You can add coloring and flavorings and plenty more.

😘 Happy face☺️

These homemade Marshmallows are the real deal!
I promise you these Marshmallows will be the softest, fluffiest, springiest little pillows of deliciousness you’ve ever had! 
Enjoy Guys!! 🙂

WATCH HOW TO MAKE DORAEMON MARSHMALLOW


HOMEMADE DORAEMON MARSHMALLOWS
Yield: 16 pieces
Active time: 1 hours
Total time: 1 1/2 hours

🍭 INGREDIENTS
10 grams Gelatine powder
80 grams water
220 grams Granulated sugar
60 grams Water
1/2 teaspoon favorite extract
Food colouring (red, blue, black)
Cornstarch

🍭 INSTRUCTIONS

  1. Prepare flat pan, lined with a Greaseproof Baking Paper on top, and then dust generously with a Cornstarch.
  2. To bloom the Gelatine
    Pour the Gelatin into a mixing bowl, add 80 grams Water and mix, then let it stand for a while.
  3. To make the hot Sugar Syrup;
    In a medium sauce pot add the Granulated Sugar and 60 grams Water.
    Pop in a candy thermometer (you don’t have to have this, but it does take the guessout work out of making the Marshmallows).
    Turn up the heat to high, bring it to a rolling boil.
    Note: If you are using candy thermometer, you want to reach 240 degress fahrenheit or the softball stage, but if you don’t have one, just bring it to a rolling boil and let it boil for 1 minute.
  4. Slowly and carefully pour in the hot Sugar Syrup over the soft bloomed Gelatine (be carefull this stuff is super hot and it will definitely burn you if you get it on your skin).
  5. Once you have add in all your Sugar Syrup to the Gelatine, whip the mixture on MEDIUM speed with an electric mixer (don’t whip them to fast, you don’t want too much air bubbles inside).
  6. Add your favorite extract, then whip this for about 8 to 10 minutes. It’s going to get super thick, and fluffy beautiful white Marshmallow like.
  7. Separate the batter into 4 bowls (red, blue, black and white).
    Add the food colouring for each colour (working quickly so the Marshmallow mixture doesn’t set up).
  8. Pour the coloured Marshmallows into the piping bags.
  9. Using a large round tip; squeeze the blue colour Marshmallow to create Doraemon head.
    Then add his round face with white colour Marshmallow.
    Note: Make sure that you give each part a bit time to set before you add other details.
  10. Then using small round tip; add his big round eyes with white colour Marshmallow.
    His red nose reindeer and necklace with red colour Marshmallow.
    His eye balls, big mouth and mustache with black colour Marshmallow.
  11. Once you have already done with all the details, dust the top with more Cornstarch.
    Then Let it stand for about 5-10 minutes.
  12. Carefully scoop out the Marshmallow and place them into the strainer, gently shake to get rid of the starch powder.
  13. Once it’s done, store Marshmallow in an airtight container or plastic bag.


NOTES

  1. Piping Marshmallow can be tricky, when the Marshmallow is too firm it will hard to squeeze, and if it too soft it will more deflate.
    So you need to find the right temperature.
  2. Actually you can reheat the Marshmallow batter when it gets hard, reheat it in the microwave or in a double boiler for a few seconds.
    Please note, even if you can reheat it, you only can do it in short amount of time, because when the marshmallow have already set up, the consistency will be more sticky then before, so it will hard to pipe.
    So the best way is to working fast, pipe it as soon as possible.
  3. Store homemade Marshmallows in an airtight container on the counter for up to a month.
    I recommend layering them with Parchment Paper, just in case they stick together.
    These will last for 3-4 weeks at room temperature.